User Data Fields allow Account Administrators to include additional information about users on their SurveyGizmo account.
By default, all users in SurveyGizmo have a Username and User Email Address, are associated with a Team, and are given a Role on that team. If these standard user fields do not provide you with enough flexibility, additional User Data Fields can be created.
As an added bonus, newly created User Data Fields can then be used to populate answer option lists within the User Data Question Type.
Add User Data Fields
- To add User Data fields for users in your account go to Account > User Management > Users and click Edit User Data Fields on the bottom-left corner of your user list.
Note: Up to 20 User Data Fields can be created per SurveyGizmo account.
- Then click Add a New User Data Field.

- Enter a Name and Description (this will be the placeholder text in the field) for your user data fields and click Save User Data.


Now that you have added User Data Fields, you will need to populate these fields with data for each specific user on your account. There are a couple of methods for populating your users' User Data Fields. You can do this manually on a per-user basis, or in bulk by importing a spreadsheet.
Manually Add Values to the User Data Fields
After you save your user data fields, you can then edit each user and populate this field with the corresponding value for that user. If you plan to create survey questions based on these fields, make sure that the values entered here are keyed-in in a format you prefer.
- To manually add a value to a user's User Data Field, edit the user by clicking on the Username.

- Scroll to the User Fields section on your user's Profile tab. This section will contain fields for Username, Email Address, as well as any User Data Fields that you have previously created.
- Key in the value associated with this user into the User Data Fields. If you have not created any User Data Fields, or if you need to add additional fields, click the Edit User Data link to do so.
Important: User Data Field values should be formatted as lower-case with no spaces!
- Make sure to Save User in the bottom-right once you have made all of the necessary changes.


Import Values for the User Data Fields
You can also import information into your User Data Fields to update all users on your account in bulk. This is a great option for organizations with a large amount of users.
The easiest way to import User Data values for each user is to first export the list of your users, populate it with the User Data values, and import it to update your existing users.
- To import User Data values for your existing users start by clicking Export User List at the bottom of your user list. This will download a spreadsheet (CSV format) of all of your users with a number of columns, including your User Data Fields.

- Since, in this case, you are only updating the User Data Fields, you can delete all columns but UserID and your UserData Fields. Populate a value for each user you wish to have a value and save your file.
Important: User Data Field values should be formatted as lower-case with no spaces!
The UserID column is required when using the Import Users feature to update user information. - In the below example, we are updating each of our users with information for the Course and Department User Data Fields that we created above.

- Now, you are ready to import your list in order to update your users. To do so click the Invite Users dropdown and select Import Users.

- Click Choose a file, select the file you wish to upload, and indicate whether your file includes a header row. Click Continue.
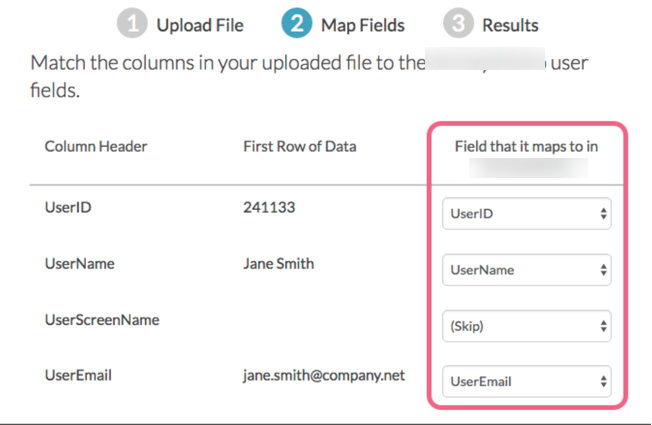
- Map the fields in your file to the corresponding fields in SurveyGizmo and click Continue (SurveyGizmo may suggest matches but make sure you double-check these prior to uploading).
- On the next screen, you can elect to have a confirmation email sent to you when the upload is finished. This email will contain an error log that will alert you to any problems with your file/upload.
- Click Continue to finish the upload process.


It is important to note that uploads are added to a queue so it may take a little bit of time for your users to update.
Below we cover how to customize the user grid to display these User Data Fields; this way you can confirm that your users have been updated.
Populate User Data Fields from SSO Attributes
If you are using SSO to authenticate/create users you can populate your User Data Fields with data you have in SSO attributes. Data from attributes will populate User Data Fields by default as long as the following requirements are met:
- User Data Fields must already be set up. Learn more about setting up User Data Fields.
- Your SSO Attributes and User Data Field names must match exactly (case sensitive).
Add UserData Fields to Your User Grid
Once you've added User Fields and entered values for each user you can set up the Users & Licenses area of User Management to display these fields. To do so, under Account > User Management > Users at the top of the table of users click the Columns link. Check all the fields you wish to display and click Save.

Now your User Data Fields are available to review. If you wish to sort by one of these columns, click the Sort By link and select the field you wish to sort the table by.

Use User Data Fields in Surveys
The great thing about having User Data Fields configured is that you can use the information within your surveys. For example, if you are running a course evaluation you have all of the possible courses already set up. You can easily add a question to your survey with the correct possible options by adding a User Data question.
1. Go to the Build tab of your survey and add a question. Select User Data from the Advanced section of the Question Type dropdown menu.

2. Under Answer Options start by selecting the User Data Field you wish to use as answer options. Our other User Data fields will be available, as will the Email field. In our example, we want to display all the courses that our users teach so we'll select Course.
Note: Multiple User Data questions based on the same User Data Field should not be included in the same survey.

3. Next, there are two options that you may wish to enable. You can enable one or both or none of the 'Restrict' options.

- Restrict users to only view responses that are related to their User Data - This option will automatically filter Individual Responses, Reports, and Exports accessed by the user to only show data related to the course they teach.
Example Scenario:
- You created a Course User Data Field.
- For user Jon Smith on your SurveyGizmo account, you provided a value of Math as their Course (since Jon Smith is the Math Instructor).
- In your Course Evaluation survey, you created a User Data Question and selected the Course User Data Field as the source of the question's answer options.
- Jon Smith logs into SurveyGizmo and creates a Standard Report to view the results of the above Course Evaluation survey.
- When Restrict users to only view responses that are related to their User Data is not selected, Jon Smith can see the results of the evaluation for all courses.
- When Restrict users to only view responses that are related to their User Data is selected, Jon Smith only sees the results for the Math course (Math is the value associated with the Course User Data Field for Jon)
- Restrict which values display in the list of answer options - This option will provide you with the ability to show a subset of your list of answer options for certain user data values using a condition.
Example Scenario:
- You created two User Data Fields: Course and Department
- You created a Course Evaluation survey but you are only sending it to the Sales Department.
- In your Course Evaluation survey, you created a User Data Question and selected the Course User Data Field as the source of the question's answer options.
- Your Course User Data Field is a comprehensive list of courses across all departments and you need to only show the courses that are taught by the Sales Department.
- Select to Restrict which values display in the list of answer options and create the following condition:

- Now, when respondents see the Course question, only courses for the Sales Department will be populated.
4. Last, under Format you can choose how you wish to have your answer options displayed to your respondents.

- Dropdown Menu (default)
- Radio Button List
- Hidden Value - (not visible to survey respondents) This option should be used with prepopulation via URL Variables. Learn more in the Prepopulation section of this tutorial.
Note: You may notice that the available Format options are all single-select questions/inputs. This is by design and allows for the discrete reporting on a per user basis. Multiple User Data questions based on the same User Data Field should not be included in the same survey.
5. Click Save Question when you are finished setting up your User Data Question.
When you are finished setting up your User Data question, you can test it out in your survey. You'll see that the answer list populates with all possible values (or a subset of possible values if you are using the option to Restrict which values display in the list of answer options).

Prepopulate Your User Data Question
In the above example we covered how to set up a question to display to your survey respondents using either a Dropdown Menu or Radio Button List layout. This allows respondents to select values from one of your User Data Fields.
If instead you wish to prepopulate a question you can do so by using URL Variables. When prepopulating you can use any of the available Formats, Radio Button List, Dropdown Menu, or Hidden Value. If you choose to use either Radio Button List or Dropdown Menu Format this will prepopulate the question but still display it to the respondent. If you choose to use the Hidden Value Format this will populate and remain hidden from your respondents.
Using URL Variables to Populate a User Data Question
You can use URL Variables to pass in the values of a User Data Question set up as a Radio Button List or Dropdown Menu question. This allows you to prepopulate the value of the User Data question.
1. Add a User Data question by selecting User Data from the Question Type dropdown. The question you would like to ask can just be an internal title like "course" for our example case.
2. Under Answer Options you'll select the User Data Field you wish to use as answer options. In our example, we want to match up the data being passed in via URL variable to our Course User Data Field.
3. Next there are two options that you might want to enable (learn more above):
- Restrict users to only view responses that are related to their User Data - This option will automatically filter Individual Responses, Reports, and Exports accessed by the user to only show data related to the course they teach.
- Restrict which values display in the list of answer options - This option will provide you with the ability to show a subset of your list of answer options for certain user data values.
4. Finally, under Format choose Radio Button List or Dropdown Menu.

5. Go to the Layout tab to set up your prepopulation. Below the Default Answer field click the link to Select a Merge Code. Select URL Variable from the About the Respondent section of the dropdown menu and click the Insert button.
Now, replace the xxx inside the quotes with the URL variable you will be passing in; in our case, this is course. Click Save Question.

6. (Optional) You can hide your prepopulated question from displaying if you wish to prevent respondents from changing their answers. To do so, place the following in the CSS Class Name field on the Layout tab: sg-hide.

This is an alternative to the Hidden Value set up below that you might choose if you wish to take advantage of how either the Radio Button List or Dropdown Menus report.
- Learn more about reporting options for Radio Button in the Reporting Section of the Radio Button Tutorial.
- Learn more about reporting options for Dropdown Menu in the Reporting Section of the Dropdown Menu Tutorial.
When you are finished setting up your User Data Hidden Value you're ready to test it out. To do so add the URL variable to your survey link and record a response.
Using URL Variables to Populate a Hidden Value User Data Question
You can use URL Variables to pass in the values of a User Data Question set up as a Hidden Value. This allows you to set the value of the User Data without needing to bother your respondent to answer the question.
In this case the question would still display to the respondent but since it is prepopulated it will save them some time as they will not need to answer the question. The respondent would of course be able to change the response to this question if they wish.
If you prefer to prepopulate and hide the question you can follow these steps and hide the question. Or set up your User Data question as a Hidden Value.
- Add a User Data question by selecting User Data from the Question Type dropdown. The question you would like to ask can just be an internal title like "course" for our example case.
- Under Answer Options you'll select the User Data Field you wish to use as answer options. In our example, we want to match up the data being passed in via URL variable to our Course User Data Field.
- Next there are two options that you might want to enable (learn more above):
- Restrict users to only view responses that are related to their User Data - This option will automatically filter Individual Responses, Reports, and Exports accessed by the user to only show data related to the course they teach.
- Restrict which values display in the list of answer options - This option will provide you with the ability to show a subset of your list of answer options for certain user data values.
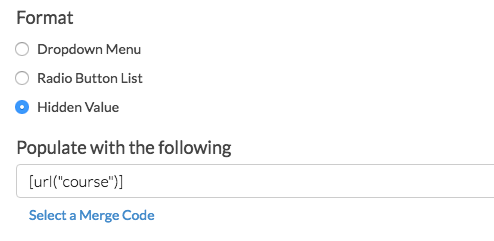
- Under Format choose Hidden Value.

- Clicking on Hidden Value will trigger a Populate with the following field. Below this field, click the link to Select a Merge Code. Select URL Variable from the About the Respondent section of the dropdown menu and click the Insert button. Now, replace the xxx inside the quotes with the URL variable you will be passing in; in our case, this is course. Click Save Question.


When you are finished setting up your User Data Hidden Value you're ready to test it out. To do so add the URL variable to your survey link and record a response.
User Data Fields in Responses, Reports, & Exports
If you selected the option to Restrict users to only view responses that are related to their User Data when setting up your User Data question, reports will be automatically filtered such that users will only see data that matches their user data values.
Account administrators will always see all data, regardless of the values in their User Data Fields.
If the Restrict users to only view responses that are related to their User Data option was not selected the data will report like any other question.


