To export your raw data, go to the Results > Exports. Click CSV/Excel.

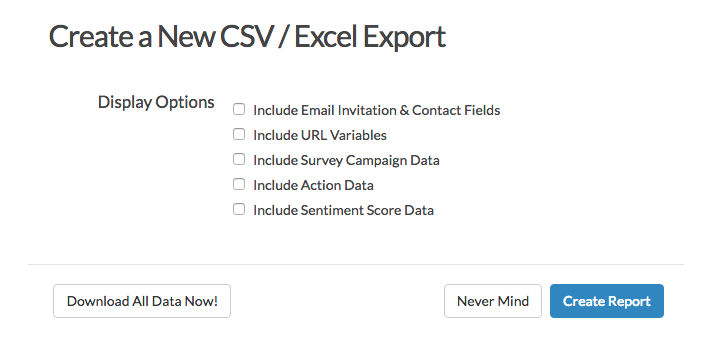
Choose from the below display options:
- Include Email Invitation & Contact Fields will add columns to the export populated with any information you passed through your email campaigns or custom contact fields.
- Include URL Variables will add a column for each unique URL variable that you've passed along with your data.
- Include Survey Campaign Data will show you a column with the name of the link used to access the survey.
- Include Action Data will show additional information about the ExactTarget, Salesforce or Google Spreadsheet actions that will help with troubleshooting actions firing in bulk. At this time, the ExactTarget, Salesforce or Google Spreadsheet actions whose data you can include in exports.
- Include Sentiment Score Data - If a question is compatible with Sentiment Analysis, a Sentiment column will be included directly after the question, within your export file.
If you wish to download your data straightaway, without making any customizations click Download All Data Now! This will create an export of your data with all the default options selected.
If you prefer to make customizations, e.g. which questions to include, filters, column header format, etc., click the Create Export button.
This will take you first to the export settings where you can customize the questions included, filters and other settings.
General Tab
On the General tab, you can choose which data fields you would like to include by selecting the checkbox in the Active column. Remove items by clicking the X next to each element. Reorder these items by clicking and dragging the arrows next to each element.
Click Add Element at the bottom of this screen to add additional elements.
Settings Tab
On the Settings tab you have several options:
Header Format: By default the column headers for your survey questions will display the question title in as the column header.
You can select to display either the question number or question ID before the question title.
Miscellaneous Options:
- Hide disabled answer options - enabled by default - prevents disabled answer options from displaying within the CSV/Excel Export.
- Hide empty columns - disabled by default - columns that contain no data are removed from the CSV/Excel Export.
Show Checkboxes as:
- Multiple Columns - this will export a field or column per checkbox answer.
- Single Column - This will export a single field or column with all selected answers in that field comma separated.
Include Additional Fields: Many of these are the same as the options that are available when you initially create the export but you can toggle them here to update the export as needed.
- Include Email Invitation & Contact Fields will add columns to the export populated with any information you passed through your email campaigns or custom contact fields.
- Include URL Variables will add a column for each unique URL variable that you've passed along with your data.
- Include Survey Campaign Data will show you a column with the name of the link used to access the survey.
- Include Data Piped from Text Fields is enabled by default. This will include data created when piping from text fields. This option is available for exports that will not run due to the inordinate number of fields that may be created when piping from text fields. Uncheck this option if your export will not finish.
- Edit Links will include an column in your export with an edit link for each response.
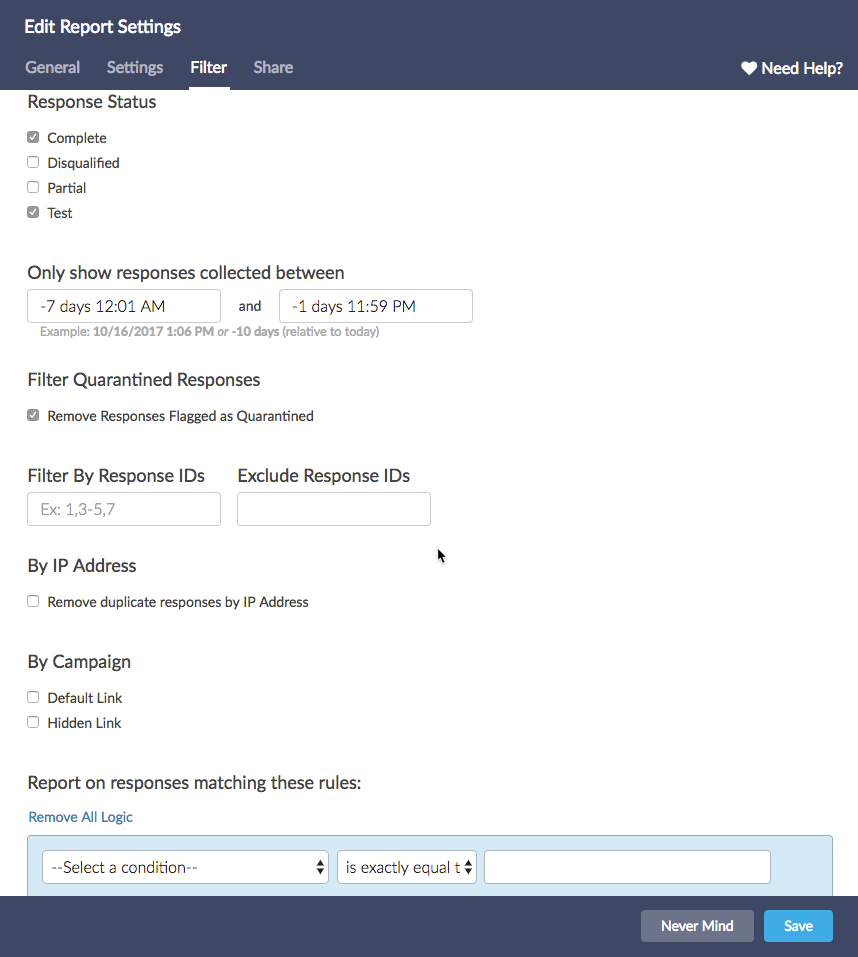
Filter Tab
On the filter tab you can filter by a number of different options, as well as just about any question in your survey!
Response Status
Complete and Test responses are included by default. You can modify to include Disqualified and Partial responses.
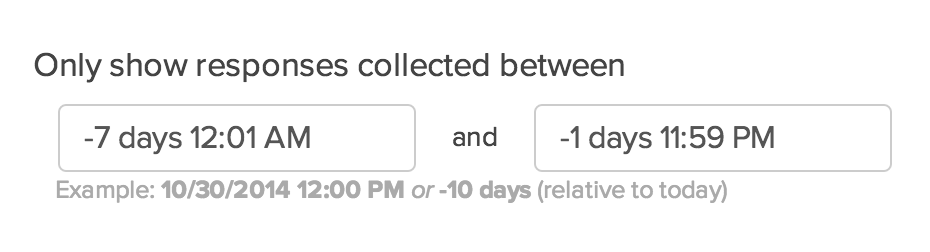
Date Range
Filtering reports and exports by a specific date range is a popular application of filters. You could set your report to filter by a specific range such as 12/1/2013 through 12/31/2013 (which would give you data between those dates).
You can also filter by a specific frequency of time such as -1 week, or -1 month. This means whenever you re-run your data, it would give you the latest week or months data.
The -x days/weeks/months etc. is based on the time you run the report. If you wish to include the entire day you'll to add a time to your -x days filter. For example, if you wish to receive the complete list of responses from the last seven days, not including responses from today, the following filter would achieve this:
Valid Date Formats for Filtering
- 4/10/2014
- 04/10/2014
- 4/10/2014 2:14 pm
- 4/10/2014 23:59
- 10 April 2014
- +/-1 weeks, days, hours, minutes
- next/last Monday
- now
Quarantined Responses
If you you used the Data Cleaning Tool to clean and quarantine poor-quality responses they will be filtered out of your export by default. Check this option to add quarantined responses back to your export.
Response IDs
Using both the Include Response IDs and the Exclude Response IDs fields you can filter to include or exclude specific response IDs.
By IP Address
This allows you to remove duplicate responses that were recorded from the same IP address. You can either keep the newest or oldest response.
Filter by Campaign
If you have multiple share links (email campaigns, embeds, default web links, etc), you can filter by specific links.
Filter Rules
This option allows you to filter by specific questions in your survey. You can also filter based on geo data, URL variables and email campaign contact data.
Share Tab
On the Share tab you can create an external link to the export. This link can be sent to analysts and clients. When clicked, it will download the CSV file. You can use a branded subdomain or private domain in this link.
You can also set up a one-time or recurring delivery of the export.
For more information on sharing your export, check out our Share, Email and Schedule an Export Tutorial.
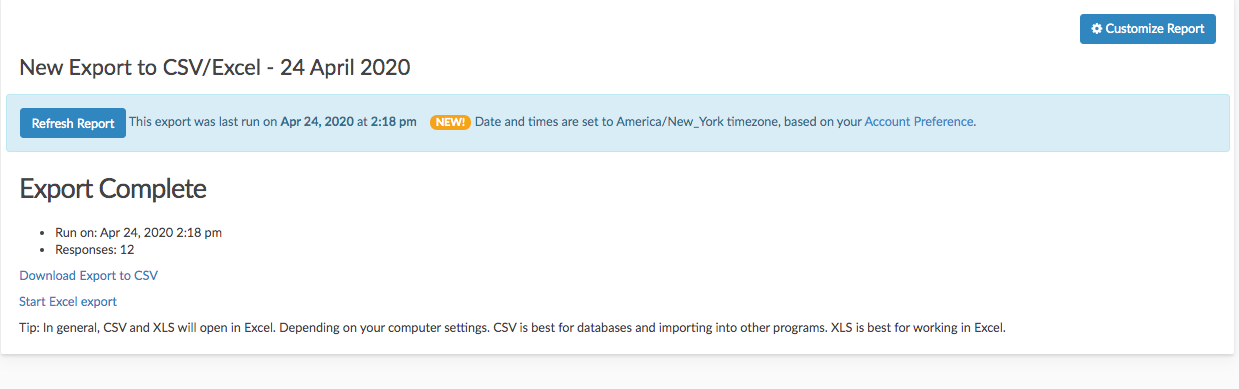
File Type Compatibility
When your export is finished running you will have two options for downloading your export. As the note within the application says, either one will, in most cases, open in Excel on Windows machines or Numbers on Macs. If you have special characters like umlauts or Chinese characters, use the Start Excel export option. There is also a Refresh Report that allows for users to update the file with the most recent data that has been collected since the export was created. The Refresh Report button will only function and re run the export if additional data has been collected since the export was last run.
Note: The option to create an Excel file (XLS) will not be available if your export has more than 1,000 columns.
What does an export look like?
Now let's talk about the layout of your CSV/Excel file of your exported data. First, you'll see that the rows contain the responses and the columns contain the survey fields.

What fields are included in an export?
The left-most columns (if you didn't opt to remove them) contain the following System Data.
- Response ID: Contains the Response ID number.
- Time Started: Date and time the respondent first clicked the link (based on the Time Zone and Format specified in Account Settings.
- Date Submitted: Date and time the respondent submitted the response (based on the Time Zone and Format specified in Account Settings.
- Status: Response status e.g. Complete or Partial.
- Contact ID: Email Campaign Contact ID number.
- Legacy Comments: Individual Response comments entered prior to May 17, 2012.
- Comments: Individual Response comments entered May 17, 2012 or later (or comments entered prior to May 17 for responses that have been edited).
- Language: Language version of the survey that the respondent responded to.
- Referrer: Contains the URL from which the respondent was referred to the survey (if embedded).
- Extended Referrer: Extended referrer records the same data as the referrer field it just allows for more characters in the case that the referrer is quite long.
- SessionID: A piece of data that is used in network communications to identify session. This value is unique for each response.
- User Agent: Contains information about respondent's operating system and browser.
- Extended User Agent: Extended user agent records the same data as the user agent field it just allows for more characters in the case that the respondent's user agent is quite long.
- Tags: Tags added via Individual Responses for categorization.
- IP Address: Respondent's IP address.
- Longitude: Respondent's longitude.
- Latitude: Respondent's latitude.
- Country: Respondent's country.
- City: Respondent's city.
- State/Region: Respondent's state or region.
- Postal: Respondent's postal code
The next set of columns will contain your Email Invitation and Contact Fields (if you opted to include this data). Note: Data must have been mapped to these fields within an email campaign in order to display here.
- Invite Status: This is effectively the same as response status. This has possible values of Partial, Complete, and Disqualified.
- Email: This is the email address that was either uploaded to an Email Campaign or a Contact List.
- First Name: This is the first name that was either uploaded to an Email Campaign, SMS Campaign, or a Contact List.
- Last Name: This is the last name that was either uploaded to an Email Campaign, SMS Campaign, or a Contact List.
- Organization Name: This is the organization that was either uploaded to an Email Campaign, SMS Campaign, or a Contact List.
- Division: This is the division that was either uploaded to an Email Campaign, SMS Campaign, or a Contact List.
- Department: This is the department that was either uploaded to an Email Campaign, SMS Campaign, or a Contact List.
- Team: This is the team that was either uploaded to an Email Campaign, SMS Campaign, or a Contact List.
- Group: This is the group that was either uploaded to an Email Campaign, SMS Campaign, or a Contact List.
- Role: This is the role that was either uploaded to an Email Campaign, SMS Campaign, or a Contact List.
- Is Manager: This is a TRUE or FALSE value that was either uploaded to an Email Campaign, SMS Campaign, or a Contact List.
- Phone (Home): This is the home phone number that was either uploaded to an Email Campaign, SMS Campaign, or a Contact List.
- Phone (Fax): This is the fax phone number that was either uploaded to an Email Campaign, SMS Campaign, or a Contact List.
- Phone (Work): This is the work phone number that was either uploaded to an Email Campaign, SMS Campaign, or a Contact List.
- Address 1: This is the address that was either uploaded to an Email Campaign, SMS Campaign, or a Contact List.
- Suite/Apt: This is the suite or apt that was either uploaded to an Email Campaign, SMS Campaign, or a Contact List.
- City: This is the city that was either uploaded to an Email Campaign, SMS Campaign, or a Contact List.
- State/Region: This is the state/region that was either uploaded to an Email Campaign, SMS Campaign, or a Contact List.
- Postal Code: This is the postal code that was either uploaded to an Email Campaign, SMS Campaign, or a Contact List.
- Job Title: This is the job title that was either uploaded to an Email Campaign, SMS Campaign, or a Contact List.
- Website: This is the website that was either uploaded to an Email Campaign, SMS Campaign, or a Contact List.
- Country: This is the country that was either uploaded to an Email Campaign, SMS Campaign, or a Contact List.
- Source: This is how the contact was added to the Email Campaign, SMS Campaign, or Contact List.
- Invite Custom 1 - 10: This is the custom data that was uploaded to an Email Campaign or SMS Campaign.
- Contact List Custom Fields: This is the custom data that was uploaded to a Contact List.
Next, if you selected the option to Include Survey Campaign Data, you have a field in your export called Link Name. This is the URL name as defined in your Share tab e.g. "Default Link."

Next, if you selected the option to Include URL Variables they will display next in the following format: URL Variable: Variable Name.
Next, if you selected the option to Include Edit Links on the Settings tab of your export this column will following URL Variables.
Next, you will see your survey fields. Only Reporting Values will export. Check out the Survey Legend if you are looking for option titles and reporting values in a data-dictionary format.

Finally, if you selected the option to Include Action Data this will be the final column in your export.
FAQ
I have a number that contains more than 15 digits and Excel automatically converts it, what can I do?
This is a limitation of Excel. Visit the Excel Documentation for workaround recommendations.
— Mike.cordeiro on 04/09/2020
@DHCD: Thank you so much for your question!
We do have the ability to apply Question Aliases to your question that have longer titles. This is especially useful in exports and custom scripting! Once question have Aliases they will automatically be used in the column headers. Follow the link below for more information on how apply Aliases to your questions:
https://help.surveygizmo.com/help/using-question-aliases#use-question-aliases
I hope this helps Clarify!
Mike
Technical Writer
SurveyGizmo Learning and Development
— DHCD on 04/07/2020
Is there a way to change the heading that appears in the exported CSV file from being the same as the question text? For example, I have some questions that are a sentence or more long. When i export to CSV, the entire sentence is the heading for the column. Is there a way to assign an alternate column ID so that the heading is something simple like "Age" instead of "What is your age at the time of registration"?
— Mike.cordeiro on 12/15/2019
Hey there Marc! Thank you so much for your inquiry!
To touch on your question, one can obtain a sharable export link by accessing any previously created export. To do this, Navigate to Results > Exports. Select the export you would like a sharable link to. This will open up a menu and when you navigate to the share tab of the menu, one will find a link to download the export!
For more information on sharing exports, check out this article:
https://help.surveygizmo.com/help/share-email-and-schedule-an-export
I hope this helps clarify!
Michael Cordeiro
SurveyGizmo Customer Success
— Thibault on 12/12/2019
Hello help team !
Please how to create/obtain a direct export link on Survey Gizmo ?
A link to a live export, I mean...
Admin
— Dave Domagalski on 10/03/2018
@Tim: Yes, this is possible.
After you create your export, on the General tab you can determine which questions/fields you want to include in the export file (by checking/unchecking the associated checkboxes).
The questions/fields that are checked will be included in the download.
I hope this helps clarify!
David
Documentation Specialist
SurveyGizmo Customer Experience
— Tim on 10/03/2018
Is it possible to export data from just a single question?
Admin
— Dave Domagalski on 09/06/2018
@IS: Thank you for your question!
The Raw Data Export is designed to only include response data that has been submitted to the survey. Individuals who have not answered the survey will not be included.
The Raw Data Export will include Partial, Complete, Disqualified, and Test responses.
I'm afraid that the 'Not Started' status is reserved for the Email Campaign status log file which can be downloaded via the 'Export Contacts with Send Status' link found on the campaign Contacts page:
https://help.surveygizmo.com/help/monitor-contacts
I hope this helps clarify!
David
Documentation Specialist
SurveyGizmo Customer Experience
— IS on 09/06/2018
Hi, how we can include 'not started' status in the export file?
Admin
— Dave Domagalski on 04/27/2018
@Wind.uw: Thank you for your question!
I'm afraid that it is not currently possible to export survey responses from multiple surveys in one download.
We also do not have immediate plans for a combined exporting functionality, I'm sorry to say.
In the meantime, if your team has access to development resources, it may be worth exploring SurveyGizmo's API as an option:
https://apihelp.surveygizmo.com/help
Custom development with SurveyGizmo's API could allow for some automation with pulling survey response data.
I'm sorry for the trouble!
David
Documentation Specialist
SurveyGizmo Customer Experience
— Cari on 04/27/2018
Is it possible (or will it be in the future) to export survey responses from multiple surveys in one download in a zip file? My organization does multiple evaluation surveys every week during the academic year and we export responses from every survey (even surveys that are several months old, in case of new responses) every month. It would save us a great deal of time if there was the option to export responses from multiple surveys as a zip file, instead of going into every survey and grabbing the export one by one. Is this possible?
Admin
— Dave Domagalski on 03/23/2018
@9th: I do mean actual separate surveys. It's certainly not an ideal solution, and when the survey consists of more than just the Custom Table question, it's not practical as you have mentioned.
I'm sorry for the limitation and the trouble that this is causing. I hope this helps clarify my earlier statement.
David
Documentation Specialist
SurveyGizmo Customer Experience
— CJIN/Leadership on 03/23/2018
@Dave Domagalski: Thanks for the reply. I'm disappointed the function I'm after is not possible, since it seems intuitive, but so be it.
Out of curiosity, when you say:
"The best option that I can suggest in terms of getting an output in the way that you described, would be to have the respondent submit a separate survey response for each subject."
Do you mean actual separate surveys, submitting one after another? Is there a way to make that happen within the main survey, with links or some such, so they would answer and then come back to where they were?
Otherwise, that sounds as if they would have to submit five separate surveys to answer one question out of 30. If anyone ever hung around for that, I would have to manually combine the results together with the rest of the survey, anyway.
Confused about that.
Jonathan
Admin
— Dave Domagalski on 03/21/2018
@9th: Thank you for your question!
I'm afraid that SurveyGizmo Excel Exports will always export each survey response as a single row, regardless of the question type or format. There is not a setting to override this output.
With regard to Custom Table questions, there are two options for how these are exported (this is configured on the initial screen when first creating the export):
- Group by Row - results in Subject 1/Grade 1/Students 1/ Subject 2/ Grade 2, etc.
- Group by Column - results in Subject 1/Subject 2/ Subject 3, etc. / Grade 1/ Grade 2, etc.
The best option that I can suggest in terms of getting an output in the way that you described, would be to have the respondent submit a separate survey response for each subject.
A separate survey response for each subject would create a separate row in Excel. Depending on how you are asking for this information, there may be other options. Please don't hesitate to reach out to our Support team to discuss this further!
I'm sorry for the trouble!
David
Documentation Specialist
SurveyGizmo Customer Experience
— CJIN/Leadership on 03/21/2018
I know how to do the following in a Report, by toggling the Custom Table Subquestions. I want to do the same in an Excel export that has a custom grid table, with 5 possible rows and 3 columns, like so ("/" is column break):
Subject 1/Grade 1/Students 1
Subject 2/Grade 2/Students 2
3/3/3
4/4/4
5/5/5
(some may be blank)
When exporting to Excel, instead of looking like the above--Subjects, Grades and Students each in their respective columns--the result puts columns into rows for each person:
Person X: Subject 1/Grade 1/Students1/2/2/2/3/3/3/
Person Y: 1/1/1/2/2/2/3/3/3
etc.
I need the result to be
Person X: Subject 1/Grade 1/Students1
Person X: Subject 2/Grade 2/Students2
Person X: Subject 3/Grade 3/Students3
Person Y: Subject 1/Grade 1/Students 1
etc.
I realize this is different than Excel's standard one row per person. But the current result is impossible to read, sort and tabulate. I will happily change the form of the Question in the survey if necessary.
Thanks for any help.
Admin
— Bri Hillmer on 03/05/2018
@Thomas: We do not currently have an export customization that you describe available.
Bri Hillmer
Documentation Coordinator
SurveyGizmo Customer Experience Team
— Thomas on 03/05/2018
I did a search on this topic and nothing came up so apologies if this is somewhere already, but is there a way to have the CSV data exported so that each record is a single response as opposed to how it currently is with each record being a respondent's entire set of responses. It's easier to apply pivot tables to data in this format (at least for me). Thanks...
Admin
— Dave Domagalski on 01/25/2018
@Jason: Thank you for your question!
After checking with our Development team, I can confirm that the 1,000 column limit is still in place, specifically for the .XLS version of the export file. The .CSV version does not currently have a column limit and will typically also open in Excel by default.
There is not a file-size limit that would prevent a file from downloading, though having thousands of columns will certainly slow down the download process. In that event, filtering the export is very much the recommended solution. Often, we recommend filtering by responses. For example, extract one file for response IDs 1-1000, another file for 1001-2000, and so on.
I hope this helps clarify!
David
Documentation Specialist
SurveyGizmo Customer Experience
— Jason on 01/24/2018
This article is two years old so some of the information may be updated as the platform has updated, however, it appears that 1,000 columns is no longer a limitation for exporting as an Excel file as my current survey has ~1200 columns and allows me to do so (fortunately).
However, this leads me to an important question about if there are any Excel file size limitations, in terms of MBs? And if yes, assume filtering to exclude partials, etc. would be an acceptable/recommended solution to decrease the file size?
Admin
— Dave Domagalski on 04/21/2017
@Ray: Thank you for exploring SurveyGizmo Documentation!
By default, all survey results are exported via the CSV Excel Export. The main reason that would prevent all results from being exported is a filter.
Perhaps there is a filter applied to your export to limit the results? More information on filtering is available here:
https://help.surveygizmo.com/help/filter-export-data
I hope this helps!
David
Documentation Specialist
SurveyGizmo Customer Experience
— Ray_francis03 on 04/20/2017
Hi,
Good day!
I just want to know if it is not possible to export the data results from yesterday or the past few days. Because in my case, the data that only shows when I export is only the results from today.
Best Regards