Using Contact Lists, you can manage various lists of survey contacts within SurveyGizmo all from one place. Think of it as your survey address book. There are several benefits to using Contact Lists to store and manage your contacts:
- Upload your contacts only once
- Easily add contacts to Email Campaigns or SMS Campaigns
- Easily update, edit, and organize your contacts
- Easily manage unsubscribes
- Access a complete message history for each contact in your list across surveys and campaigns
- Create list segments to send targeted invites
You can set up a contact list in whatever way is most useful to you. Ideally, you should create a contact list that encompasses all contacts for a certain target population. Within these lists, you can then create segments to further break down your contacts into small sub-demographic target groups or "segments."
For example, at SurveyGizmo we might have an All Customers contact list and within that the following segments might be useful: Trial Customers, Marketers, Consultants, and Students. With these segments available, we can selectively send a survey that only applies to our trial customers or for surveys that apply to everybody, we can send separate invites with content that targets those subgroups in an effort to increase response rates.
Please note that Contact Lists are only accessible to Admin Users in your account.
Standard Contact Fields
The following Standard Contact Fields are available in every list that you create. You can selectively populate these fields as needed. To eliminate confusion, we recommend only using these fields for their intended use. If you have data that you would like to store with your contacts that do not correspond to one of these Standard Contact Fields, we recommend using Custom Contact Fields.
| Email* | State/Region | Group |
| Phone (Mobile)*† | Country | Role |
| First Name | Postal Code | Job Title |
| Last Name | Organization Name | Website |
| Address | Division | Phone (Home) |
| Suite/Apt | Department | Phone (Fax) |
| City | Team | Phone (Work) |
*When creating a new list, either the Email field or the Phone (Mobile) field is required to create a contact.
- If you plan to use a contact in an Email Campaign, an email address will be required.
- Similarly, if you plan to use a contact in a SMS Campaign, a mobile phone number will be required.
One of these fields is also the key field or matching field when uploading updates to your contacts' info.
†Currently, only US and Canadian phone numbers are supported in SMS Campaigns.
Contact Custom Fields
Contact Custom Fields are great for storing data for each of your contacts that do not correspond to one of the Standard Contact Fields. You can use these custom fields in Segment Filtering Rules to further customize your contact lists. Learn how to create and manage Custom Fields.
Custom Fields are also available in both your invites and surveys via Merge Codes, for more info see Using Custom Fields in Email Invites and Surveys.
Create a New List and Upload Contacts
If you intend to use Contact Custom Fields you will need to create the fields first before you upload your list. Go to the section of this tutorial that covers Creating and Managing Custom Fields for steps on how to set these up.
Learn more about the requirements for email addresses uploaded to SurveyGizmo Contact Lists.
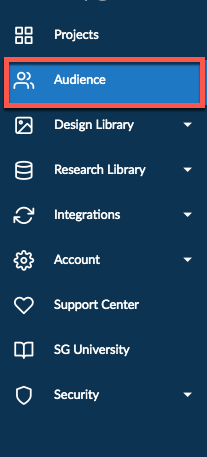
- From the Left Navigation Menu select Audience.

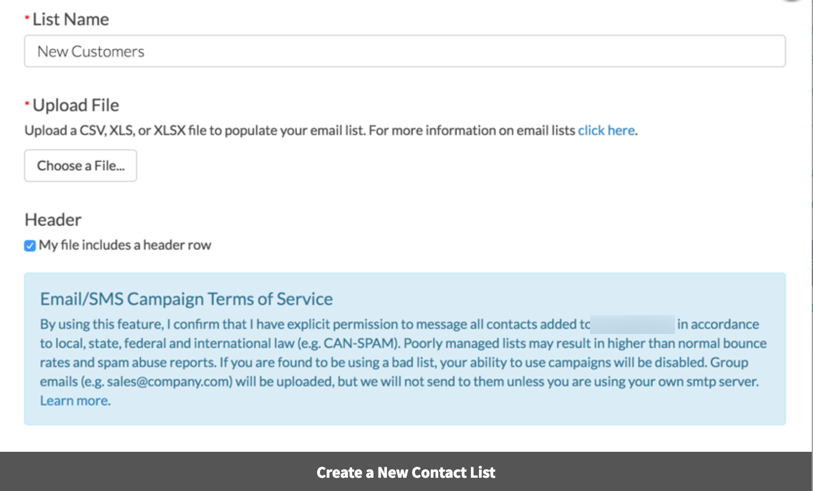
- On the Audience Section select Create New List.
- Name your List and choose a file to upload. This can be a CSV, XLS, or XLSX file. If you are using a list with special characters (like umlauts or Cyrillic characters) make sure to use an XLS or XLSX.
- If your file has a header row (a row that labels the data in each column (ex. Email, First Name, Last Name, etc.), check the box and click Create List.SurveyGizmo will allow the upload of group email addresses such as sales@, support@, etc. however, we will not send emails to these addresses unless you send via your SMTP Custom Email Integration. Visit our documentation to learn about additional email address requirements.
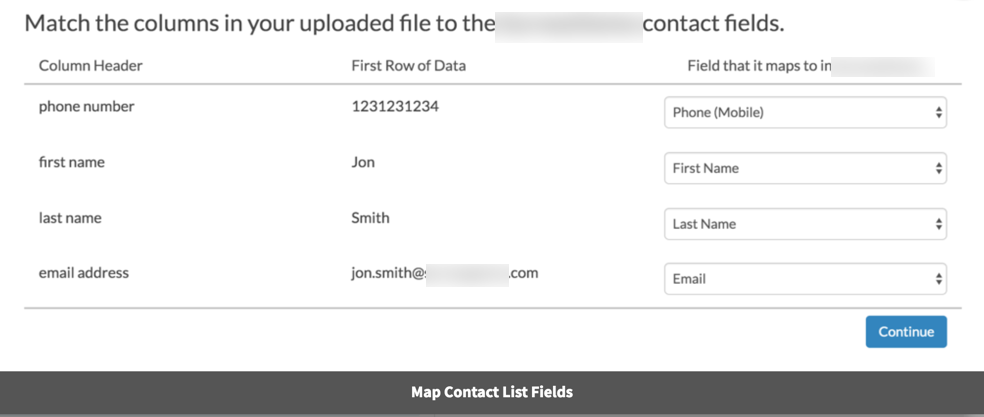
- Map the fields from your spreadsheet to the fields (Standard or Custom) in the SurveyGizmo system and click Save Fields when you are finished.


Add Contacts
If you need to add more contacts to your list you can do using these quick steps:
Add a Single Contact
- Go to the list you would like to add to and click Add Contact.

- Populate the contact fields including any Custom Contact Fields (if you have them set up) and click Save Contact.

Bulk Add Contacts via Import
- Go to the List you would like to add to.
- Click the dropdown arrow next to Add Contacts and select Import Contacts.

- Select a new file to upload by clicking Choose File and indicate whether your file has a header row.
- Choose whether you would like to Add/Update Contacts or Unsubscribe Contacts.
- Add/Update Contacts - This option will add any contacts that are not already present in your list, and/or will update any contacts currently in your list with updated information
- Unsubscribe Contacts - This option will unsubscribe any matched (by email or mobile phone number) contacts found in the newly uploaded file from the existing contacts in your list.
- Click Import File and then map your fields then click Save Fields.

Export Contacts
If you would like to export your Contact List, go to the list you would like to export. At the bottom of the list click to either Export as CSV and Export as XLS.

Your exported contact list will include all of your contact fields as well as the following fields:
- ID - Contact's id
- Status - Contact status: Active or Unsubscribed
- Addedby - Manual or Import depending on the method by which the contact was added
- Dateadded - Date contact was added to the list
- Unsubbed on - Date contact was unsubscribed
Unsubscribe Contacts
Unsubscribe a Single Contact From a Single List
- Select the list from which you would like to unsubscribe the contact. In the row for your contact, you'll see a Red Circle with a Diagonal Cross icon (below).
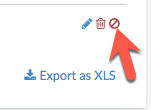
- Click the icon and verify you want to unsubscribe that contact.

Unsubscribe a Single Contact From All Lists
- Select a list that contains the contact you want to unsubscribe from all lists.
- Click the contact's email address/mobile phone in the list. This will open the contact's details.
- Next, check the Unsubscribe from all campaigns option. This will remove the contact from all campaigns (Email and SMS) where they were added using the Use Existing List option. If an email address was manually added to a campaign, it will not be unsubscribed from that campaign when using this option.


Bulk Unsubscribe Contacts
- Export your current list and subset to the list of contacts you wish to unsubscribe (either email address or a mobile phone number are necessary).
- Go to the list from which you would like to unsubscribe the contacts and click the arrow next to Add Contacts and select Import Contacts.
- Indicate whether your file has a header row.
- Select Unsubscribe Contacts under Modify and click Import File.


When a contact clicks the unsubscribe link in email campaigns or unsubscribes via SMS message, their status will also update to Unsubscribed in Contact Lists if they were added using the Use Existing List option. Contacts cannot be deleted from these lists, they remain unsubscribed so that they cannot be added back into the list by accident.
Create Segments
What is a Segment? Great question! A segment is a subset of your Contact List based on a specific filter. This is usually a demographic characteristic such as males aged 18-35. You can use segments to quickly set up different invites targeted towards various key groups of your target population!
- Go to the list you would like to segment and click the arrow next to Add Contacts.
- Click Create Segment. Name your segment and set up your Segment Filter Rules.We recommend basing your segment rules on standard fields. (Organization Name, Division, etc.). Doing so will automatically place any new contacts that you add to your list within a corresponding segment. Should your segments use your own Custom Fields, newly added contacts would not be automatically placed within a corresponding segment.
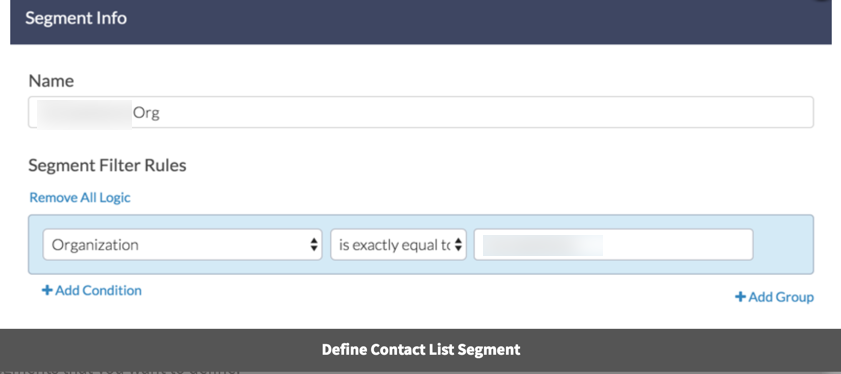
- Make sure to Save Segment once you have defined your segment rule(s). Repeat this process for any additional segments that you want to define.

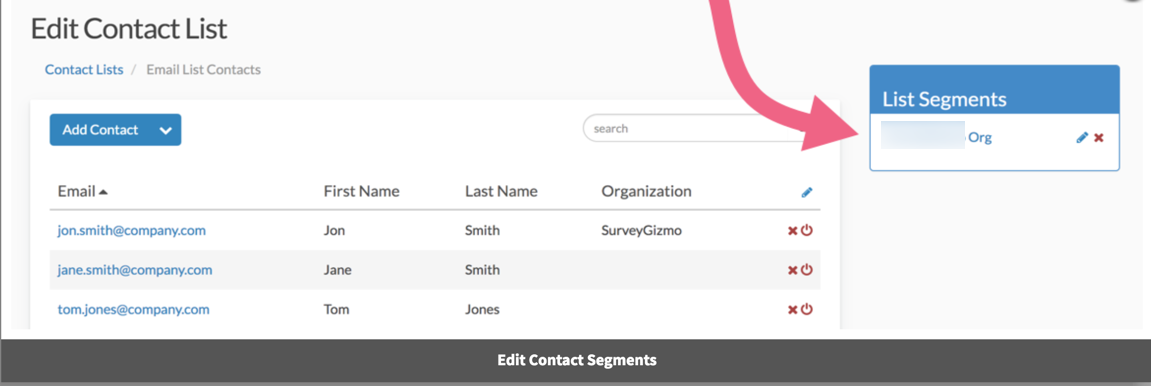
Once you have a segment set up, your Segment dashboard will look much like your Contact List dashboard. In addition to all the functionality available in the Contact List dashboard, you will have the ability to edit your segment including the segment name and the Segment Filter Rules.
You can also always access your segment by going to the associated contact list and clicking the name of the Segment from the List Segment box.
Create and Manage Custom Fields
Custom Fields are anything other than the Standard fields that you would like to include in your list. For example, let's say you always need a Customer ID available when customizing your surveys, and all your contacts will have one, you can create a Custom Field called Customer ID.
To create a new Custom Field:
- Go to Account > Libraries > Contact Lists and click Manage Custom Fields below your contact lists.
- Enter your Custom Field Name - Custom Field Names will be saved as lowercase with no spaces (this is to accommodate their use in Merge Codes in your surveys and email invites, for more info see Using Custom Fields in Email Invites and Surveys). Field Names are limited to 25 characters.
- Select a Field Type. Choose from Text, Date/Time, Currency, Number, or Yes/No (The type setting is present only for labeling and organization purposes), and click Add New Field.

- After you have added all the fields that you need to add, click Save Fields to finish.

To edit and delete a Custom Field:
To edit or delete custom fields, access the fields by clicking on the Manage Custom Fields link on the main Contact List page.
- Edit: If you would like to edit a Custom Field, make the change in the Custom Field Name field and click Save Fields.
- Delete: To delete a custom field, click the red x associated with the field.


Select Lists and Segments in Your SMS/Email Campaigns
Now that you have set up all your contact lists, you're probably wondering how to go about adding these lists to your campaigns.
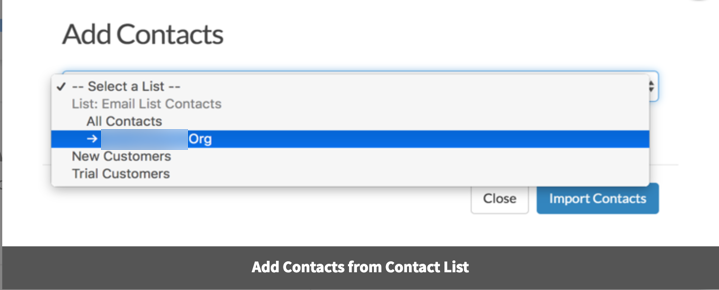
- Go to Share and create a new or edit your existing SMS/Email Campaign.
- Go to the Contacts step and click Add Contacts.
- Select Use an Existing List and select a list or segment from the dropdown menu.
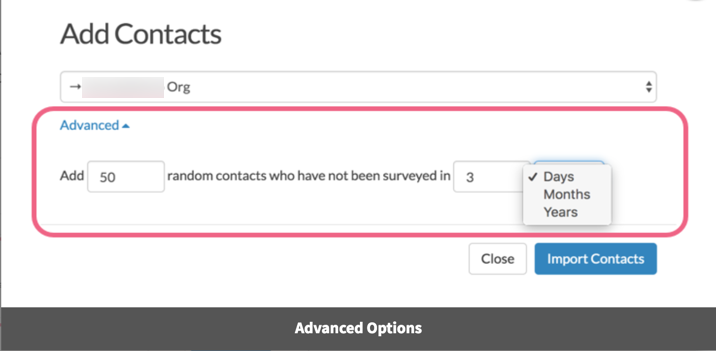
- (Optional) Click the Advanced link below the dropdown. From here you can choose to invite only a random number of contacts who have not been surveyed in a specified number of Days, Months, or Years. This is great to prevent over-surveying your contacts!


Use Custom Fields in Email Invites and Surveys
Your contacts' Custom Field data is available for use via Merge Codes in your email invites and surveys.
The basic structure for a Custom Field Merge Code is: [contact("customfieldname")] where "customfieldname" is replaced with the actual custom field name you created in your contact list. For example, if you have a Custom Field in your Contact List called "customerid" then the corresponding Merge Code would be [contact("customerid")].
For more info on merge codes, visit our Merge Codes tutorial.
Email Invites
Custom Field Merge Codes are available for use within your email campaign invites (not within SMS invites). For email invites, use the dropdown menu below the body of the invite to Select a Merge Code in the text of your invite.
Surveys
You can also use your contacts' Custom Field data within your survey using the same Merge Code. For example, use these Merge Codes in question titles, default values, hidden value fields and more!
If you'd like to set up logic using these fields, set up a hidden value to store these fields to use later to set up logic conditions. To learn about hidden values visit our Hidden Values tutorial.
The Merge Code helper within email campaign invites is the only location where these Merge Codes are available. But you can easily construct these Merge Codes yourself! Just remember the basic structure of the Custom Field Merge Codes and you should be all set!
Message History
For each contact in your list, a unique Message History is stored. This is a complete history for this contact for all surveys and invites relative to the list.
To access a Contact's Message History, go to the list where that contact is stored and find your contact click the email address to edit the contact. Go to the Contact History tab.
Admin
— Mike Cordeiro on 04/09/2020
@Leslie: Thank you for your question!
If a contact is unsubscribed in one contact list or via any unsubscribe method, they will be unsubscribed globally across your SurveyGizmo account. Follow the documentation below for more details!
I hope this helps clarify!
Mike
Technical Writer
SurveyGizmo Learning and Development
— Leslie on 04/09/2020
If I have multiple contact lists and I want to unsubscribe someone from one of those lists but not the others, will using the unsubscribe function in one list effect other lists that in contact is in?
Admin
— Dave Domagalski on 07/30/2019
@Administrator: Thank you for your question!
I'm afraid that there are no immediate plans to change this Contact List functionality (allowing access to non-admin users), though it is a need that has been communicated with our Product team.
I suspect that initially, this limitation was put in place to allow certain users to control how the contact lists are managed (segmenting, custom fields, etc.), while not exposing access to the whole account (which could make contact lists harder to standardize on an account basis).
I understand that depending on the organization, there may be a need to allow access to more users than just admins.
I will share this feedback with our Product team.
I'm sorry for the trouble!
David
Technical Writer
SurveyGizmo Customer Experience
— Administrator on 07/30/2019
I echo Claudio's comment below from 2016. We also have several independent departments/users. They should all be able to work on their projects independently and not have to depend on the Admin to free up some time to manage *their* lists. Any chance this will be changed soon? Also, what was the reasoning behind this limitation in the first place? (I'm trying to understand if there's some logical reason here that hasn't occurred to me.) Thanks!
Admin
— Dave Domagalski on 02/26/2019
@Jared: Thank you for following up on your initial post.
While there is not a built-in feature to automate this process, SurveyGizmo does offer a custom scripting function to accomplish this. The function and associated example can be found here:
https://luascript.surveygizmo.com/help#addcontacttolist
I hope this provides a viable option.
David
Technical Writer
SurveyGizmo Customer Experience
— Jared on 02/26/2019
Hi - I asked this question a year ago so thought it would be worth while asking again incase anything has changed - Is there any way to add/update contacts in an email list from an SG survey or form?
Admin
— Dave Domagalski on 07/03/2018
@Jared: Thank you for your question!
I'm afraid that contacts cannot be added or updated within Email Lists via a SurveyGizmo survey/form.
SurveyGizmo offers the MailChimp Integration as a potential alternative:
https://help.surveygizmo.com/help/mailchimp-integration
If you were to manage your contact lists within MailChimp, contacts could be added and updated within that list via SurveyGizmo surveys/forms.
I hope this helps clarify!
David
Documentation Specialist
SurveyGizmo Customer Experience
— Jared on 07/02/2018
Is there any way to add/update contacts in an email list from an SG survey or form?
Admin
— Dave Domagalski on 12/22/2016
@Amy: Thank you for following up and for your additional feedback!
My apologies for the current limitations. I will certainly forward this feedback to our Development Team for consideration as a future upgrade to the Email Lists interface.
Thank you again for your feedback!
David
Documentation Specialist/Survey Explorer
SurveyGizmo Customer Experience
— Amy on 12/22/2016
@Dave - thanks -- yes, I know how to view the send status logs, but it will require quite a bit of work to download all the log files for all the panel surveys and then append all the logs together to determine how engaged the panelists are. Since the data exists in the contact history for each email address. I was hoping there was a way to bulk download this info. I hope you consider this in the future so panel management becomes easier within SG. Thanks!
Admin
— Dave Domagalski on 12/15/2016
@Amy: Thank you for your question!
While there is not an option to download the message history for all contacts in an Email List, there is an option to download this on a per email campaign basis.
You can do this for any email campaign via the 'Export Contacts with Send Status' feature described here:
https://help.surveygizmo.com/help/monitor-contacts
I realize this is not exactly what you are looking for but hopefully, it helps you gather the information that you are after.
David
Documentation Specialist/Survey Explorer
SurveyGizmo Customer Experience
— Amy on 12/15/2016
I've been using an email list to manage a panel for about six months now and I'd like to download a report to review how engaged/active the 1900+ panelists are. I know I can look up message history individually by clicking on an email address in my email list, but is there a way to easily download the message history for all of my list members?
Admin
— Bri Hillmer on 11/22/2016
@internetforschung: This is a great suggestion. I will make note of this for discussion of possible future improvements with our development team!
Bri
Documentation Coordinator
SurveyGizmo Customer Experience Team
— Claudio on 11/22/2016
Are you planning to overthink this limitation "Please note that Email Lists are only accessible to Admin users in your account.". It would be really cool if specific roles could be given the permission to manage email lists. E.g. We work in 5 very independent teams and it's not very efficient if only the admin create email lists.
Admin
— Bri Hillmer on 11/21/2016
@Bobbi: You can definitely do this! You'll need to store email list custom field data in Hidden Values in order to do so. Here is a tutorial that covers how to create the merge codes for these fields:
https://help.surveygizmo.com/help/using-contact-data#creating-merge-codes-for-email-list-custom-fields
I hope this helps!
Bri
Documentation Coordinator
SurveyGizmo Customer Experience Team
— Scott on 11/21/2016
Is it possible to apply logic within a survey off the data in a custom field? For example, I know that we can do it off of Email Invite Data - Custom Field 1, but if we create our own custom field, is there any way to apply logic off of that?
Admin
— Bri Hillmer on 05/19/2016
@Georgiana: I'm sorry for the trouble you are having! I did a little testing with changing the value for a custom field for one of my contacts in an email list and it was successfully changed for me in the in new invites that are sent as well as in the survey. If you continue to run into this trouble reach out to our support team; they will be able to sort out the trouble!
Bri
Documentation Coordinator/Survey Sorceress
SurveyGizmo Customer Support
— Beatrix on 05/19/2016
Hi!
"Add/Update Contacts - This option will add any contacts that are not already present in your list, and/or will update any contacts currently in your list with updated information"
If I upload a list , the campaign are sent out and at a later time re-upload the list and only one field has changed for all contacts (a custom field I created) , why doesn't it update with the new information?
I tried yesterday and it didn't work.
Admin
— Bri Hillmer on 02/11/2016
@Sarahdownes: The limit comes into play when you are sending. You'll need email credits in order to send. The Pro account has a limit of 20k or 40k if you have an annual subscription. Here is our documentation on email credits for your reference:
http://help.surveygizmo.com/help/article/link/email-credits
Bri
Documentation Coordinator/Survey Sorceress
SurveyGizmo Customer Support
— Sarahdownes on 02/11/2016
what it is the maximum size of email list in Pro account?