By default, all emails sent from SurveyGizmo are sent from one of the following email addresses:
- Send Email Actions - noreply@surveygizmo.com
- Email Campaigns - invites@mailer.surveygizmo.com
- Shared Reports and Exports - reports@mailer.surveygizmo.com
To enable the use of a custom From Email address in Email Actions and Email Campaigns (other than the above SurveyGizmo defaults) you must either send from your own (or a third-party) SMTP server or configure your domain with SPF and DKIM records. Custom From-Email-Addresses are not currently available when sharing reports and exports via email.
If you need to continue sending emails using SurveyGizmo's email server, you will need to set up SPF and DKIM records on your domain in order to specify a custom email From Address.
If you have your own mail server and wish to send your SurveyGizmo emails via your server, you can set up an SMTP integration. This will allow you to provide a custom From Email address to use with Email Campaigns and Send Email Actions.
What You Will Need Before You Get Started
You may need the assistance of an IT professional at your organization as they are the most likely to have administrative access to your domain (needed to configure DKIM & SPF records).
Option 1: DKIM & SPF Records
Configuring DKIM and SPF records will allow you to customize your email From Address for Email Actions and Email Campaigns while continuing to send these emails from SurveyGizmo servers.
- Mail sent using SurveyGizmo servers is subject to Email Limits and email address requirements.
- Delivery/Bounce information will be available.
DKIM (DomainKeys Identified Mail) is an Internet Standard that enables an email sender (person or organization) to associate a domain name with email messages that they are sending. This, essentially, serves as a method of claiming responsibility for a message.
DKIM is a means for confirming that the content of an email is not tampered with from the time it leaves SurveyGizmo servers to the time it reaches the intended recipient. It is a system designed to detect email spoofing by allowing receiving mail exchanges to check that incoming mail from a domain is authorized by that domain's administrators.
An SPF (Sender Policy Framework) record is an open standard created to stop forgery of from-email-addresses by spammers. An SPF record helps mail servers distinguish forgeries from real mail by making it possible for a domain owner to specify which mail servers they use to send mail from that domain.
Visit our SPF Records article for additional information.
Setup DKIM & SPF Records
For expanded instructions on configuring DKIM & SPF records, click here.
In order to configure your DKIM and SPF records, you will need to be a SurveyGizmo Account Administrator. You will also likely need access to your organization's domain administrator or IT Team (or direct access to your domain's DNS record settings).
The first four steps for setting up DKIM & SPF records are identical to the above-described SMTP setup.
- Go to Integrations > Data Connectors.
- Scroll to the Enterprise Level Integrations page and locate the Custom Email Settings option. Click Configure.
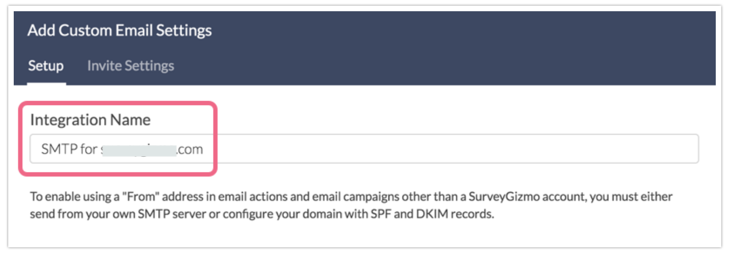
- Provide an Integration Name. This is the internal title that will be used to identify this integration in Email Actions and Email Campaigns. It is important to make this name something meaningful like DKIM & SPF for surveygizmo.com.
- Determine whether you want this integration to serve as the default for any Email Actions and Email Campaigns that are created going forward.
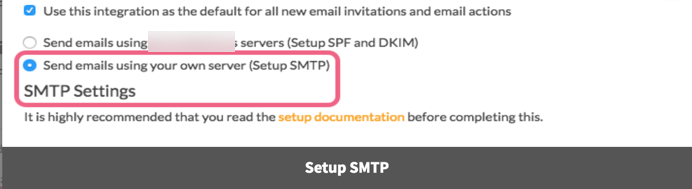
The option to Use this integration as the default for all new email invitations and email actions will be automatically selected. Un-check the option if needed. - Select Send emails using SurveyGizmo's servers (Setup SPF and DKIM). This will expose additional fields for configuring this integration.
- Within the From Address section, provide your Domain Name and Default From Address.
This is the domain that you want to use as your From Address within Email Actions and Email Campaigns. The above Default From Address can be updated when configuring your Email Actions or Campaigns (the domain cannot be updated).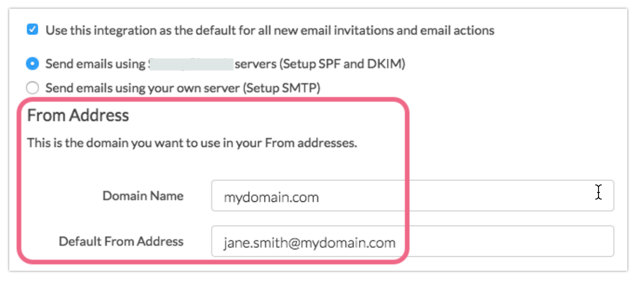
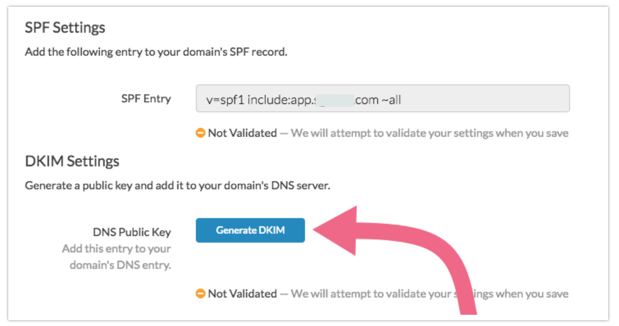
- Next, the SPF Settings section will provide you with the SPF Entry that will need to be added to your domain's SPF Record. Copy the SPF Entry from the provided field or reference it here:
v=spf1 include:app.sgizmo.com ~all
- Last, under DKIM Settings you will need to generate a public key. This public key will then need to be added to your domain's DNS Server.
- Click Generate DKIM to generate your public key.
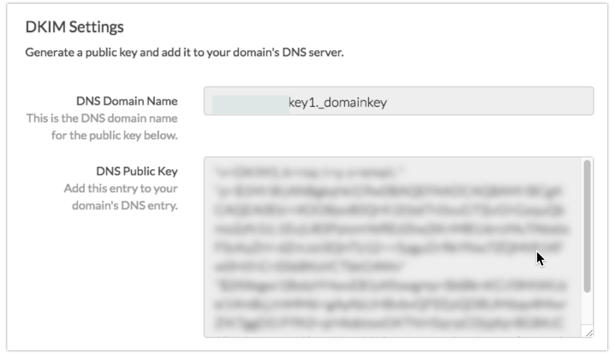
- A DNS Domain Name (the DNS domain name for the public key), as well as the DNS Public Key, will be generated. Add the domain name and public key to your domain's DNS entry.
- Click Generate DKIM to generate your public key.


You will notice that both your SPF and DKIM Settings are not validated during setup. We will attempt to validate your settings when you Save your integration.
We perform this validation by sending a test email (to one of our servers) and reviewing the email headers of that test email.
Your DKIM & SPF Records will need to be verified before you can start using them in email sends. On the main Integrations page, look for the green check mark under the Verified column.
It can take 24-48 hours for DNS changes to propagate in some instances.

Configure Email Actions to Use DKIM & SPF
Once your DKIM & SPF records are in place and verified, you will be able to customize the email From Address for Send Email Actions (as well as Email Campaigns) to use your domain.
For additional information on Send Email Actions (as well as setup instructions), visit our tutorial.
To use your DKIM & SPF records integration within your Email Actions, follow the below steps:
- Create a Send Email Action (or edit an existing one) and access the Primary Setup tab to locate the From Address field. If you configured your DKIM & SPF integration as the default for all actions and campaigns, you will see a pre-populated From Address.
- If your desired from address is not pre-populated, click the domain dropdown menu and select your DKIM & SPF integration. Each integration will be identified by the domain and internal title that was provided during setup. Make sure your titles are unique and meaningful to simplify the selection process.
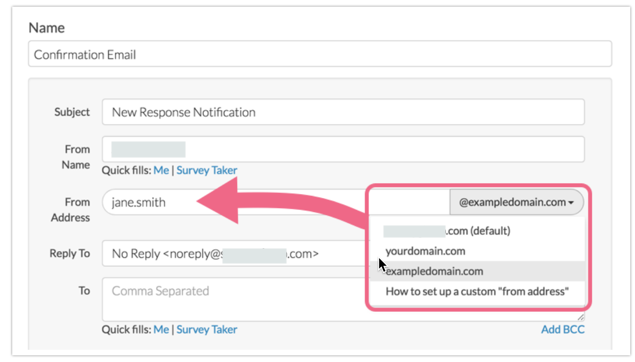
- After selecting your DKIM & SPF integration, you will see the From Address populated with the Default From Address (entered during setup).
Unlike the SMTP integration, you can customize the portion of the email address before the @ symbol. The domain portion of the email address cannot be customized without selecting another integration.
You can also choose to use the surveygizmo.com (default) option, which will result in the noreply@surveygizmo.com address being used as the From Address. - Make sure you Save Action to finish setting up your Email Action.

Configure Email Campaigns to Use DKIM & SPF
Once your DKIM & SPF records are in place and verified, you will be able to customize the email From Address for Email Campaigns (as well as Send Email Actions) to use your domain.
When sending your Email Campaign messages via your DKIM & SPF integration, you are subject to SurveyGizmo's Email Limits as well as email address requirements.
For additional information on Email Campaigns (as well as setup instructions), visit our tutorial.
To use your DKIM & SPF records integration within your Email Campaigns, follow the below steps:
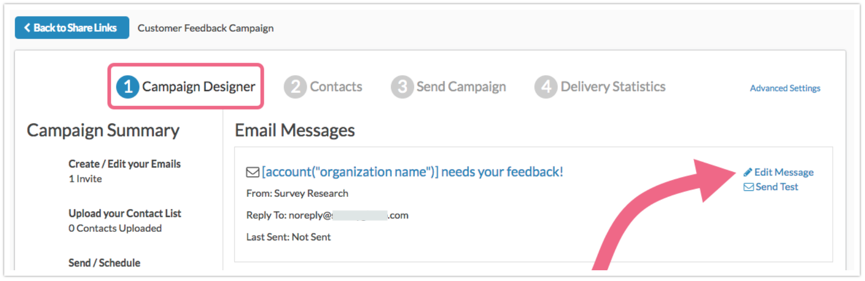
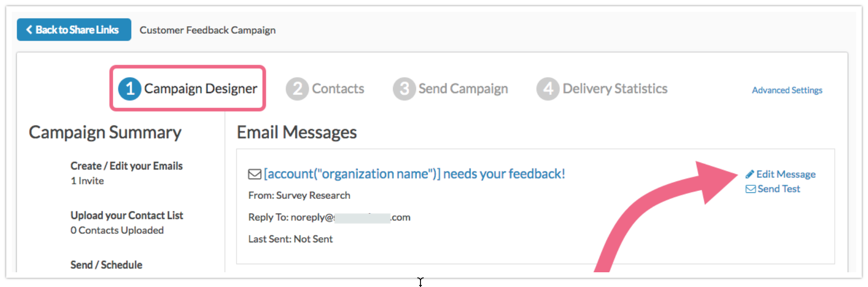
- Create or access your Email Campaign via your Share tab and on the Campaign Designer page, click the Edit Message link.
 If you configured your DKIM & SPF integration as the default for all actions and campaigns, you will see it pre-populated in the From Address field.
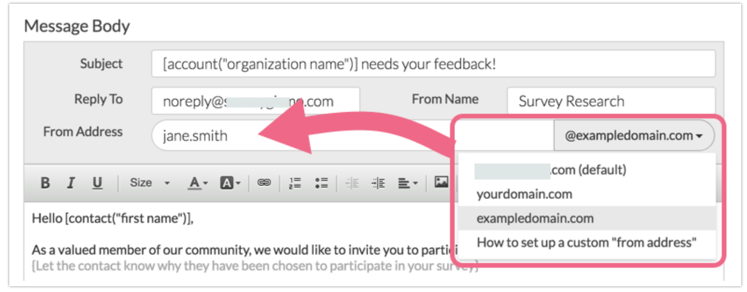
 - If no default is selected, locate the From Address field and click the domain dropdown menu to select your DKIM & SPF integration. Each integration will be identified by the domain and internal title that was provided during setup. Make sure your titles are unique and meaningful to simplify this process.
- Select your DKIM & SPF integration and see the From Address populated with the Default From Address (entered during setup).
Unlike the SMTP integration, you can customize the portion of the email address before the @ symbol. The domain portion of the email address cannot be customized without selecting another integration.
You can also choose to use the surveygizmo.com (default) option, which will result in the noreply@surveygizmo.com address being used as the From Address. - When you have finished with your From Address customization, make sure to Save Message.
 If you configured your DKIM & SPF integration as the default for all actions and campaigns, you will see it pre-populated in the From Address field.
Option 2: Send Email Using SMTP
SMTP (Simple Mail Transfer Protocol) allows you to send your SurveyGizmo emails from your own email server (or a third party provider e.g., SendGrid). This generally results in improved deliverability and will help your email avoid recipients' spam/junk folders.
- SMTP servers are TLS-only. Self-signed certificates are not supported.
- SurveyGizmo is not responsible for the deliverability of email sent via your SMTP server.
- SurveyGizmo cannot report on delivery/bounce rates for emails sent via your SMTP server.
- Sending via SMTP is not subject to SurveyGizmo's Email Limits but is subject to Limits of of your SMTP server.
- Sending via SMTP is not subject to SurveyGizmo's group email requirements (make sure to check with your Email Service Provider to make sure that sending to group email addresses is supported).
- Sending via SMTP does not alter the process in which contacts are unsubscribed from your campaigns. Learn more!
When using SMTP users are limited to the parameters of the email server in use. For example, SendGrid allows for 5,000 sends per connection. Always check the limitations of the email server being used to send emails before scheduling sends in SurveyGizmo. We strongly recommend adhering to the limitations of the SMTP server in place.
Your SMTP endpoint must allow Auth Login to ensure a successful integration. SurveyGizmo does not support unauthenticated SMTP integrations.
Set Up SMTP
In order to configure your SMTP integration, you will need to be a SurveyGizmo Account Administrator. You will also likely need to loop in your organization's IT Team to gather the information regarding your organization's SMTP server.
- In SurveyGizmo from the Left Hand Navigation menu select Integrations > Data Connectors.
- Scroll down to the Enterprise Level Integrations section and locate the Custom Email Settings option. Click Configure to get started.

- On the Setup tab, provide an Integration Name. This is the internal title that will be used to identify this integration in Email Actions and Email Campaigns. It is important to make this name something meaningful like SMTP for surveygizmo.com. If you set up multiple Custom Email Integrations, make sure your names are unique to avoid confusion down the road.
- Determine whether you want this integration to serve as the default SMTP server for any Email Actions and Email Campaigns that are created going forward. Only one Custom Email Integration can be set as default (you can always change this setting later).
The option to Use this integration as the default for all new email invitations and email actions will be selected automatically. Feel free to un-check the box if needed. - Select Send emails using your own server (Setup SMTP). This will expose the SMTP Settings where you will provide the information necessary to finish the setup.
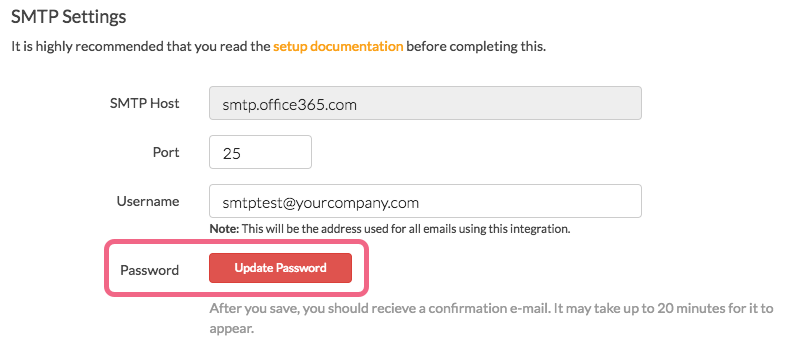
- Input your SMTP Host, Port, Send From Address, Username, and Password. The following ports are supported (learn more):
- 25
- 465 - While this port is supported it is technically deprecated for secure SMTP and is only available for backward compatibility with older systems. If you use 465, double check that your server supports starttls.
- 587 (recommended) - used by modern email servers for secure submission of email for delivery. We recommend using port 587 with TLS enabled to ensure that emails are encrypted during transmission.
 Important! The email address input via the Send From Address field will serve as the email From Address for all Email Actions and Email Campaigns that are sent via this integration. It must be a real email address.
- 25
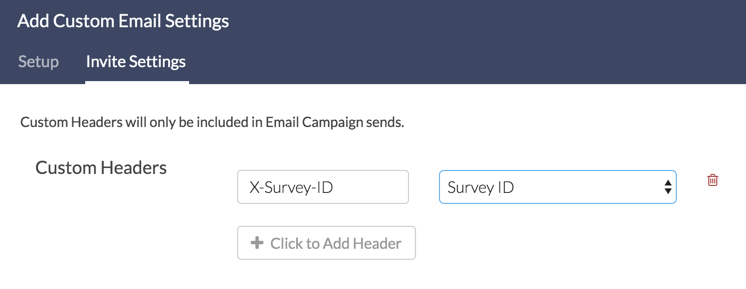
- (Optional) Next, you have the option to configure Custom Headers for use in your Email Campaign messages only. To do so, click on the Invite Settings tab during setup. You may include up to 10 custom headers in key-value pairs (combined character limit of 79).
- Click the Add Header button and provide the name of the header.
- Your header name must be pre-fixed by an X, for example X-Survey-ID.
- Hyphens are the only special characters allowed in this field.
 Certain values are prohibited from being used as Custom Headers. View the list in the FAQ section.
- Next, use the Select a custom header dropdown menu to choose from four available options:
- Survey ID - The unique ID for the survey
- Contact SGUID - The unique sguid value for the contact
- Campaign ID - The unique ID for the email campaign
- Text Field - Use the text field to pass in a value to the custom headers, for example, the survey's name. The Text Field supports JSON format as well as the following merge codes to pull in Survey ID, Campaign ID, and the Contact SGUID information:
- Survey ID:
[survey('id')] - Contact ID:
[contact('sguid')] - Campaign ID:
[campaign('id')]
- Survey ID:
- Click the Add Header button and provide the name of the header.
- Make sure to Save your integration once you have provided the necessary information. Upon saving the integration, a confirmation email will be triggered to the email address associated with your SurveyGizmo user.


 Important! The email address input via the Send From Address field will serve as the email From Address for all
  Certain values are prohibited from being used as Custom Headers. View the list in the
The confirmation email may take up to 20 minutes to arrive in your inbox. This email is triggered each time you save your integration.
Once the email arrives, click on the confirmation link to finalize your SMTP integration (the confirmation link will not expire).
Now, your integration is ready to use in Email Actions and Email Campaigns!
Configure Email Actions to Use SMTP
Once your SMTP Integration is configured (and you have verified this via the confirmation email), the email address entered into your SMTP Send From Address field will be ready for use as the email From Address for Send Email Actions. (as well as Email Campaigns).
For additional information on Send Email Actions (including setup instructions), visit our tutorial.
To use your SMTP integration to send your Email Actions, follow the below steps:
- Create a Send Email Action (or edit an existing one) and access the Primary Setup tab to locate the From Address field.
- If you have elected for your SMTP integration to be the default for all new Email Actions, it will be pre-populated in the From Address field.
If no default has been set, click the domain dropdown menu and select your desired SMTP integration. Each integration will be identified by the domain and internal title that was provided during setup. Make sure your titles are unique and meaningful to simplify this process.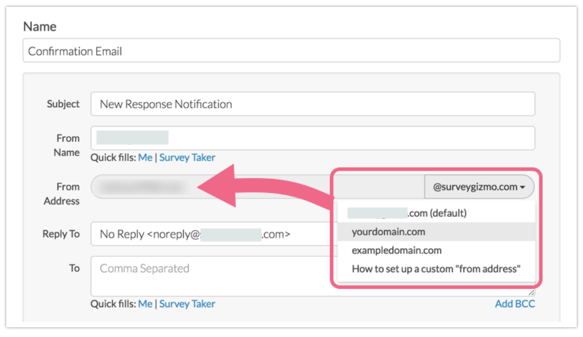
- Select your SMTP integration and see the From Address populated with the associated email address (this is pulled from the integration's Send From Address field and cannot be updated here). You can also choose to use the surveygizmo.com (default) option, which will result in the noreply@surveygizmo.com address being used as the From Address.
- Make sure you Save Action to finish setting up your Email Action.

Configure Email Campaigns to Use SMTP
Once your SMTP Integration is configured (and you have verified this via the confirmation email), the email address entered into your SMTP Send From Address field will be ready for use as the From Address within Email Campaigns (as well as Send Email Actions). For additional information on Email Campaigns (as well as setup instructions), visit our tutorial.
When sending your Email Campaign messages via your SMTP email server, you are not subject to SurveyGizmo's Email Limits or limitations concerning sending to group emails (we recommend checking with your Email Service Provider (ESP) to make sure that they don't have their own restrictions). In addition, SurveyGizmo is not responsible for the deliverability of your emails when sent via your server.
To use your SMTP integration to send your Email Campaigns, follow the below steps:
As a best practice, we recommend configuring SMTP on email campaigns that you have not yet sent out from SurveyGizmo. If you have already sent and initial invite via SurveyGizmo, configuring that campaign to use SMTP for reminders, etc. will result in not being able to use the campaign statistics.
- Access your Email Campaign (or create a new one) via your Share tab and on the Campaign Designer page, click the Edit Message link.
- If you configured your SMTP integration as the default for all new email actions and campaigns, you will see it pre-populated in the From Address field.
If no default is selected, locate the From Address field and click the domain dropdown menu to select your SMTP integration. Each integration will be identified by the domain and internal title that was provided during setup. Make sure your titles are unique and meaningful to simplify the selection process.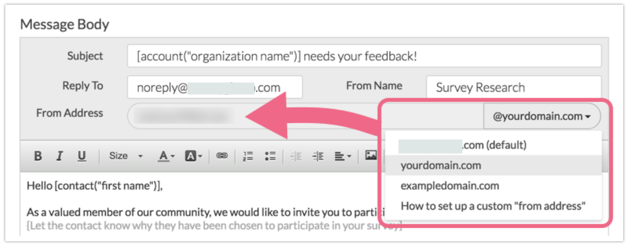
- Select your SMTP integration and see the From Address populated with the associated email address (this is pulled from the Send From Address field in your integration and cannot be updated here). You can also choose to use the surveygizmo.com (default) option, which will result in the noreply@surveygizmo.com address being used as the From Address.


FAQs
Why did SurveyGizmo implement SMTP and DKIM/SPF?
Most Email Service Providers (ESPs) i.e Mailchimp, Mailgun, and SendGrid require setting up either an SMTP integration or custom DKIM/SPF records in order to send from a custom 'from address'.
By providing these options to our customers, we are following an industry standard in order to help increase email deliverability. By using either SMTP or DKIM/SPF to send email, you are decreasing the likelihood of your emails getting caught up in SPAM filters - while also avoiding 'Email Spoofing'.
Do I need to use SMTP or DKIM/SPF to send email from SurveyGizmo?
Only if you need to customize your from address. If you don't need to customize your email from address, you can continue to send Email Actions and Email Campaigns using the default noreply@surveygizmo.com address.
My SMTP password has changed, can I update it in SurveyGizmo?
Absolutely! Access your Integrations page via Account > Integrations > 3rd Party Integrations. Locate your SMTP integration and click the Edit link to open the SMTP settings.
Click the Update Password button and input your new password. Make sure to Save your updated integration to send a new confirmation email.
A new confirmation email will be triggered to the email address associated with your SurveyGizmo user.
Can I set up multiple Custom Email integrations, is there a limit?
You certainly can add multiple Custom Email Integrations. We do not currently have a limit in place for the number of Custom Email Integrations that you can add.
What port should I use for SMTP?
SurveyGizmo supports ports 25, 465*, and 587. We recommend using port 587 with TLS enabled to ensure that emails are encrypted during transmission.
Often Email Service Providers (ESPs) work with specific ports and may communicate that with you. We have confirmed that the following ports work with the provided SMTP Hosts:
| SMTP Host** | Port |
|---|---|
| smtp.office365.com | 25 |
| smtp.mandrillapp.com | 587 |
| smtp.sendgrid.net | 587 |
| smtp.mailgun.org | 25 |
*While this port is supported it is technically deprecated for secure SMTP and is only available for backward compatibility with older systems. If you use 465, double check that your server supports starttls.
**If you find that one of the above SMTP Hosts (or another one altogether) works with additional ports, please let us know and we will add it to the above list!
Learn more about these options from a June 2016 Sparkpost article.
Can I use my SMTP or DKIM/SPF integration when emailing Reports or Exports?
The Custom Email Integration is currently available for Send Email Actions and Email Campaigns only.
Can I use both SMTP and DKIM/SPF Integrations at the same time?
While you can create separate SMTP and DKIM/SPF integrations for your SurveyGizmo account, you can only use one or the other for any given email action or email campaign. If you have not set up a custom email integration, all emails will send via SurveyGizmo servers with the default noreply@surveygizmo.com from email address.
I'm not receiving the email to confirm my SMTP integration.
- Please note that the confirmation email can take around 20 minutes to arrive in your inbox.
- Make sure that you check your spam/junk folder in case the confirmation email was routed there.
- The email will not trigger if any of the information provided (username, password, and port) is incorrect. We recommend confirming that all information is correct prior to contacting the SurveyGizmo Support Team.
If I want to use multiple/different from addresses, do I need multiple integrations?
This depends on whether you are using the SMTP option or the DKIM/SPF option:
- If you need to send via SMTP, a separate integration is needed for each unique email address. For example, one integration for jon.smith@company.net, and a second integration for jane.smith@company.net.
- If you are instead sending via the DKIM/SPF option, you configure the domain portion of the from address (e.g. @company.net) and can customize the rest of the from address within each Send Email Action or Email Campaign.
How are unsubscribed contacts handled when using a Custom Email Integration?
Whether you are sending Email Campaigns via the default SurveyGizmo options (from noreply@surveygizmo.com) or via a Custom Email Integration (SMTP, DKIM & SPF), unsubscribed contacts are handled in the same way.
Should a recipient of an email campaign sent from your account click the unsubscribe link, they will not receive further invites from any campaigns or surveys in your account. Learn more about contact statuses.
Are you using Gmail SMTP and having authentication problems?
If you unable to authenticate your Gmail account via SurveyGizmo, you may need to Let less secure apps access your account. Visit the Google Documentation article to learn how.
Can I include Custom Headers in my emails using SMTP?
Yes, Customer Headers can be defined during the integration setup process in SurveyGizmo. Keep in mind that custom headers are only available for Email Campaign messages and not messages sent via Send Email Actions.
Are there values that cannot be placed in Custom Headers?
Yes, the following values are blacklisted and cannot be used in your invite Custom Headers:
- 'authentication-results'
- 'auto-submitted'
- 'cc'
- 'content-alias'
- 'content-base'
- 'content-disposition'
- 'content-id'
- 'content-identifier'
- 'content-length'
- 'content-transfer-encoding'
- 'content-type'
- 'date'
- 'encoding'
- 'from'
- 'lines'
- 'mail-system-version'
- 'mailer'
- 'message-id '
- 'mime-version'
- 'originating-client'
- 'received'
- 'received-spf'
- 'reply-to'
- 'return-path'
- 'subject'
- 'to'
- 'vbr-info'
- 'x-complaints-to'
- 'x-errors-to'
- 'x-mailer'
- 'x-originating-ip'
- 'x-report-abuse-to'
Known Issues
If your SMTP endpoint has two-factor/multi-factor authentication enabled, that functionality needs to be disabled for the user used to set up the SurveyGizmo the integration. A common approach is to use an ‘app’ or ‘api’ user that is configured without the use of two-factor/multi-factor authentication.
— Brian on 03/23/2018
When sending a reminder via SMPT, will reminders be sent only to those who have not submitted a survey?