The Send Email action allows you to send an email at the completion of your survey to respondents, colleagues, yourself or anyone else you need to notify! This action gives you the flexibility to customize what is sent, from a simple notification of a survey response to a full PDF review of responses with links to any uploaded files.
You can use the Send Email action to send your survey respondents a quick thank-you message, a follow-up on a negative customer experience, or simply mail a copy of the survey results to yourself... and that's just scratching the surface.
Best Practice Tip
The Send Email action works best on the Thank-You page so it can reference all data collected in the survey. If you wish to include response data in your email, you must place these actions on pages that follow questions you want to include.
Setup
- Add your Send Email Action to the desired page in your survey.
More often than not, you'll want to set up an email to send at the end of your survey, once you've collected data. To do so click the Action link at the bottom of the Thank You Page (or one of the Confirmation Email buttons in the Getting Started Guide).
Note: If you want to add your email action to a page other than the Thank You page, click the Action link corresponding to that page.
- Provide a Name for your Send Email Action - this is an internal name that will not be visible to your survey respondents.
- Customize Your Email Subject ("New Response Notification" by default). You can use merge codes in the email subject to dynamically populate with the answers from the survey response itself. The easiest way to set this up is to use the merge code helper that is available in the message body to find the merge code for the survey question(s) you wish to use in the email subject.
Check out this quick demo of adding merge codes to the email subject:
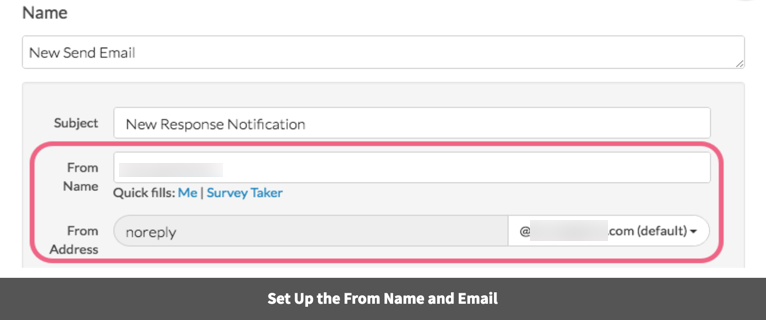
- Set up the From Name which will be populated with SurveyGizmo will display as the from name and address in the message. If you need to set a custom From Address you will need to create a Custom Email integration. You will need to be a SurveyGizmo Account Administrator and likely will need to loop in an IT professional at your organization. Learn how to use a custom From Address to send email from SurveyGizmo by visiting our Custom Email Settings Tutorial.
 If you have a Custom Email integration, you can choose your from address via the dropdown menu available in the From Address field (if it has not been populated by default).
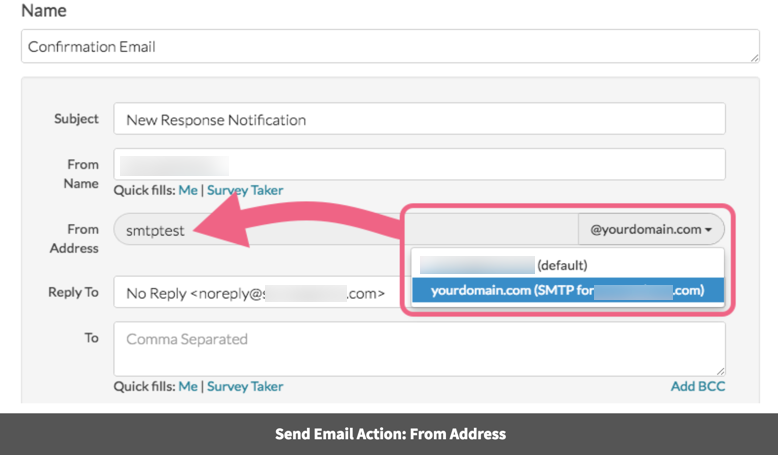
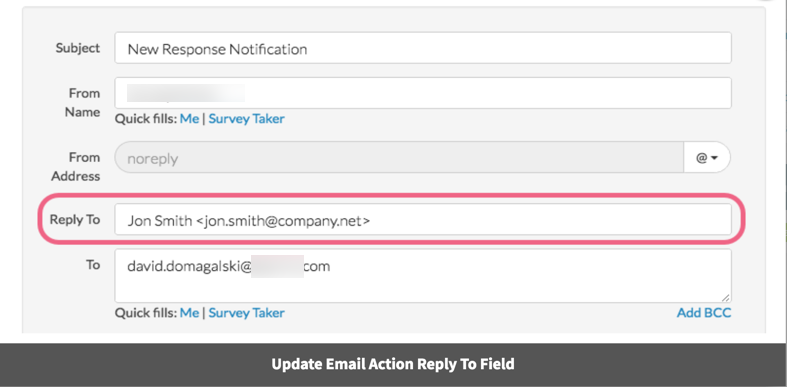
- (Optional) Set Up Your Reply To Name and Email Address.
If you wish to receive replies, you can specify a Reply To Name and Address. This can be different than what is set up in the From Name and Email. This is especially useful when the person who will follow up with respondents is not necessarily the person from whom the email should appear, i.e. a teaching assistant responding on behalf of a professor.
Note: The Reply To field accepts an email alias in the format of: alias <email address> as shown below:
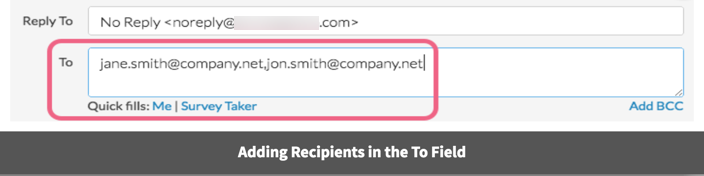
- Add your recipient(s) to the To field. We recommend adding no more than 5 recipient email addresses, separated with commas (no spaces).
 You can use the Quick fill links to populate the To field with either your SurveyGizmo account email address or an email address collected earlier in your survey.
 Click Me to populate the To field with your account email or Survey Taker to identify the survey question that collects your respondent's email address.
 Select the question and click Save to see the question merge code inserted into the To field.
- (Optional) Add a BCC. Click the Add BCC link found below the To field to access the BCC field
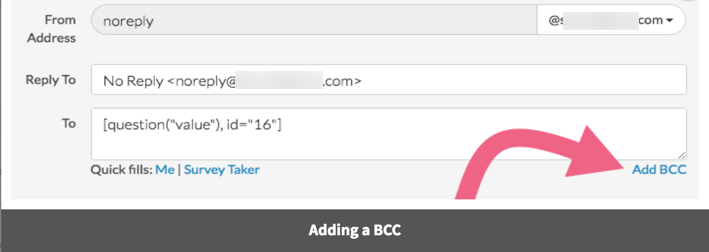 To BCC multiple email addresses, separate them with commas (no spaces). If an email fails to send in this list, all emails that follow it will also fail, so make sure to triple-check your addresses!
 - Customize Your Message Body
The default message body will contain some instructions and sample text that you will want to delete. Click into the Body field, delete the placeholder content and begin customizing your message.
By default, you are working in the HTML Message Body. A Plain-text version of your email is automatically generated based on your HTML version as long as the default Automatically generate plain-text version setting remains checked.
If you wish to customize your own plain-text email independently of the HTML version, uncheck the Automatically generate plain-text version setting. The Plain-Text Message Body field will become available and you can make edits independently of the HTML body. Remember, if you are taking advantage of both Plain-Text and HTML Versions, to make edits in both places!


 If you have a Custom Email integration, you can choose your from address via the dropdown menu available in the From Address field (if it has not been populated by default).


 Click Me to populate the To field with your account email or Survey Taker to identify the survey question that collects your respondent's email address.
 Select the question and click Save to see the question merge code inserted into the To field.
 To BCC multiple email addresses, separate them with commas (no spaces). If an email fails to send in this list, all emails that follow it will also fail, so make sure to triple-check your addresses!
Including Survey Response Details in Your Message
To include values entered in the survey response in your email messages you can use the Merge Codes menu (available in the bottom toolbar).
For example, say you want to include all of the respondent's answers in your message content. All you need to do is click Merge Codes below the message. The Merge All Questions option will include the text and the response that was entered for all the questions in your survey in the message body.

If you only wish to include a question or two, place your cursor in the message body where you wish to add the question and select the survey question in the dropdown menu.
The merge code will be added at cursor.
Applying Logic to Determine When Email is Sent
If you'd like to set up rules for when the email is sent, click on the Logic tab along the top. This is where you can set up the conditional logic that determines when this email is sent. If no logic is set here, the email sends for every response that reaches the page that the action was added to.
Check out our tutorial on Using Logic to Send Different Email Notifications to learn more!
Attaching a PDF of the Response
On the Advanced tab the option to Attach a PDF Review creates and attaches a PDF file that includes either all questions or answered questions only.
You can choose to include page titles and numbers, question numbers, text elements, quiz score results and hidden values. As far as the questions that are included in the PDF you can choose the include all questions, only those displayed to the respondent, or only the answered questions.
PDF Settings
- In the PDF settings field, you can specify a PDF File Name. The survey title will be used by default. Merge codes are supported in this field!
- Use the PDF Encryption field to provide a password that will be used to encrypt (128-bit encryption) the PDF. The recipient will need to supply the password to open/view the PDF. If no password is input into the PDF Encryption field, the PDF will not be encrypted.
Set Up a Time Delay
The time delay is another popular Send Email action feature. By default, the Send Email action fires when the survey respondent reaches the page where the action is located. If you want to set a timed delay, you can set this up on the Advanced tab. You can specify +10 hours, +23 minutes, +30 days, +6 months or even +2 years! You can also specify the date when you want the action to fire by putting a date in this field using MM/DD/YYYY as the format.
Once you have set a time delay and the action has fired, this delay cannot be changed for messages already queued.
Other Advanced Options
Those are the basic features of this action, so now let's dive into some of the more advanced features you can find by clicking the Advanced tab.
Custom SMTP Server, User, and Password:
The Send Email Action SMTP Server Settings have been deprecated in favor of the Custom Email Settings integration. Existing Email Actions will continue to use the method described below. Newly created email actions (including copies) will be subject to the new process.
Include Link To Uploaded Files: If you have used a File Upload question in your survey, this option lets you include links to download all the files uploaded to the survey. A separate link is provided for each individual uploaded file.
Send each time page is rendered: This option allows the action to generate more than one email if this page is displayed more than once. The default is to send one email for each response, but you might find a need for this if respondents loop back to this page due to logic set up in other parts of the survey.
Change From Address in Send Email Actions
To enable using a custom From Email address in Email Actions and Email Campaigns, you must either send from your own (or third party) SMTP server or configure your domain with SPF and DKIM records.
- If you have your own mail server (or use a third party provider such as SendGrid) and wish to send your SurveyGizmo emails via your server, you can setup an SMTP integration. This will allow you to provide a custom From Email address to use with Email Campaigns and Send Email Actions.
- If you need to continue sending emails using SurveyGizmo's email server, you will need to setup SPF and DKIM records on your domain in order to specify a custom From Email address.
Both of these options provide greater security and help mitigate against spoofed emails and spam complaints.
Please visit our Custom Email Settings tutorial to learn how to take advantage of these features! Configuring these Custom Email Settings requires SurveyGizmo Account Administrator access.
Alternative Option: Change the Reply To Email Address in Send Email Actions
If you are not able to utilize either SMTP or DKIM & SPF to customize your From Address, consider updating the Reply To Email Address on the Primary Setup tab.
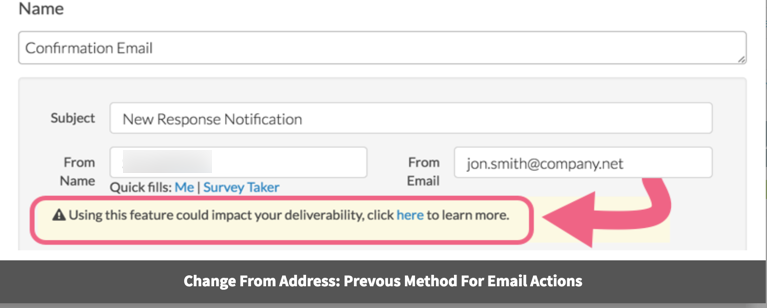
Longtime SurveyGizmo customers might recall changing the From Email Address within Send Email Actions via the From Email field located on the Primary Setup tab of the action. This process could often result in degraded email deliverability.
As of June 30, 2017, SurveyGizmo has retired the above process for customizing your Send Email Action From Address. Any existing Email Actions will continue using the above process, though any newly created (including copied) actions will be subject to the below process.
Troubleshooting & FAQ
Having trouble getting the content you've created to show up in your test emails?
If you have elected to manually edit the Plain-Text Message Body, make sure to double-check both the Plain-Text and HTML versions of your content in your message body. If you make changes to one version, you'll also need to update the other so that they match. Most recipients will see the HTML version.

How do I know if the email was sent?
On the Details tab of each Individual Response found on the Responses tab, you will have a success or fail message on the page with the Send Email action. You can re-fire the action from here, if needed.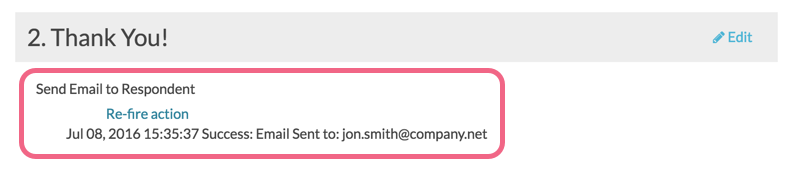
Why are my emails not being sent?
Here are a couple of things to check for if your emails are not being sent:
- Check your spam folder. Depending on your email client, messages sent from notifications@sgizmo.com might be flagged as spam. If you find messages in your spam folder be sure to indicate that they are not spam and this will likely fix up the trouble.
- Check the addresses in the recipient email address field. Confirm the address themselves are correct as well as the formatting. Multiple emails must be separated with commas and no spaces.
- Depending on your network security you may need to whitelist our domain in order for emails to come through. See our SPF record documentation for more info.
Limitations
- Email actions can’t be on the same page as the field where you collect the Send To email address.
- Email actions can’t be on a page by itself or with just a page description as this page will be skipped and thus the email action will not fire.
— Mike.cordeiro on 05/06/2020
@Tim: Thank you for reaching out!
If you are using the PDF feature in your email actions, select the Advanced tab when editing the action and select, “Only include answered questions.” This will display only questions populated by respondents.
I hope this helps!
Mike
Technical Writer
SurveyGizmo Learning and Development
— Tim on 05/06/2020
is there a way to only include responses from 'answered' questions?
Admin
— Dave Domagalski on 07/17/2019
@Strategic: Thank you for your question!
We shy away from advising on verbiage concerning how you will use your respondents' responses/data.
It's important to note that even with the anonymous setting enabled, once a respondent provides identifying information in a survey (such as an email), their response is no longer anonymous as their survey answers can now be tied to their email address.
As a potential alternative, I would suggest using the Review Action:
https://help.surveygizmo.com/help/review-response-action
This action would allow respondents to download a PDF summary of their response without providing an email, and as such takes any potential gray area out of the equation.
I hope this helps!
David
Technical Writer
SurveyGizmo Customer Experience
— Strategic on 07/17/2019
We are sending out a survey and want to let participants know that their responses are anonymous...but in order to send them a summary of their responses, we need them to enter their email
What is a good, short message to include explaining that email is only for sending them their responses and not for anything else?
Admin
— Bri Hillmer on 03/06/2019
@Brennan: Custom delays per response are not available out of the box. This is the kind of customization that our Professional Services team could tackle for a fee. You can learn more about Professional Services here:
https://www.surveygizmo.com/programming-services/
Bri Hillmer
Documentation Coordinator
SurveyGizmo Customer Experience Team
— Brennan on 03/05/2019
Hi,
Would it be possible to set a time delay for a send email action based on a response within a survey?
E.g. I want to remind people to exercise once every three days.
As such, I'll ask a question, 'When was the last date you exercised?'
and I want to send an email with a two days delay based on the question above.
As such, the current time delay, which is based on the system date, might not work for this.
Please advise on how i can go about with it.
Thank you.
Admin
— Dave Domagalski on 12/06/2018
@Deb: Thank you for your question!
You can certainly include a link in your email to allow respondents to reaccess their original form/response.
This is accomplished with the use of an 'edit link' as described here:
https://help.surveygizmo.com/help/send-an-edit-link#set-up-an-automated-email-to-send-respondents-an-edit-link
I hope this helps!
David
Documentation Specialist
SurveyGizmo Customer Experience
— Deb on 12/06/2018
I would like to create an email action to fire 2 years after our form is submitted for the respondent to review and update their information. How can I include a link to the respondent's original survey form? I don't want to merge their information into the email (its too lengthy) plus I need them to be able to edit any changed information.
Admin
— Dave Domagalski on 10/09/2018
@Jane: Thank you for your question!
I'm sorry for the lack of clarity. The 'include link to uploaded files' option will result in a separate link to download each individual file.
I'm afraid that there is not an option to have just one link to download all files that were uploaded by a respondent via the email action.
Having said that, the Bulk File Export will allow you to download all files that have been uploaded to your survey in bulk. If this is of interest, the below article should be a good place to start:
https://help.surveygizmo.com/help/bulk-file-export
I hope this helps!
David
Documentation Specialist
SurveyGizmo Customer Experience
— Blaze on 10/08/2018
"Include Link To Uploaded Files: If you have used a File Upload question in your survey, this option lets you include a link to download all the files uploaded to the survey."
I thought this meant that there would be 1 link from which you could download all the uploads .... but it looks instead as if there is a link for each and every upload. Is it possible to have just one link in the email action that will result in being able to download all the uploads in one go?
Admin
— Bri Hillmer on 08/15/2018
@Dave: We have the following description for using delay.
You can specify +10 hours, +23 minutes, +30 days, +6 months or even +2 years! You can also specify the date when you want the action to fire by putting a date in this field using MM/DD/YYYY as the format.
We're actually using a function that translates nearly any text string to a time but I will work with the developers to get some more concrete details on the syntax for this field.
Bri Hillmer
Documentation Coordinator
SurveyGizmo Customer Experience Team
— Stevie on 08/15/2018
I'm not able to find documentation on the specific semantics for a time delay. For one minute would it be +1 minute or +1 minutes? Can I put the delay in as a MM:SS format? Any additional information on delays, would be very helpful.
Admin
— Dave Domagalski on 01/23/2018
@Jennifer: Thank you for your question!
It sounds like maybe you are using a Drag & Drop Ranking question. If that is the case, what you are looking to do is possible.
This does require a bit of merge code manipulation - specifically using the 'delimiter' attribute, as discussed here:
https://help.surveygizmo.com/help/merge-code-customizations
In your scenario, the following merge code should do the trick:
<ol>
<li>[question("value"), id="2", delimiter="</li>
<li>"]</li>
</ol>
This merge code needs to be pasted into the 'source' code of the email message, as illustrated here:
https://www.screencast.com/t/Szzeg2IbaTH
Keep in mind that you will need to replace the id=2 in the example with the specific ID number of your actual question.
I hope this helps! Please don't hesitate to reach out to our Support Team if you need assistance implementing this.
David
Documentation Specialist
SurveyGizmo Customer Experience
— Jennifer on 01/23/2018
I have a survey with a dropdown menu question (allowing up to 5 responses). When I send the confirmation email, I want to include the answers provided...but only if they are not null and with no extra spaces. For example:
Favorite colors:
1. Blue
2. Purple
vs
Favorite colors:
1. Blue
2. Purple
3.
4.
5.
Is this possible?
Admin
— Bri Hillmer on 05/05/2017
@Cheryl: Our Send Email Action emails do not have unsubscribe links as there is no contact list to link back to in order to unsubscribe a contact.
As far as the CAN-SPAM law, these kinds of emails would be considered Transactional or Relationship-based as it facilitates an already agreed-upon relationship; as such, they are exempt from the CAN-Spam requirements.
I hope this helps!
Bri Hillmer
Documentation Coordinator
SurveyGizmo Customer Experience Team
— Cheryl on 05/04/2017
Our plan is to have the auto-response email provide product information via email based on respondent answers. Do we need to have an unsubscribe option? If so, how do you suggest doing this since these are potential new customers that are not part of an existing list?
— Andrew on 03/20/2017
Hi, I am creating an HR survey and want an email to be sent a different HR Specialist depending on the Inquiry. For Example: If the respondent is asking about benefits, I want an email to go to Sally. If the inquiry is about Payroll I want it to go to Bob. Is there a way to do this?
Admin
— Bri Hillmer on 01/23/2017
@Ghanshaw: There is not currently an option to insert charts or graphs into the send email action emails.
Bri
Documentation Coordinator
SurveyGizmo Customer Experience Team
— Ghanshaw on 01/21/2017
This is very helpful. I have the email set up and data averages in the email using insert merge code. Is there anyway to get a graph into the automated email?
Admin
— Bri Hillmer on 09/19/2016
@Martin: We do not have the ability to send a custom attachment.
Bri
Documentation Coordinator/Survey Sorceress
SurveyGizmo Customer Experience Team