The Payment Form allows you to set up an order form or donation form for purchasers to select various products and services and submit a payment! We've integrated with Stripe to bring you the ability to have your survey respondents make payments from within your surveys!
Stripe Integration Setup
- Sign up for a new Stripe account at https://dashboard.stripe.com/register (or login to your existing Stripe account).
- You'll receive activation instructions in your inbox but you can get started right away in Test mode.
- On your Stripe Dashboard, go to API.
- Copy both the Publishable Key and Secret Key (you will need to click Reveal test key token in order to obtain this). You'll be in test mode if you've just signed up. Once you activate, you can toggle the View test data option to get your live Publishable and Secret Keys.

- Log in to SurveyGizmo and go to Account > Integrations > 3rd Party Integrations.
- Click Configure on the Stripe option and paste your Test and Live Secret and Publishable Keys. You'll want to have both so that you can test as well as collect live payments; SurveyGizmo will use your test keys in survey preview and in test responses.
- Click Save.

Set up a Payment Form
With your integration with Stripe set up, you're ready to create a Payment Form.
- From the SurveyGizmo home page, select Payment Form from the Create Survey dropdown.You can add a Payment action to other project types (Surveys, Quizzes and Forms) however, the overall Question Amount field will not be available within the question editor in these project types!
Make sure that the payment form action is always on a page that follows the questions it evaluates. It should also not be placed on a page that is set to auto-submit.
- Name your Payment Form and click Start Building.
- The Payment Form will default to collecting payments in the currency specified for your account under Account > Summary > Account defaults > Default Currency (this defaults to US Dollars). If you wish to change this for all surveys go to the above and change the Default Currency. If you wish to change this on this one survey go to Tools > Payment Form Settings and select one of the below available currencies in the Payment Form Currency dropdown menu.
- The Payment Form will automatically have a Payment action on the Thank You page. You can move this from the Thank You page but it should always follow your payment form fields.
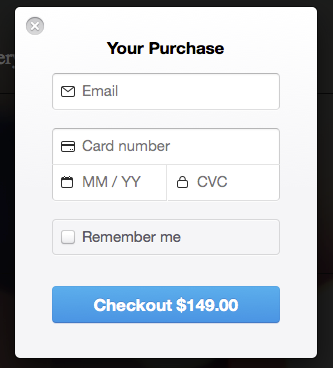
- Set up the payment form questions and options to determine what is being purchased and how much to charge. Please read about the various Payment Collection Formats to get an understanding on how you might set up your questions.
- Once you have each of your items set up in your Payment Form, scroll to your Payment Action (this is typically on the Thank You page) and click Edit.
- Edit your payment action Name as this will display to respondents. If you would like, you can add Payment Summary Page Instructions which will display along with the payment action Name (this is typically the Thank You page).

- The Payment Description will pass to the Description field of Payment details in Stripe. It will also display to respondents when they provide their billing info. You can enter a static value like "Mobile Phone Purchase" or you can use merge codes to pull in the respondent's selected items from your survey.

- You can also customize the Payment Button Text which will display along with the payment action Name and Payment Summary Page Instructions (this is typically the Thank You page). Respondents will need to click this to launch the payment box.
- Next, click the Bulk Edit Prices link to assign your prices to your questions and options.

- On the Metadata tab you can send over up to fields to the the Metadata field in Stripe to assist with identifying payments. To set this up click Add to Metadata. Enter a Key Name (this field has a limit of 40 characters in Stripe). In the Value field select the question in your Payment Form that contains the value you wish to send for this key name (this field has a limit of 500 characters in Stripe).

- Test your Payment Form. See Testing your Payment Form.
- Once you have fully tested your payment form, you are ready to send out your form! and send out your form! You can email a link, embed on your website, or send it out to contacts via an email campaign!


Payment Collection Formats
With the exception of table questions, all question types are available to have payment amounts assigned. For some question types you can assign an amount to the overall question, as well as, each answer option. The following Payment Collection Formats are available to be built out in your Payment Form:
Option Selection
Option selection allows your purchaser to select an option or options from a list. A question amount can be assigned to the overall question as well as each option. This will add the option amounts to the overall question amount when displayed to the purchaser:

Compatible Question Types
To set up a question to use the option selection payment format create one of the above question types with each of your options. Then, edit your Payment Action and click the option to Bulk Edit Prices and add the (Optional) Question Amount and Option Amounts.

Tips for using a Radio Button question to collect variable amounts:
- If you are using a Radio Button question, we recommend adding a "Reset" answer option that is set up with both the Not Applicable Special Setting and a $0 amount as radio buttons cannot be deselected. An answer option with the N/A Special Setting will allow purchasers to reset their selections.

Quantity Entry
Using either a Textbox List question or a Continuous Sum question you can collect quantities of a given item for purchase. This will multiply the quantity by the price specified for each product (option).

Compatible Question Types
To set up a question to use the quantity entry format create one of the above question types. When adding the various options we recommend adding the dollar value you will be assigning (the Payment Action will not add this automatically as with other question types).

Next, edit your Payment Action and click the option to Bulk Edit Prices and add the (Optional) Question Amount and Option Amounts.

Tips for using the Textbox List or Continuous Sum questions to collect quantities:
- If you are using a Textbox List to collect quantity entries, you can opt to display the products/items to the left of the text fields on the Layout tab of the question by selecting the option Place labels on the right side of the input.
- When collecting quantities using either the Textbox List or the Continuous Sum questions, we recommend setting up Number validation on the Validation tab of the question as well as Force Whole Numbers and Force Positive Numbers.

Variable Amount
The Number question type can be marked as Variable Amount field. Purchasers will be charged the value they enter in this field; this is great for donation collections!

Compatible Question Types
To set this up, create a Number question and save. Edit the Number question and go to the Options tab to select the option to Charge the respondent the amount entered in this field.

Tips for using Number questions to collect variable amounts:
- DO NOT change the validation to Currency on the Validation tab.
- Enter a $ (or the appropriate currency symbol) in the Left Label field on the Layout tab.
- If you'd like to collect partial dollar amounts, you can do so by ensuring the the option to Force Whole Numbers on the Validation tab is not selected.
- Change the Textbox Width on the Layout tab to 10 characters or (unless you are collecting really large payments).
Overall Question Amount
This option, available in the Answers tab of a question, as well as in the Payment Action, will increment the total due by the question amount if the question is answered. This field is available on all questions except tables.

Testing your Payment Form
- If you added both test and live secret keys under Account > Integrations > 3rd Party Integrations in SurveyGizmo you can easily record a test response by clicking Preview on the Build tab or by clicking New Test Response or Invite Others to Test on the Test tab.
- Run through the form and test that purchasers are being charged as they should be. Make sure to test all possible combinations and scenarios!
- Next, you'll want to test submitting a payment to Stripe. To do so, click Buy Now (or whatever you have changed your button to read). Supply an email address, then use one of the test card numbers provided by Stripe and any expiration date and CVC code to complete a test transaction. Test card numbers can also be referenced by clicking the Test Mode button in the upper right corner.

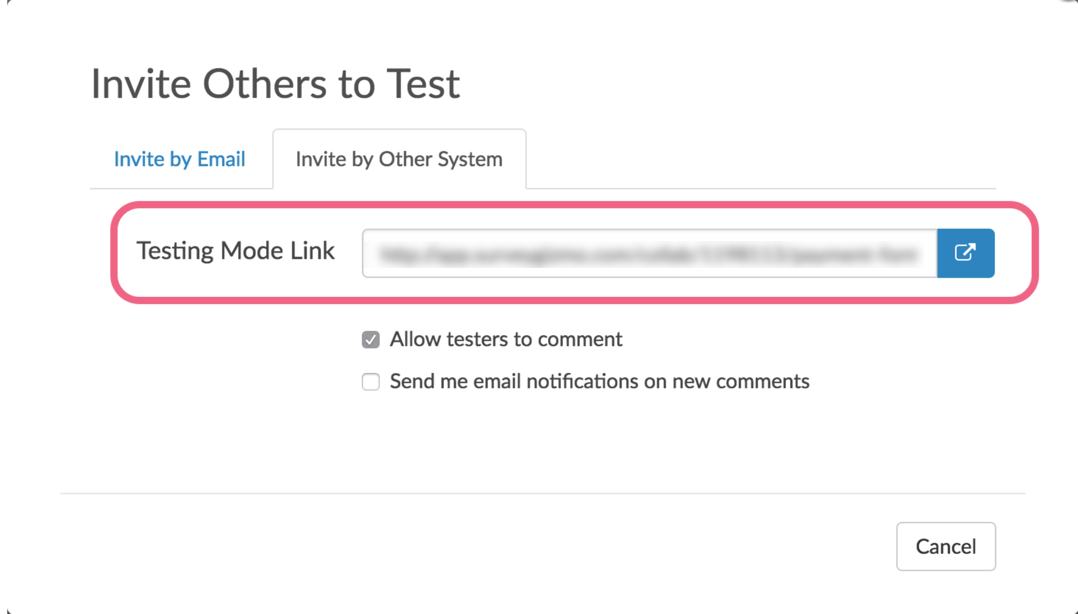
- If you would like to verify that a payment is being created in Stripe, go to the Test tab and click the option to Invite Others to Test. Go to the Invite by Other System tab to access a Test Mode Link. Alternatively, on the Invite by Email tab you can enter your email address to have the test link sent to your email.


Cross-referencing Payments in SurveyGizmo and Stripe
Once the response is processed you will see data about the transaction on the individual response's Data tab. You will see the payment total, Metadata, and Payment ID.

Within Stripe each of these field can be cross-referenced within the payment view.

Send Purchasers a Receipt
At this time we do not have a built-in option for sending a receipt to purchasers but you can take advantage of the Send Email Action to set up a receipt. Follow these steps to set this up!
- First, you'll need to move your Payment Action to a page preceding the Thank You page.
- Once you've moved your Payment Action, add a Send Email Action to the Thank You page. This will open a panel for setting up your Send Email Action.
- Customize your Subject to whatever you wish it to read.
- Customize the From Name field.
- From Address and Reply To will default to SurveyGizmo but you can customize these. For Reply To just key a different name and email address. The From Address change is a little more complicated; learn more about changing your from address.
- Under the To field click the link for Survey Taker. In the popup, select the field in your form where you collect the purchaser's email address in the Email Address dropdown menu. Click Save in the popup when you are finished. This will place a merge code in the To field. This merge code will populate on the fly for each response with the purchaser's info.

- For the Message Body delete the default text in the this field. Add the text of the receipt you wish to send. To include payment details, click the Insert Merge Code link in the bottom-right corner of the Message Body field. In the dropdown menu that appears look for your Payment Action, select it and click Insert.

- Click Save Action when you are finished. When sent, your email should look something like the below. Be sure to test to make sure everything is in order!


FAQ
What browsers are supported?
Check out the Stripe (the integration we are using to bring you the Payment Form) Browser Support Documentation: https://support.stripe.com/questions/browser-support-policy
What currencies are available for me to collect payments in?
The following currencies are available within the SurveyGizmo Payment Form:
- $ - US Dollar
- A$- Australian Dollar
- C$ - Canadian Dollar
- € - Euro
- ¥ - Yen / Yuan
- £ - Pound
- ₱ - Peso
- ₨ - Rupee
- ₩ - Won
- ₪ - New Sheqel
- ₤ - Lira
- ₣ - Franc
- ₡ - Colón
- R$ - Real
Can I change the color of the Buy Now button?
You sure can! Copy and paste the below CSS in your survey's theme. To do so go to your Style tab and scroll to the bottom of the survey preview to access the link for the HTML/CSS Editor. Paste the below code on the Custom CSS tab. Replace "green" with a color of your choice or hex code for the color of your choice.
.sg-payment-total .sg-payment-button span {
background:green;
}
Are payment actions available in raw data exports?
They are! Payment actions are available in CSV/Excel exports. The total due and payment ID for each response will export from your payment form.
Are payment actions available for reporting?
The Payment ID from Stripe is available in each Individual Response. Payment actions are not available in any of our report types at this time.
Can I use the Short URL share link option with payment forms?
No, the payment form is not compatible with Short URL share links.
Can I integrate with PayPal or another payment service?
At this time, we only integrate with Stripe for payment collection.
I would like to have more than one payment action in a payment form? Is this possible?
At this time, only one payment form per survey is supported.
Admin
— Andrew Sturtz on 12/05/2019
@MARCUS: That is a great question! When a respondent receives a payment form on a survey, they won’t be able to move forward without putting in proper payment information.
If you are seeing otherwise, please reach out to our support team at support@surveygizmo.com.
Andrew
SurveyGizmo Customer Support Team
— MARCUS on 12/04/2019
Hi, can you prevent the respondent from progressing further through the survey if the payment is not successful?
Admin
— Bri Hillmer on 12/17/2015
Hi there! I just added a new section to this tutorial that covers how to achieve this using the Send Email Action. Check it out here:
http://help.surveygizmo.com/help/article/link/payment-form#send-buyers-a-receipt
I hope this helps!
Bri
Documentation Coordinator/Survey Sorceress
SurveyGizmo Customer Support
— on 12/17/2015
I am curious about a way for the payment form to generate an email back to the respondent that includes the total price that is paid. This would serve as the invoice for both customers paying online with a credit card and also for those opting to mail a check to us. Is there a way to create a total amount purchased line in the confirmation email? Thanks
Admin
— Bri Hillmer on 07/13/2015
@Richard: Thanks for taking a look at our documentation! We don't have plans to implement a way to pay respondents within SurveyGizmo in the near future. We do work with several panel companies however:
http://help.surveygizmo.com/help/article/link/cint-integration
Bri
Documentation Coordinator/Survey Sorceress
SurveyGizmo Customer Support
— Richard on 07/13/2015
This is all good and well, but sometimes we want to pay the respondents (rather than the other way around). When will this be implemented?