The data uploaded with your contacts will be stored and available in the Email/SMS Campaign Contact Fields to set up logic in your surveys and to use in filtering in your reports. This data will also be available in your Individual Responses and will export with the data collected in your survey.

Use Contact Data in Email Invite Messages
Any data uploaded along with your contacts' email addresses can be used in your email campaign invite messages. Say, for example, you upload your contacts' first and last names; you can then personalize the greeting of your invite message with this data using a merge code.
Follow these steps to use data about your contacts to personalize your invite messages.
- Within your Email Campaign, go to the Campaign Designer and edit the message you wish to customize. The default message text already includes the merge code for first name.
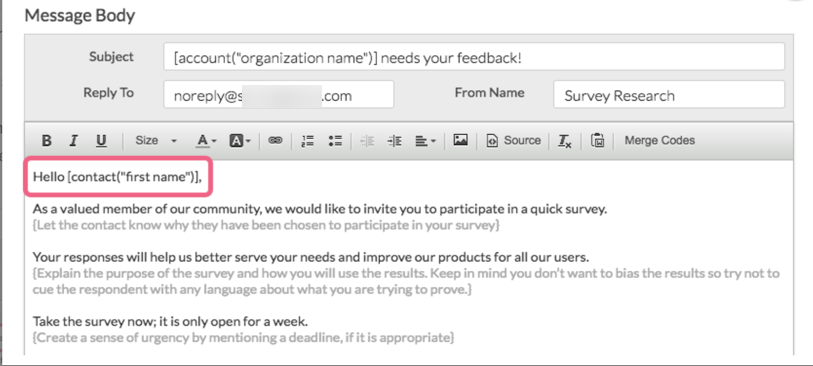 Let's imagine we deleted the default text in order to write our own custom message. To add the first name back...
 - Place your cursor where you wish to insert the contact's fist name and, using the Merge Code dropdown on the editor toolbar, select the merge code with the data you wish to use.
In the below example, we inserted the merge code for first name in the salutation. This merge code will populate with each contact's first name when they access their unique survey link.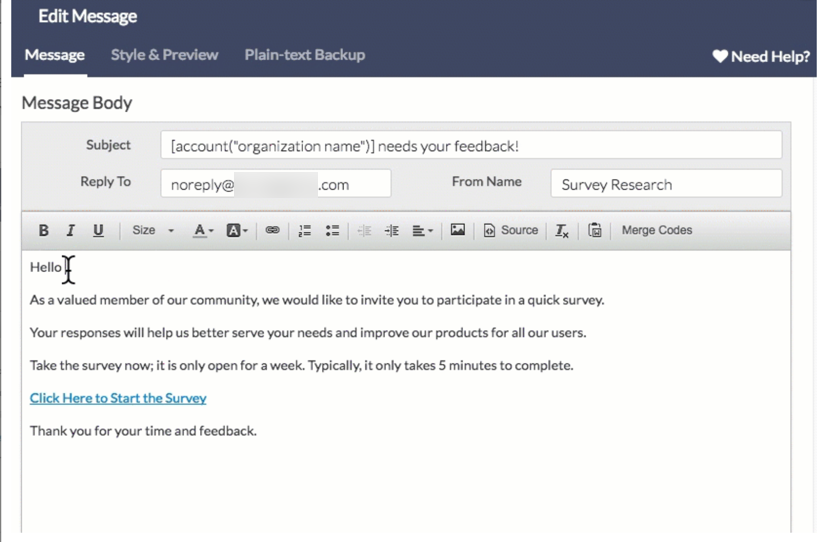 For a complete list of fields available for storing data with email campaign contacts and their associated fields check out the merge code reference.
Use Contact Data in SMS Invite Messages
While Email Campaign messages allow you to use any data uploaded along with your contacts' email addresses in the body of the email message, this is not the case in SMS messages.
SMS messages are limited to 160 characters. Your SMS message allows for using two merge codes:
[invite(survey_link)]- This is a required merge code and will reserve 30 characters.[contact("first name")]- This is an optional merge code and will reserve 10 characters.
The survey link merge code will be included in SMS messages by default and cannot be removed. If you want to include the [contact("first name")] merge code in your message*, follow these steps:
- Within your SMS Campaign, go to the Campaign Designer and edit the message you wish to customize.
- Place your cursor where you wish to insert the contact's fist name and click the Contact First Name link below the message. The
[contact("first name")]merge code will be inserted at the cursor.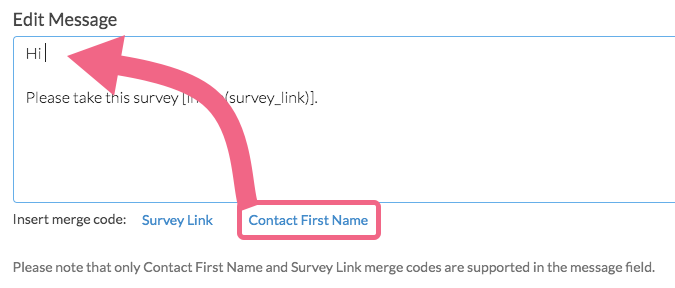
*This limitation applies specifically to the SMS message content. If you have uploaded additional contact fields as part or the contact file for your SMS campaign, these fields can still be pulled into your survey and used for reporting purposes.
Use Contact Data in Question Text
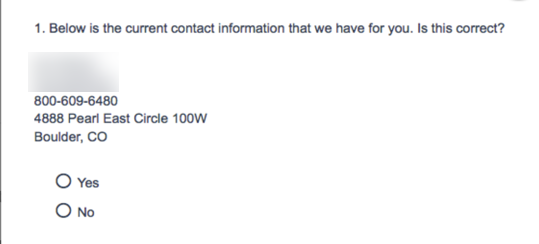
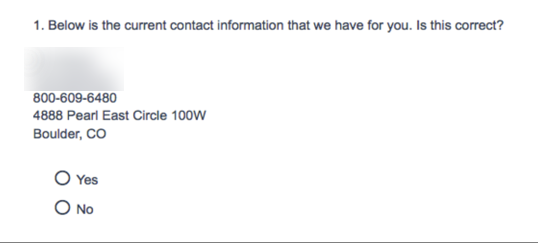
You may want to use your contact data in your question text. For example, you can display the current contact information and ask the respondent to confirm that the contact information is correct.
Follow these steps to use data about your contacts in question text.
- Place your cursor where you would like to insert the contact information and use the Merge Codes dropdown menu.
- Select the contact data field you would like to display in the question text from the Merge Codes helper tool.
In the below example, we inserted the merge codes for all contact information. These merge codes will populate with the specific information for each contact when they access their unique survey link.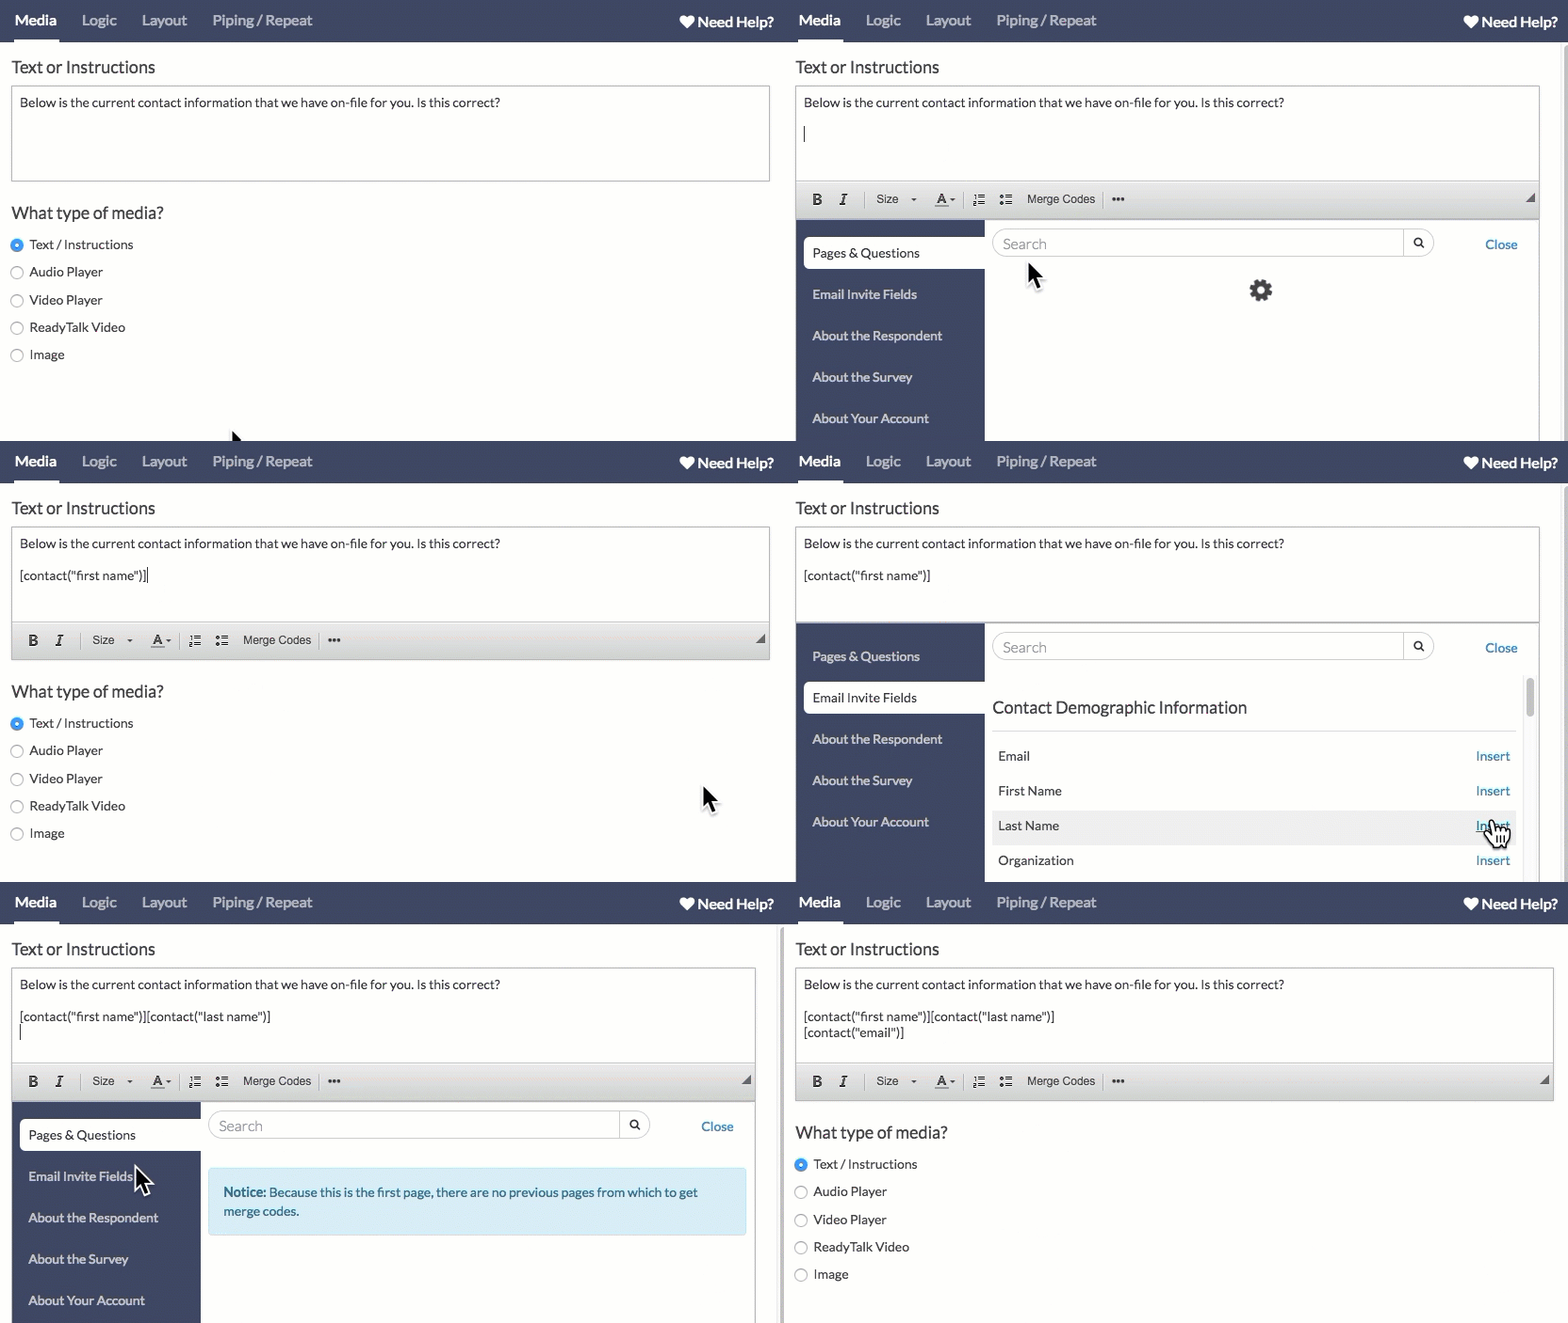 For a complete list of fields available for storing data with email/sms campaign contacts and their associated fields check out the merge code reference.
Use Contact Data as Default Answer Text
You can also use your contact data as default text. For example, you can display the current contact information in a Contact Form and ask the respondent to make any necessary changes.
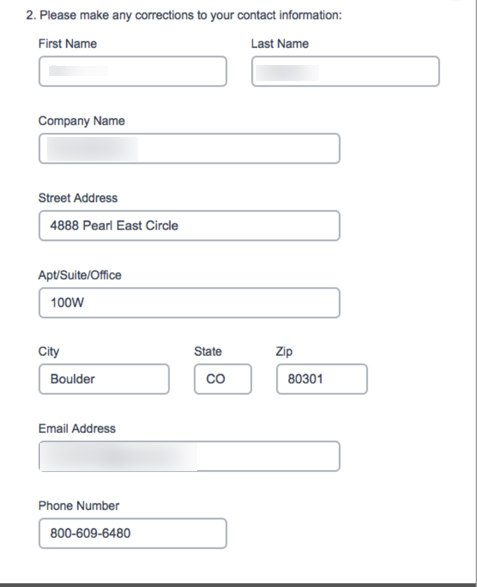
Follow these steps to display contact information as the default answer.
- Add a Contact Form question to your survey.
- Click the pencil icon next to edit the first subquestion and go to the Layout tab.
- Scroll to the Default Answer field.
- Click Select a Merge Code.
- Select the contact data field you would like to display and click Insert.
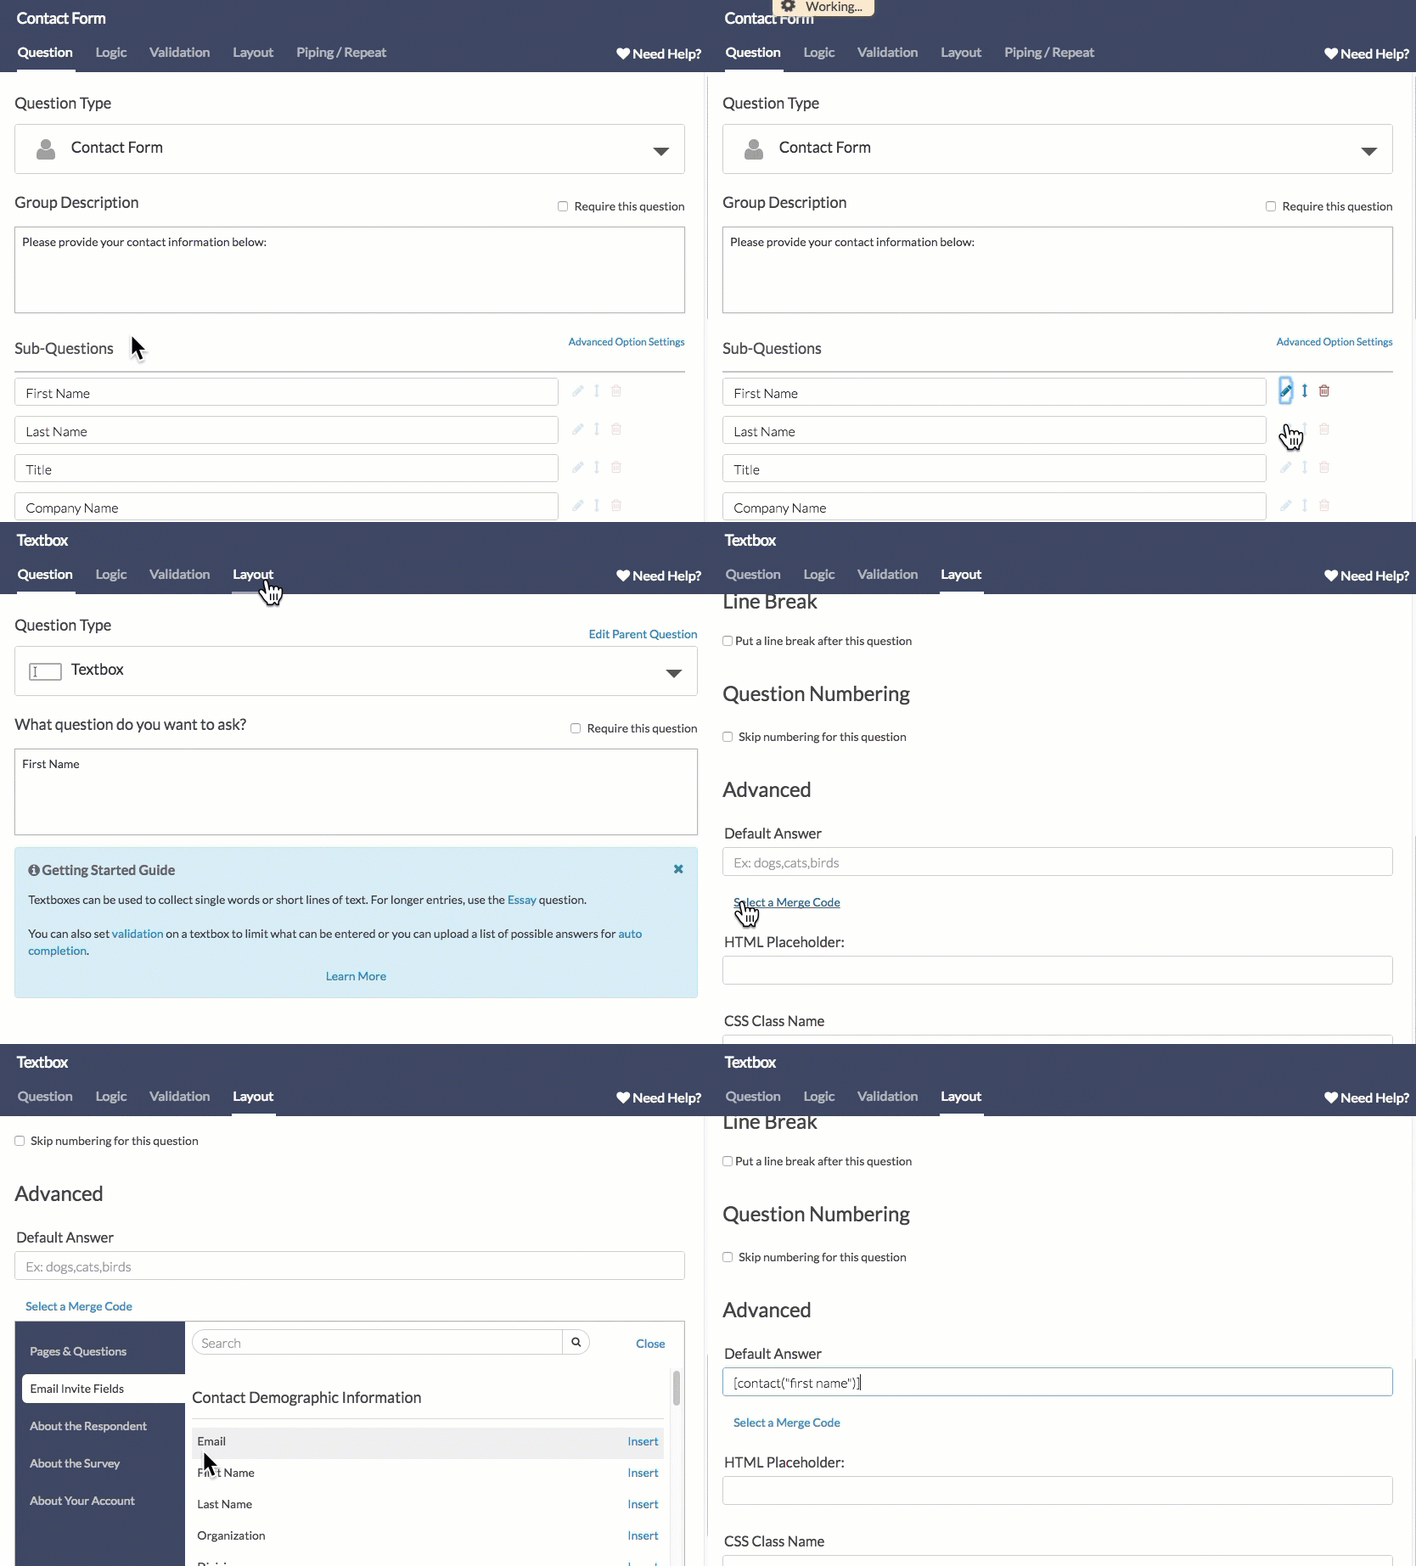
For a complete list of fields available for storing data with email/sms campaign contacts and their associated fields check out the merge code reference.
Use Contact Data in Logic
You can also use your contact data in logic rules. There are all sorts of possibilities for setting up logic using contact data. It is a great opportunity to save asking questions that you already know but need to use in logic conditions.
For example, you may have certain questions that you only ask for a certain department in your organization. Since you already know this information upload it to the Department field in your email campaign or contact management and base logic of this field.
Using the custom fields available within email/sms campaigns and contact management the possibilities are endless! Start saving your respondents time by uploading the data you already have!
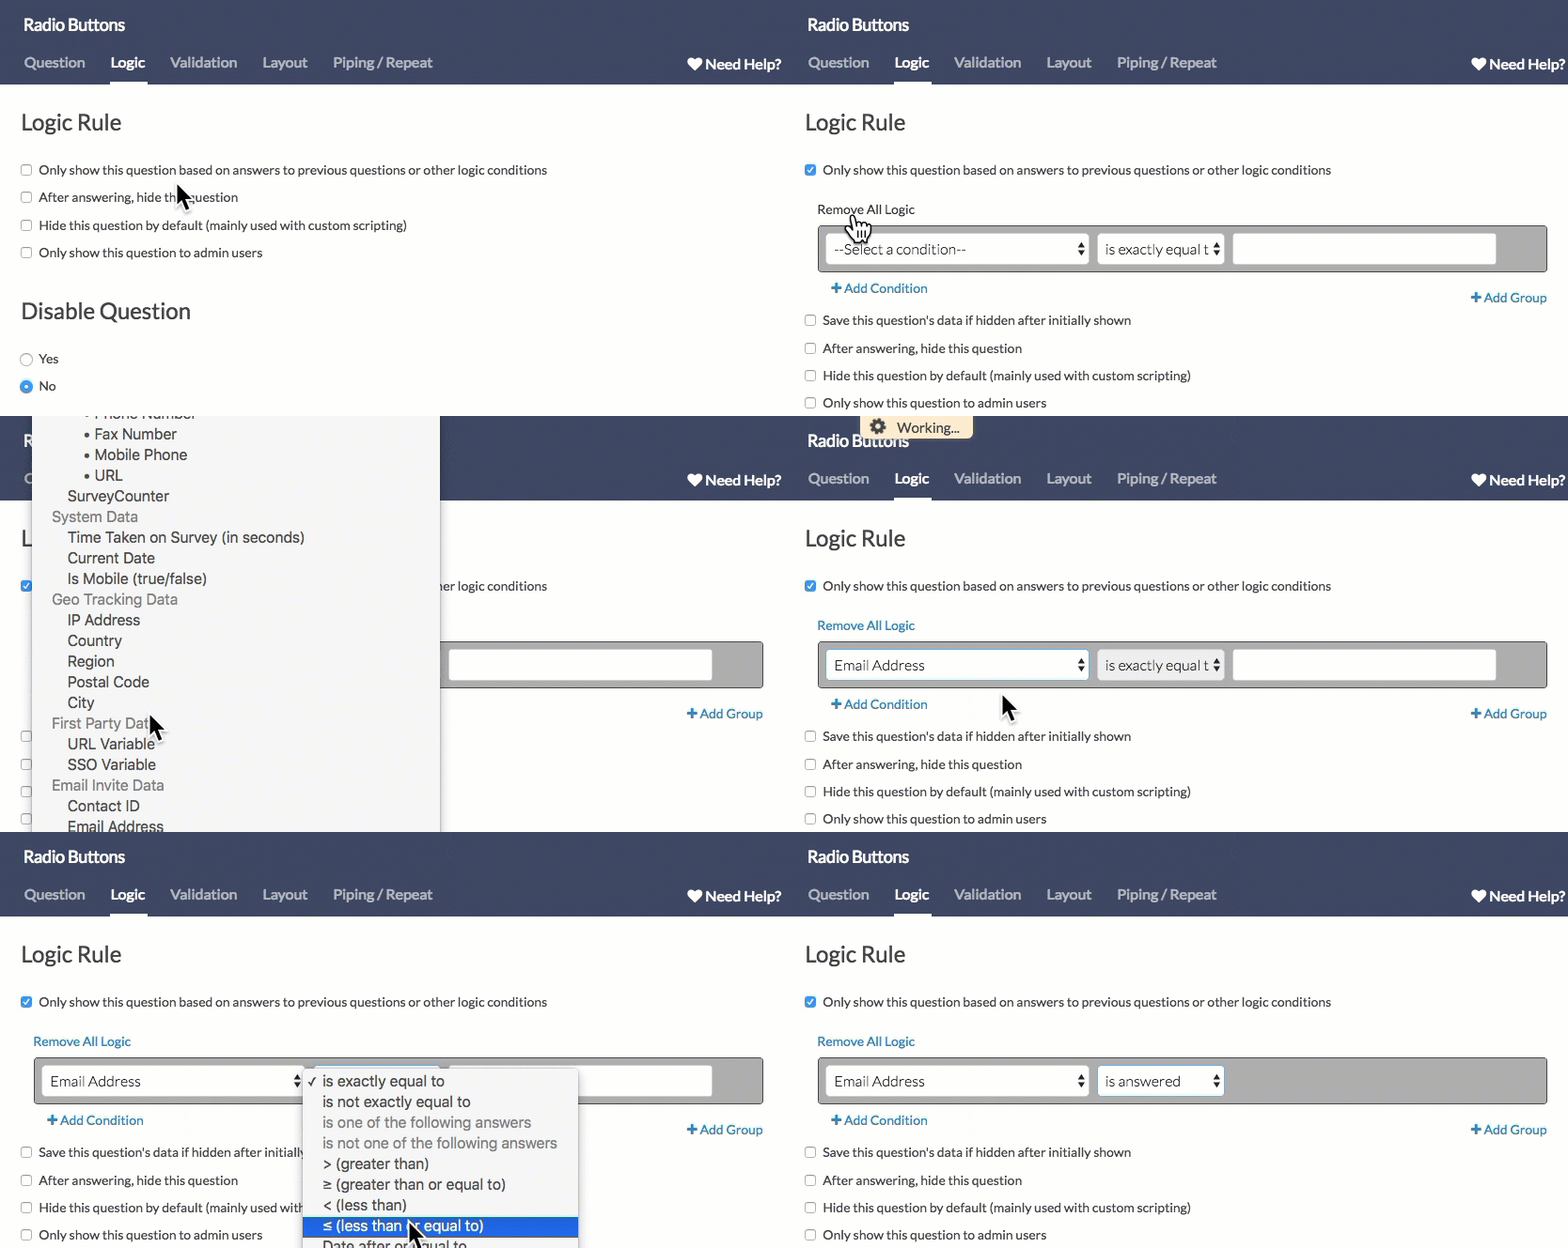
As a simple example, let's imagine we are sending out a survey to our existing list of customers contacts. We'll also be sharing a link to the survey on our website to collect contact information from new potential customers. For our existing customers, we set up a question that verifies each respondent's contact information. For new potential customers, this question won't make sense. We can leverage our email campaign contact fields in logic to ensure that this question only displays to respondents for whom we have contact information!
To set up logic using your contact data follow these steps.
- Edit your question and go to the Logic tab.
- Select the option to Only show this question based on answers to previous questions or other logic conditions.
- Select the contact field you wish to use to set up logic rules.
- Next, select the operator and operand to complete the logic conditions. In our example, we chose to display the question only when the email address field "is answered" which means when the field has data.
For a complete list of fields available for storing data with email/s,s campaign contacts and their associated fields check out the merge code reference.
Use Contact Data in Send Email Actions
If you are using an Email or SMS Campaign to distribute your survey and you wish to send an email notification to each respondent it can be a little tricky to figure out how. In this tutorial, we'll cover how to make the email addresses associated with your Email Campaign available in the Send Email action.
To make the email addresses from your Email Campaign available in the Send Email action, you'll need to set up a Hidden Value within the survey to store them. Follow these steps to do so.
- On the first page of the survey, click the Action option and select Hidden Value.
- Change the name to "Respondent email address."
- Click the Select a Merge Code link below the Populate with the following field.
- Select Email under Email Invite Fields in the menu and click Insert.
- Click Save Action.
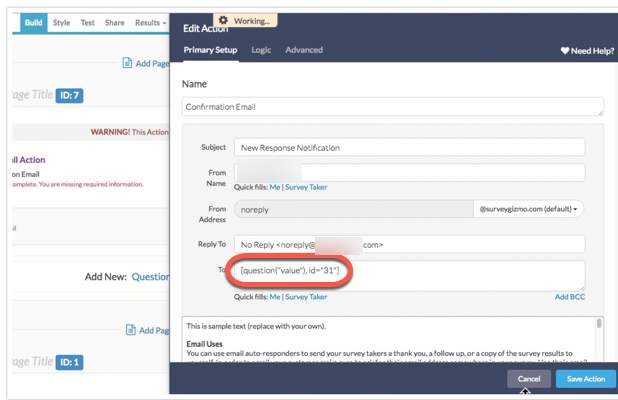
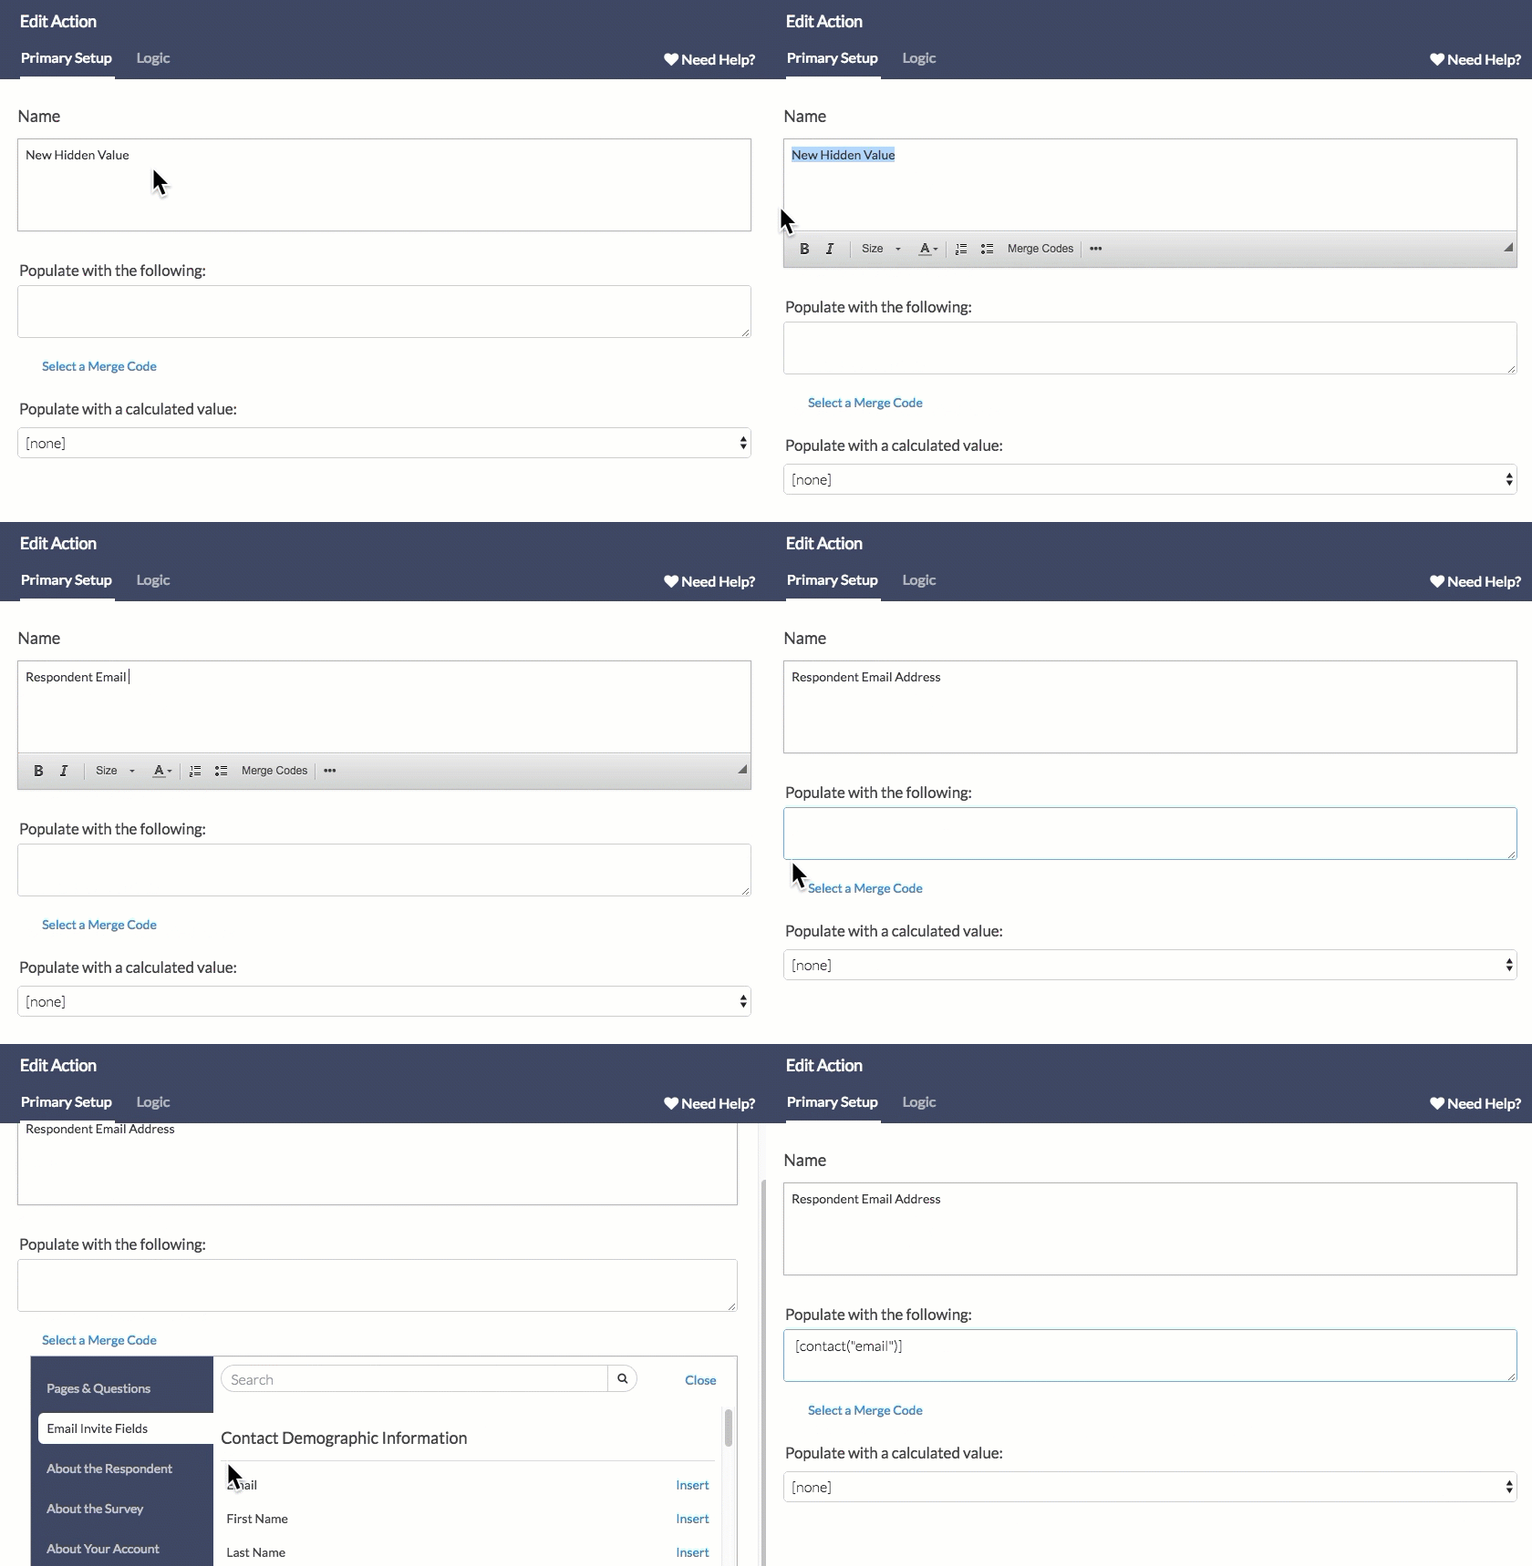 Now this new Hidden Value field "Respondent email address" will be available in the Survey Taker menu of a Send Email action.
Export Your Contact Data
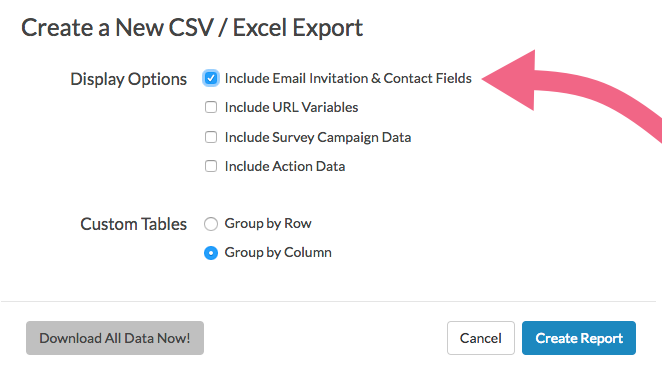
Once your responses start rolling in you'll likely want to get a report of your contacts' responses. The easiest way to review this information is to create a CSV/Excel Export and select the option to Include Email Invitation & Contact Fields.
Reference: Available Contact Fields and Their Merge Codes
Below is a list of each email/sms campaign contact field and its corresponding merge code. These merge codes can be used in your email campaign messages as well as throughout the survey to dynamically populate with the unique value for each contact.
For instance, the merge code [contact("first name")] placed in your survey will populate with the contact's first name.
Throughout the survey builder you will notice an option to Insert merge code; use this to reference your contact data in your survey.
| Global Contact Fields | Global Contact Field Merge Codes | Custom Contact Fields | Custom Contact Fields Merge Codes |
|---|---|---|---|
| Email | [contact("email")] | Invite Custom Field 1 | [invite("custom 1")] |
| Phone (Mobile) | [contact("mobile phone")] | Invite Custom Field 2 | [invite("custom 2")] |
| First Name | [contact("first name")] | Invite Custom Field 3 | [invite("custom 3")] |
| Last Name | [contact("last name")] | Invite Custom Field 4 | [invite("custom 4")] |
| Address | [contact("street")] | Invite Custom Field 5 | [invite("custom 5")] |
| Ste/Apt | [contact("suite")] | Invite Custom Field6 | [invite("custom 6")] |
| City | [contact("city")] | Invite Custom Field 7 | [invite("custom 7")] |
| State/Region | [contact("region")] | Invite Custom Field 8 | [invite("custom 8")] |
| Country | [contact("country")] | Invite Custom Field 9 | [invite("custom 9")] |
| Postal Code | [contact("postal")] | Invite Custom Field 10 | [invite("custom 10")] |
| Organization Name | [contact("organization")] | ||
| Division | [contact("division")] | ||
| Department | [contact("department")] | ||
| Team | [contact("team")] | ||
| Group | [contact("group")] | ||
| Role | [contact("role")] | ||
| Job Title | [contact("job title")] | ||
| Website | [contact("website")] | ||
| Phone (Home) | [contact("home phone")] | ||
| Phone (Fax) | [contact("fax")] | ||
| Phone (Work) | [contact("work phone")] | ||
| Contact Custom Field | [contact("customfieldname")] |
Need More Fields?
As you can see there are a number of standard contact fields available as well as 10 custom fields. We recommend against uploading non-contact data into the contact fields.
For example, say you have a customer ID you wish to upload but each of your custom invite fields are already storing other custom invite data. So, since you are not using the Phone (Fax) field you decide to upload the customer ID into this field. This is a BAD idea. First, because this field is a global field so for ALL other surveys where this contact email address has been uploaded this information will display in this field. Second, it can get confusing.
Instead, consider using our Contact List feature under the Account menu. One of a number of advantages of the Contact List is that you can create as many custom contact fields as you wish.
Creating Merge Codes for Contact List Custom Fields
For custom fields set up within Contact Lists, you can construct merge codes to capture and use this data in your surveys.
The basic structure for custom field merge code is: [contact("customfieldname")] where "customfieldname" is replaced with the actual custom field name you created in your contact list. For example, if you have a custom field in your contact list called "customerid" then the corresponding merge code would be [contact("customerid")].
 Let's imagine we deleted the default text in order to write our own custom message. To add the first name back...
 For a complete list of fields available for storing data with email campaign contacts and their associated fields check out the
 For a complete list of fields available for storing data with email/sms campaign contacts and their associated fields check out the

 Now this new Hidden Value field "Respondent email address" will be available in the Survey Taker menu of a Send Email action.
Admin
— Dave Domagalski on 07/31/2019
@KERRY: Thank you for your question!
To use contact merge codes, a campaign must be set up. The merge codes are tied to the contact record via a unique link and as such, a campaign is required.
You can set up a campaign with the contact list and not send it. However, to be able to pull in the contact information via merge codes, the contacts will need to access the survey via their individualized links.
This process is described here:
https://help.surveygizmo.com/help/create-unique-links
I hope this helps!
David
Technical Writer
SurveyGizmo Customer Experience
— KERRY on 07/31/2019
Is is possible use merge codes for data from a contact list without setting up a campaign for the survey? Or, if that isn't possible, can I set up a campaign with the contact list so I can use merge codes but not actually send it?
Admin
— Dave Domagalski on 04/09/2018
@Mandylee: Thank you for your question!
It sounds like the 'Language' Toolbar is a good option for your situation. Rather than sending a different link for each language, the email recipient can choose their appropriate language when they access the survey:
https://help.surveygizmo.com/help/language-bar
I hope this helps!
David
Documentation Specialist
SurveyGizmo Customer Experience
— Mandylee on 04/09/2018
If I send an email with many language, can I provide link with respective language?
Admin
— Bri Hillmer on 10/14/2015
@Sofia: What you are looking for is the Status Log which is available on the Delivery Statistics step of your email campaign. Here is a tutorial with more information:
http://help.surveygizmo.com/help/article/link/monitor-contacts
Thanks for checking out our documentation!
Bri
Documentation Coordinator/Survey Sorceress
SurveyGizmo Customer Support
— Sofia on 10/14/2015
How can I get a list of all the contacts which were uploaded for a survey, including those who do not respond? many thanks
Admin
— Bri Hillmer on 10/13/2015
@Consejoevaluacion: Here is our tutorial that covers how to change the From Email Address:
http://help.surveygizmo.com/help/article/link/change-from-address
Bri
Documentation Coordinator/Survey Sorceress
SurveyGizmo Customer Support
— Consejoevaluacion on 10/13/2015
How can I change the sender mail in a campaign, it's possible that not appear "invites@mailer.surveygizmo.com?
Thanks!