Pre-Test and Post-Test Surveys are a common practice in the surveying world. In the Pre-Test survey baseline data is collected. Then, at a later date, the Post-Test survey collects follow-up information after some treatment has been applied. Usually, survey researchers would like for this data to be in the same survey so that they can easily make data comparisons in the analysis phase.
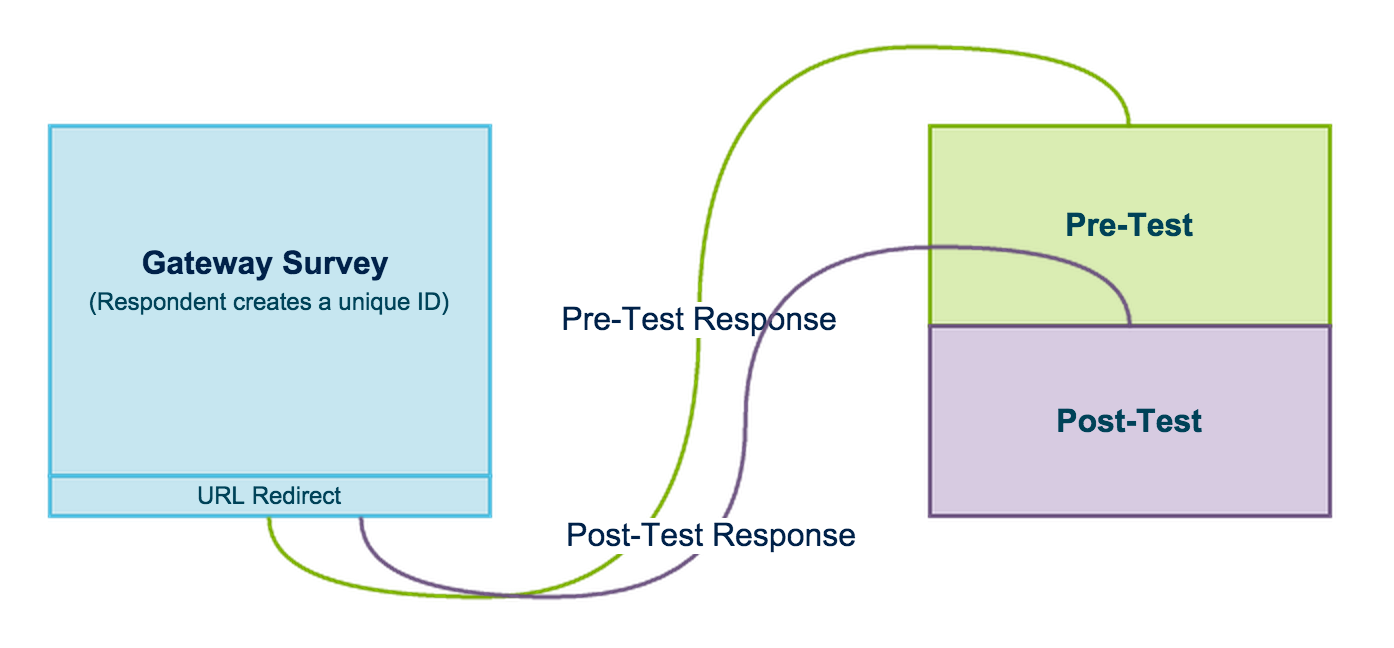
The basic set up for a Pre and Post Test Survey is pictured below. Respondents will start their response in a gateway survey that is used to create a unique identifier for each respondent. Then, using the a URL Redirect action, the respondent will be passed, along with their unique identifier, to the pre-test portion of the Pre- and Post-Test survey.
Later, when it's time for the post-test response to be completed, the respondent will return again to the gateway survey, enter their unique ID and be redirected to the post-test portion of the Pre- and Post- Test Survey.
Let's say, for example, a university professor wants to gather information on whether, and, if so, how the thinking of students change due to taking her Race, Ethnicity and Identity class. By collecting pre-test data on her students' attitudes at the beginning of the course and post-test data on their attitudes after the course she'll be able to measure any change in students' attitudes.
The following SurveyGizmo features are used in this example:
- Thank You/Terminal Pages
- Text/Instruction Elements
- URL Redirect actions
- The __sgtarget URL Variable
- The sguid URL Variable
Check it out and see the process in action in an example survey!
OR
Add the Gateway and Pre- and Post-Test Surveys to your US account!
Add the Gateway and Pre- and Post-Test Surveys to your EU account!
Add the Gateway and Pre- and Post-Test Surveys to your CA account!
Step 1: Set Up Your Pre- and Post-Test Survey
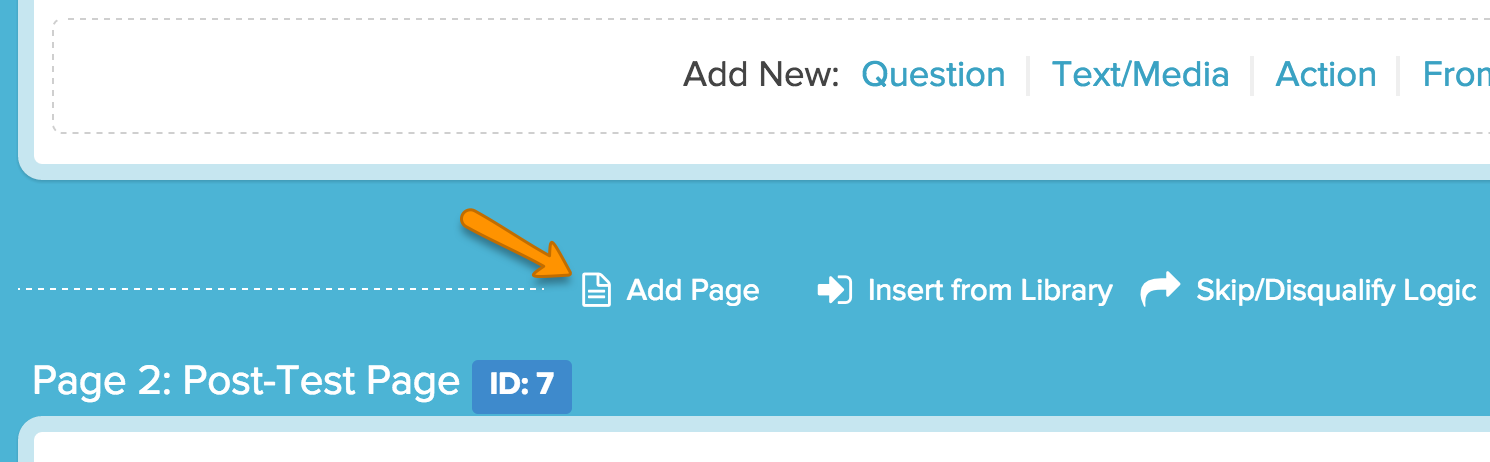
Start by creating your Pre- and Post-Test survey. This survey can be designed more or less as you desire. You'll want to make sure that the pre-test page/s precede the post-test pages. You'll also need to add a page between the pre-test and post-test portions of the survey. To do so, click Add Page to insert an interstitial page; this will serve as the Thank You page when your survey respondents record their pre-test response.
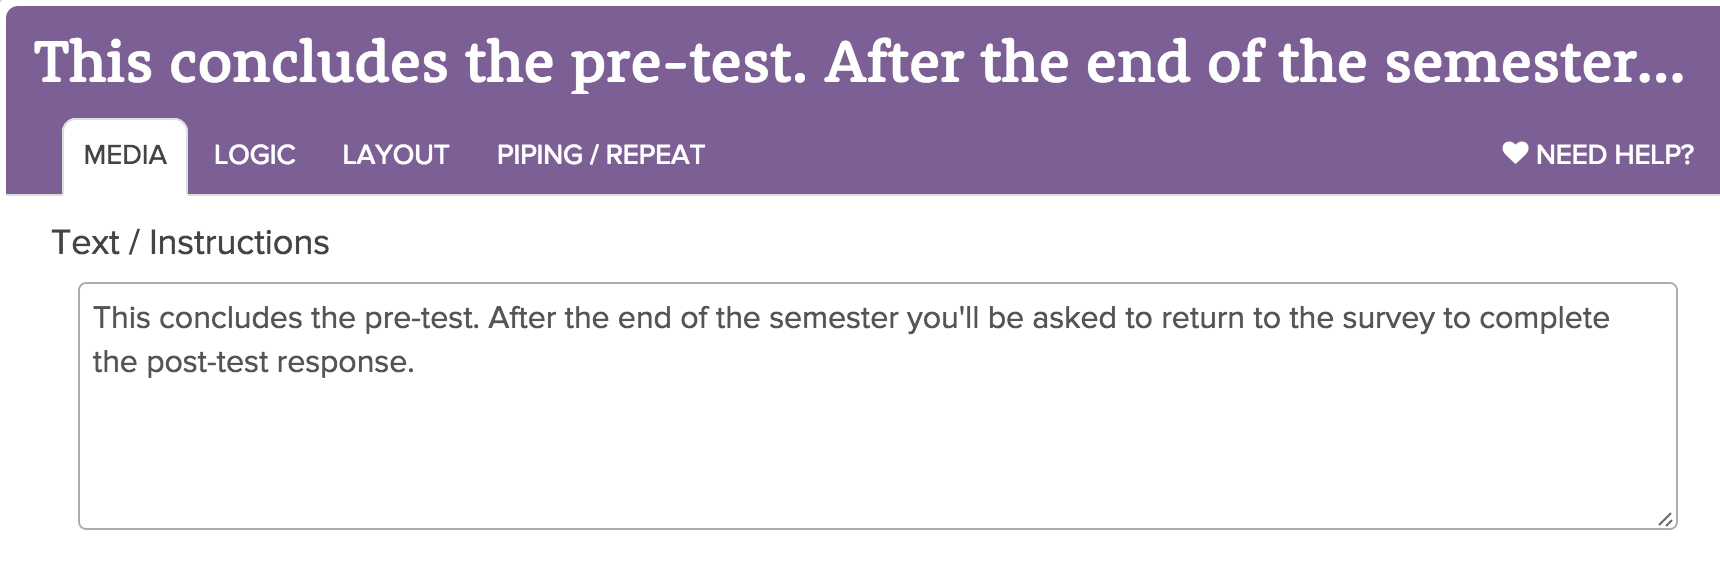
Add a Text/Instruction element to this page and add something like the below text letting respondents know that they've finished their pre-test response.
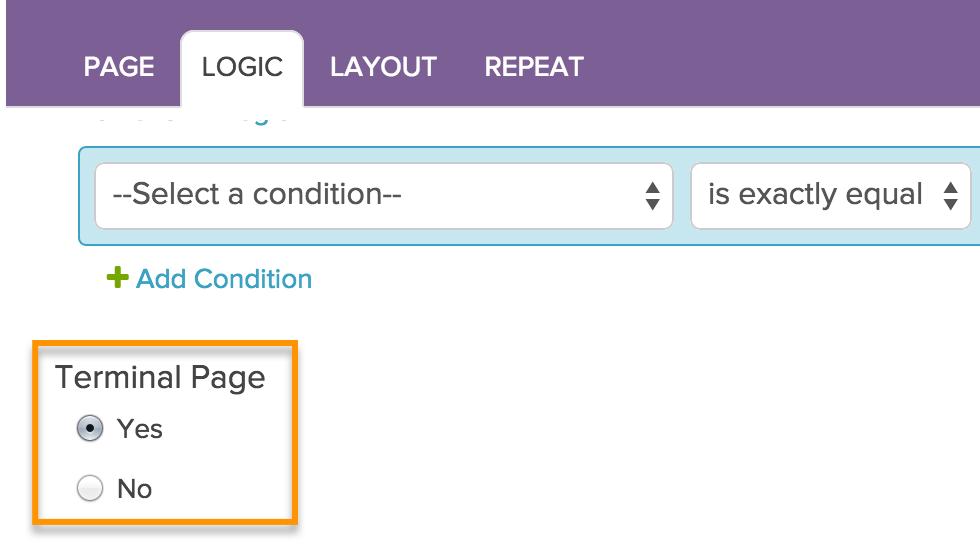
Finally, click the pencil icon above your interstitial page to edit. On the Logic tab change the Terminal Page setting to Yes. This will remove the ability for pre-test survey respondents to move past this page.
You can optionally add a page title on the Page tab while you are editing the page. Click Save Page when you are finished.
Step 2: Create a Gateway Survey
Next, you'll need to create a survey to use as your gateway survey. You don't have to call it a gateway survey, in fact, you could use the same survey title that you plan to use as your Pre and Post Test survey title.
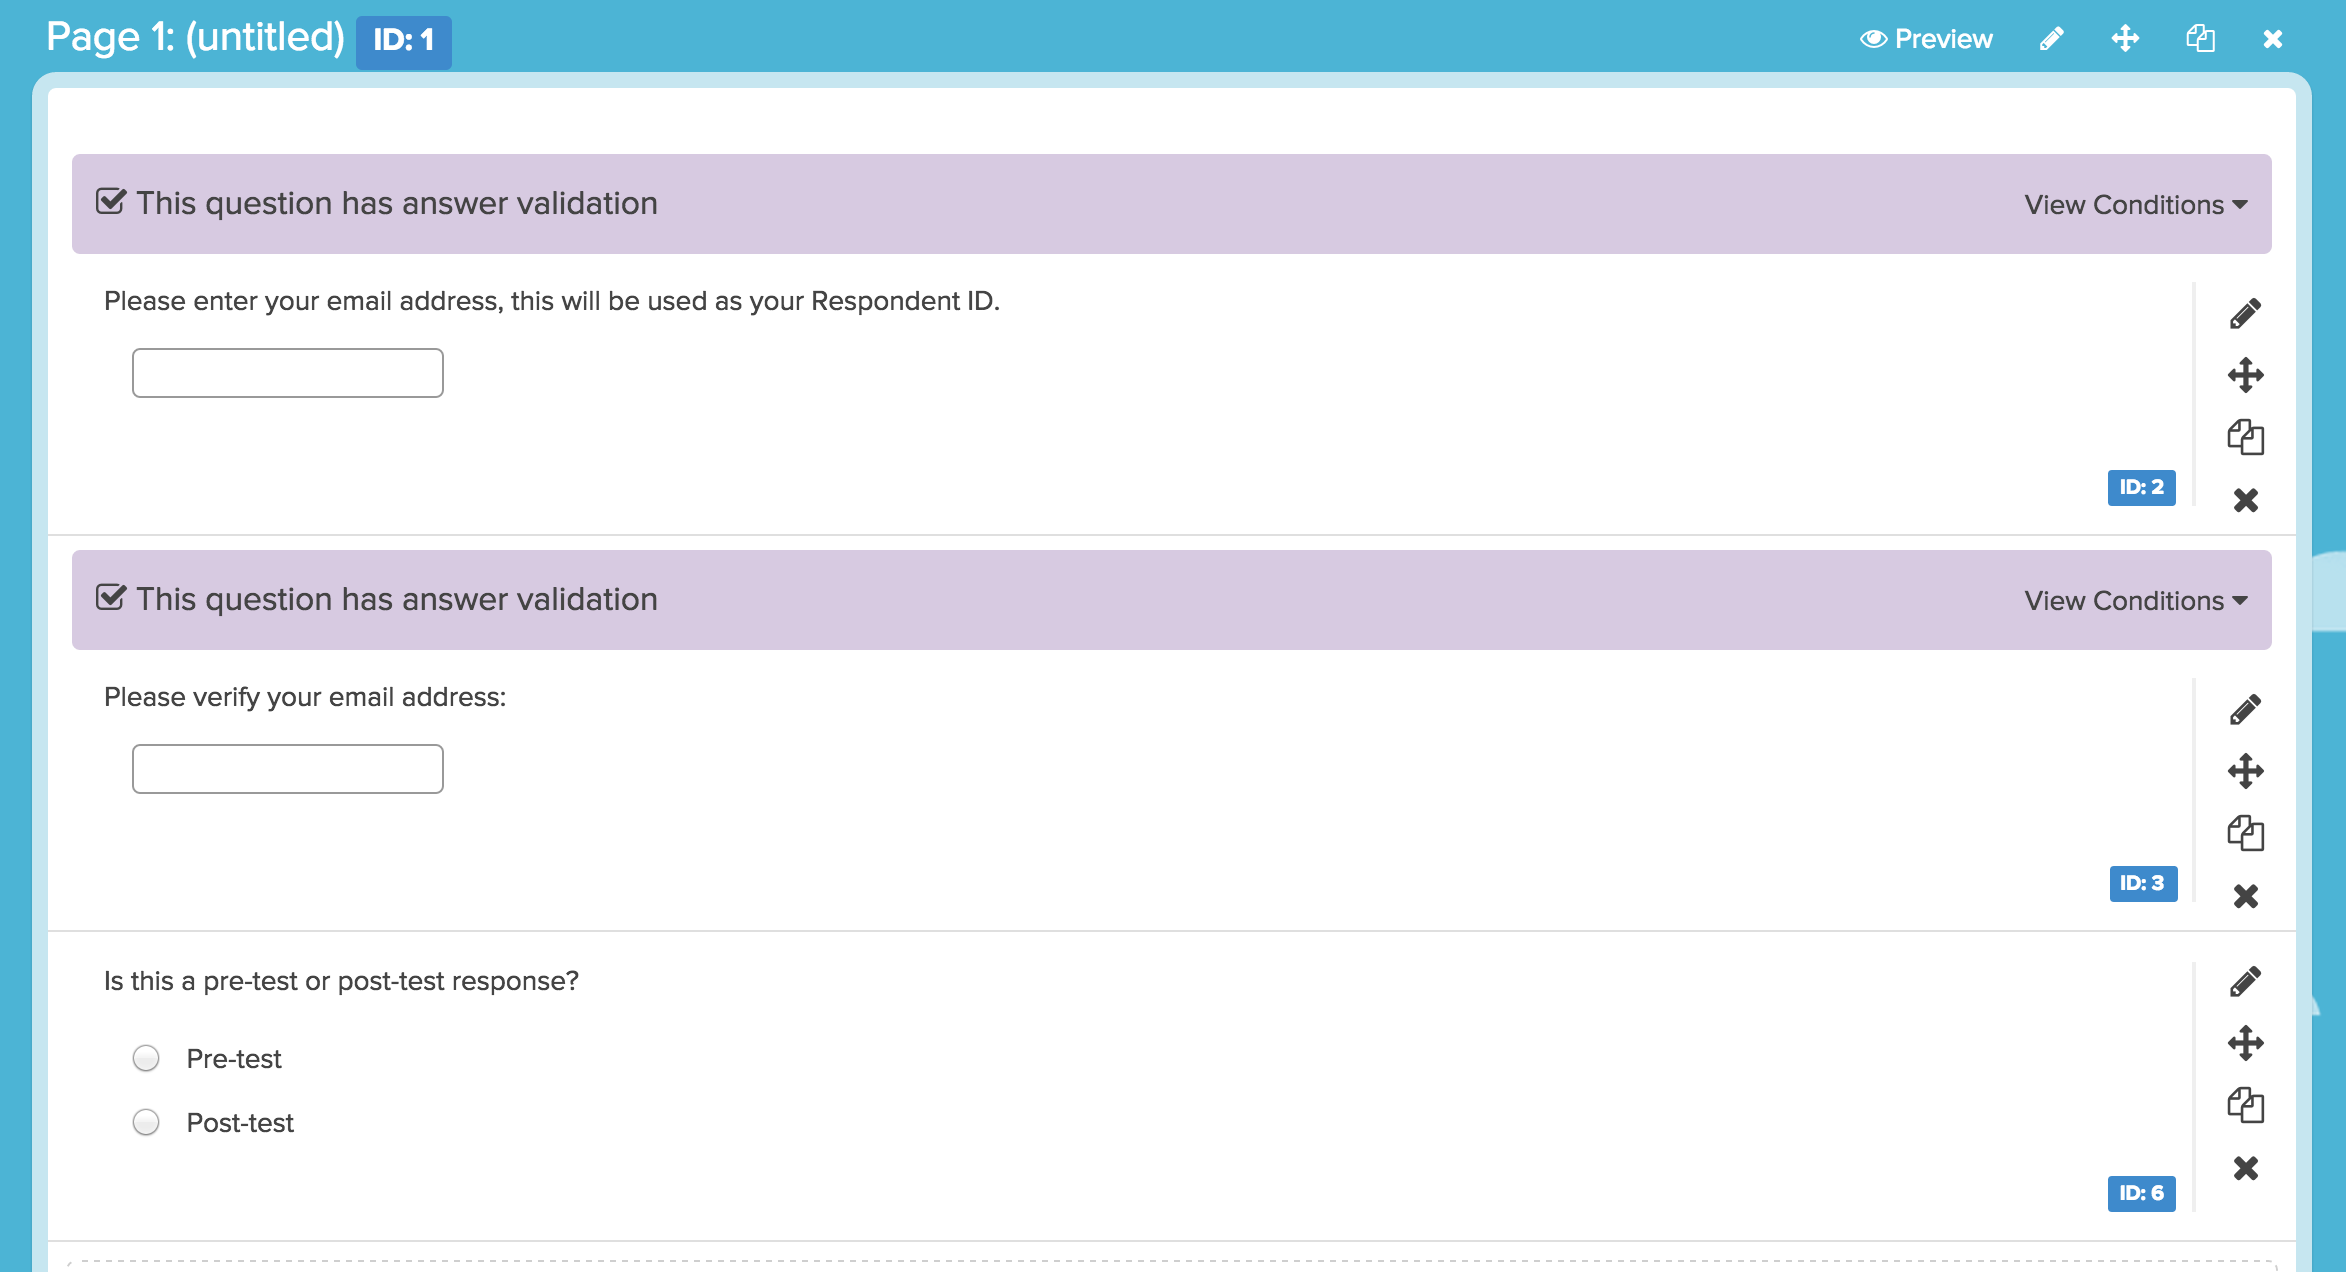
Set Up Two Textbox Questions to Create and Verify a Unique Identifier
On the first page, add a Textbox question to collect a unique identifier for your survey respondents. If your survey is not anonymous you can simply use the respondent's email address as the unique ID, in which case, you will want to use the Email question type. Whichever question you do use, make sure to require the question as knowing who is who is essential!

If your survey is anonymous you'll want to design some other entry that is likely to be unique. Be sure to add some guidelines to ensure that entries are truly unique.

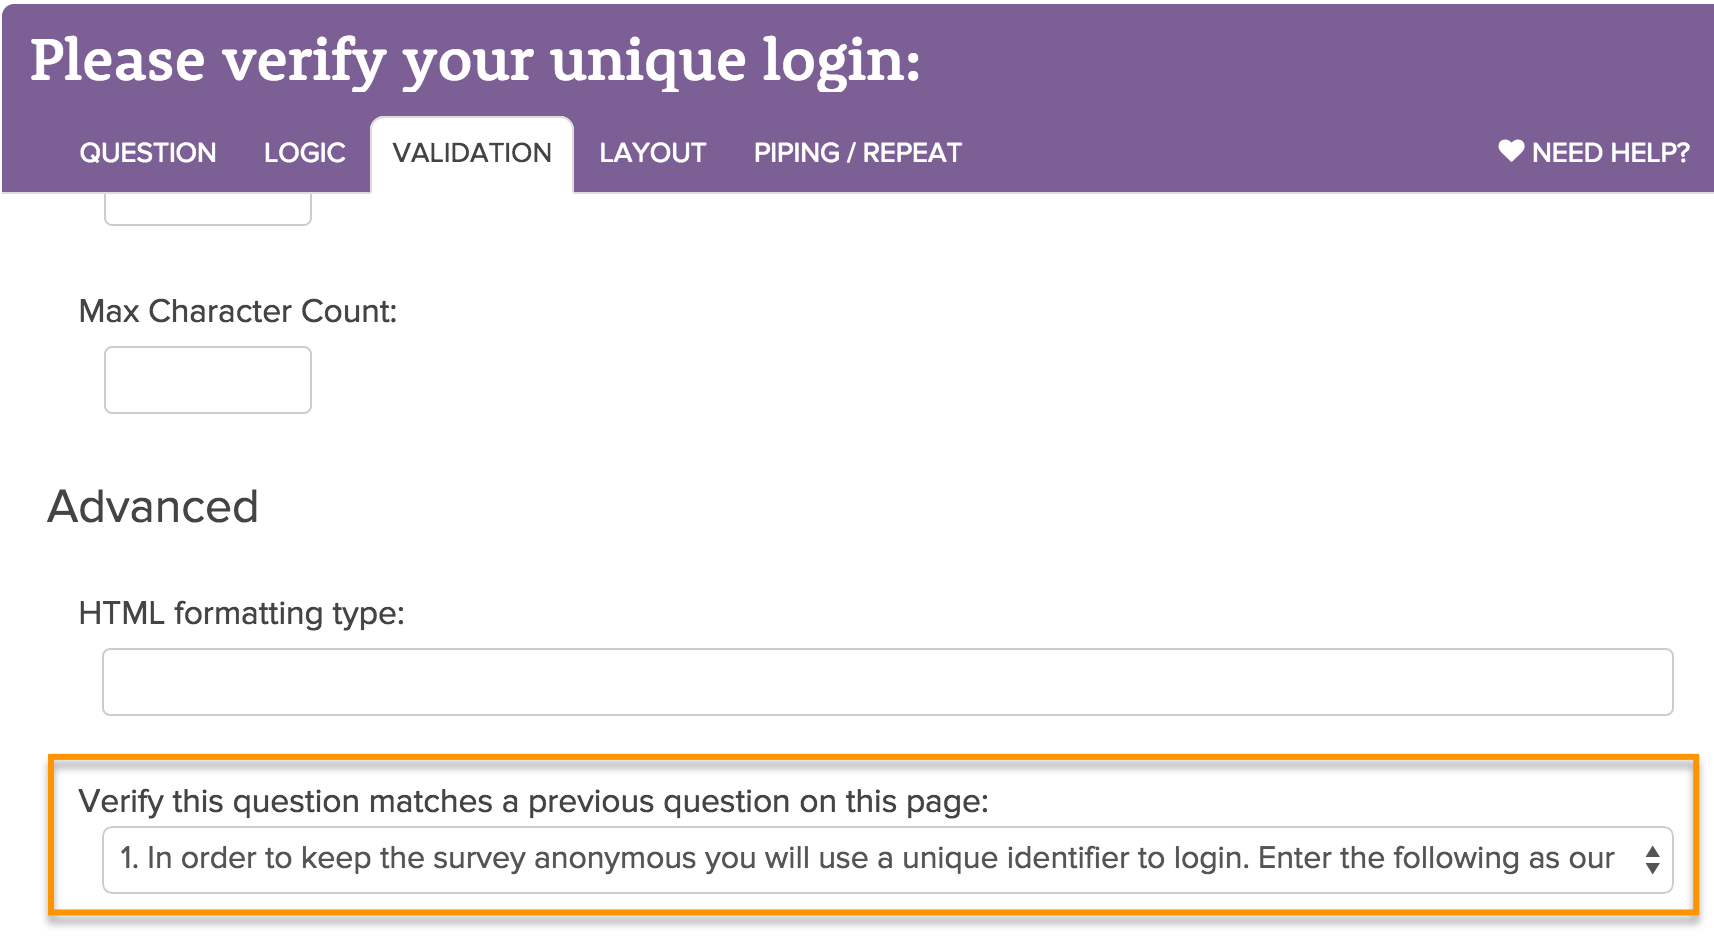
Next, add a second subsequent Textbox or Email question to validate that the entries match. To set up this matching validation, go to the Layout tab, scroll to the Advanced section, and select the first Textbox or Email question in the Verify this question matches a previous question on this page dropdown menu.
Create a Pre or Post-Test Question
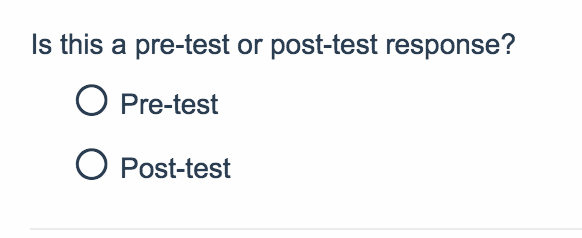
You'll also need a question in your gateway survey to determine whether the respondent is intending to record a pre- or a post-test response; add a Radio Button question to gather this information.
So, the first page of your gateway survey should look similar to the below page. If you wish, using a Text/Instructions element, you can add a greeting and/or instructions for your survey respondents.
Step 3: Set Up a Redirect to the Pre- and Post-Test Survey
The final step is to set up URL Redirects to send respondents and their unique identifier to the Pre- and Post-Test Survey. You'll need one redirect for the Pre-Test and one redirect for the Post-Test.
Start by copying the Pre- and Post-Test share link on the Share tab. You can customize this link first, if you wish.

Head back to your gateway survey and start by setting up the redirect for the pre-test. To do so, click Add New Action > URL Redirect on the Thank You page.
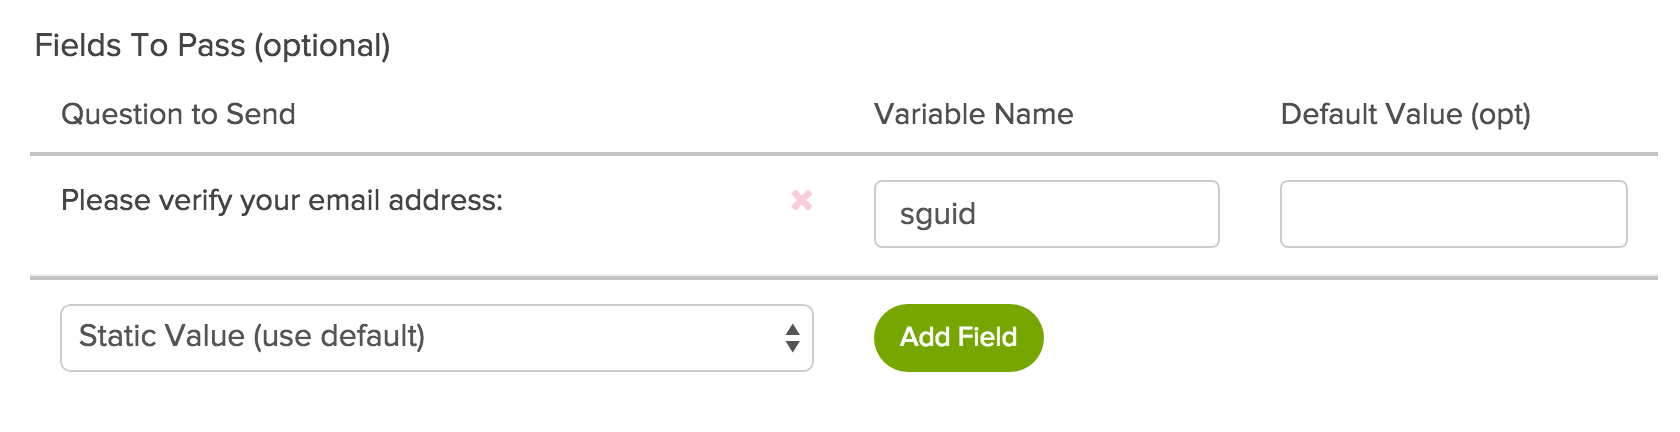
Paste the share link for your Pre- and Post-Test survey in the URL field and scroll to the Fields To Pass Section. Under Question to Send, select the question in your survey where survey respondents enter their unique ID in the dropdown menu and click Add Field. In our example, this is the email address question.

In the Variable Name field that appears enter sguid, lower case, no spaces. SurveyGizmo recognizes this variable and will store this as a unique identifier which is the key to returning your survey respondents to the same response when it comes time for the post test.

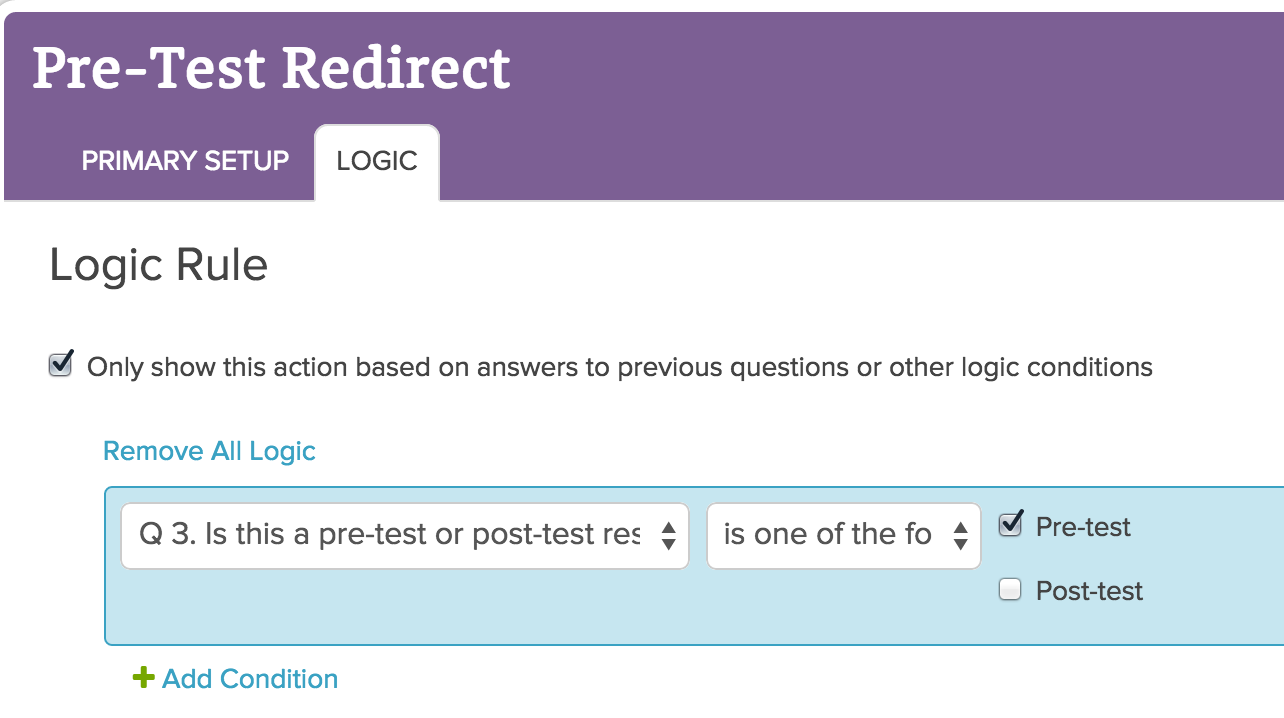
To complete the pre-test redirect, go to the Logic tab and select Only show this action based on answers to previous questions or other logic conditions. In the logic builder that appears, select the question you set up asking respondents whether they are recording a pre- or post-test response in the first dropdown menu. In the operator dropdown menu select is one of the following answers and finally check the Pre-test answer and click Save Action. With this logic set up this action will now only fire for pre-test responses.
Next, you need to set up a URL Redirect for post-test responses. Before you can add this action, you'll need to return to the Pre- and Post-Test survey to get the page ID for the first page of the post-test portion of the survey. Not sure where to find page IDs? Check out our How to Find Question, Page and Option ID Tutorial.

Once you've made note of your post-test page ID head back over to your gateway survey to set up your post-test redirect. The setup is almost the same as the pre-test redirect setup with the addition of a URL Variable that will be used to send the respondent to the post-test page of the Pre- and Post-Test survey.
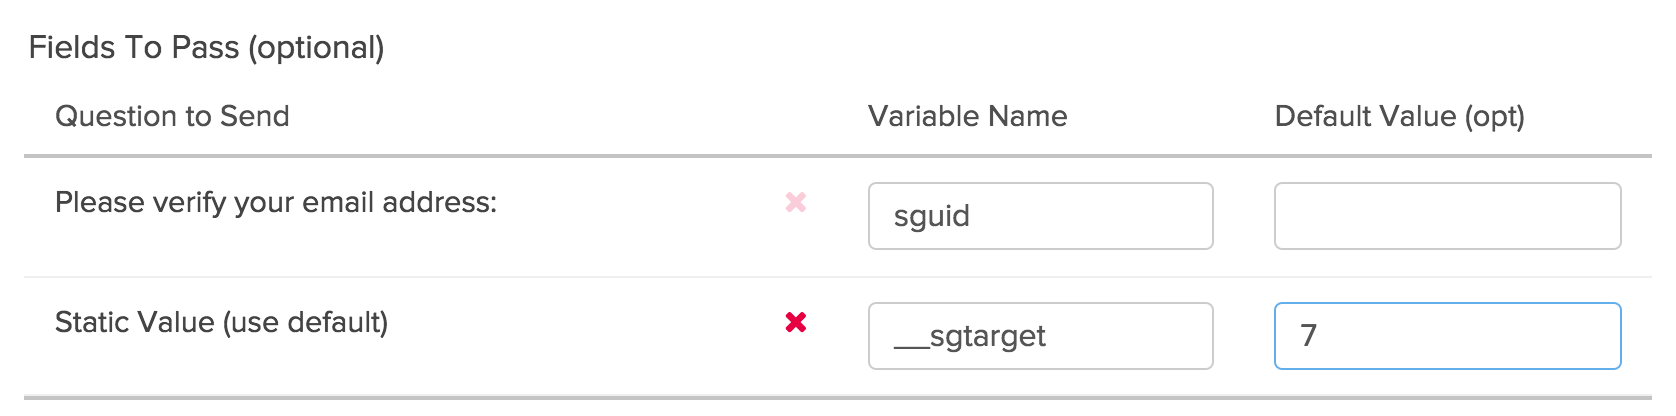
Paste the share link for your Pre- and Post-Test survey in the URL field and scroll to the Fields To Pass Section. You'll need to set up the sguid variable again as in the pre-test redirect by pulling the value from the field where survey respondents enter their unique ID.
You'll also need to set up a second value to pass. In the Question to Send dropdown select Static Value and click Add Field.
In the Variable Name field that appears enter __sgtarget, lower case, no spaces (be sure to add 2 underscores first). In the Default Value field enter the page ID that for the first page of the post-test portion of your Pre- and Post-Test survey. __sgtarget is a pre-built URL Variable that SurveyGizmo recognizes as a directions for which page to go to.
To complete the post-test redirect, go to the Logic tab and select Only show this action based on answers to previous questions or other logic conditions. In the logic builder that appears, select the question you set up asking respondents whether they are recording a pre- or post-test response in the first dropdown menu. In the operator dropdown menu select is one of the following answers and finally check the Post-test answer and click Save Action. With this logic set up this action will now only fire for post-test responses.
Step 4: Test, Test, and Test Again!
Now, you are ready to test. Record several responses to ensure everything is working properly. Make sure to record both pre- and post-test response and check the data to ensure that the data has been collected within one response. This can be confirmed under Results > Individual Responses.
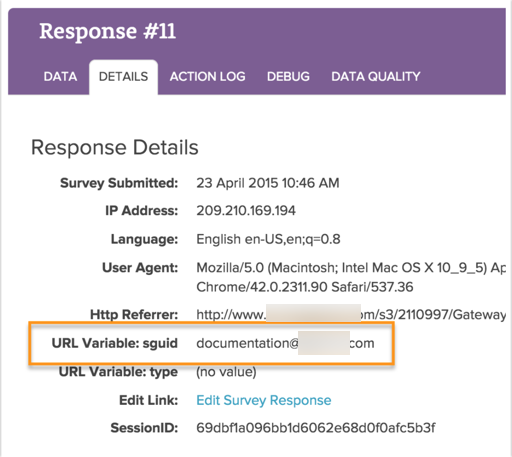
On the Details tab of the individual response you'll see the unique identifier that has been stored in the sguid for the response. On the Data tab you can confirm that both the pre- and post-test data has been stored.
Step 5: Share Your Gateway Survey Link
Once, you've tested and confirmed everything is working properly you are ready to start collecting responses. You'll be sharing the share link from your gateway survey with your potential respondents.
Optional Customizations
In the example surveys available for download above we set up a couple of additional customizations covered below.
- Set up a Hidden Value action to store the unique identifier for each response - Like any other URL Variable, our system will record sguid automatically. However, depending on what you want to do with the values you receive, you may want to capture them in a Hidden Value when you create your survey. In our downloadable survey above, we added the hidden value to both the pre-test and post-test portions of the survey.
- Restart question numbering on the first page of the post-test portion of your survey - By default, the question numbering for the post-test portion of your survey will start where your pre-test portion left off. You can use a copy-and-paste script to Restart Question Numbering.
- Change text of the button at the end of the pre-test portion of your survey - The button to progress to the pre-test Thank You page will read "Next" by default. To change this, check out our Change Text of a Button on a Specific Page Tutorial.
Alternative Options for Setting Up Pre- and Post-Test Surveys
As with most things at SurveyGizmo there are a million and one ways to skin this pre- and post-test cat. If the above description does not quite meet your needs consider these alternatives! Each of the below options is covered in our Return Respondents to a Later Page in a Survey Tutorial.
- Use an Email Campaign Reminder to Return Respondents to the Survey - If you have a list of contacts that need to be pre- and post-tested, you likely want to use an email campaign to invite survey respondents to participate in your pre- and post-test survey. For email campaigns you can you can modify the link in a reminder message to navigate to a specified page. Note, Email Campaigns CAN be use in combination with our anonymous survey setting if this is a requirement for your Pre- and Post-Test Survey.
- Use a Delayed Send Email Action to Return Respondents to the Survey - Setting up a delayed send email action to return respondents to the survey is a simply method for accomplishing pre-test/post-test survey data collection.
Admin
— Bri Hillmer on 03/04/2019
@Nicole: You can change the text of a button on a specific page with a little bit of JavaScript code. This is covered in the below tutorial:
https://help.surveygizmo.com/help/change-button-text-per-page
I hope this helps!
Bri Hillmer
Documentation Coordinator
SurveyGizmo Customer Experience Team
— Lynn on 03/04/2019
The pre-test page doesn't show a submit button. How can I fix this?
Admin
— Bri Hillmer on 12/18/2018
@National: This is intended functionality. The survey is set up to identify a respondent and return them to their same response. If they've already entered their email address they will either be taken to the place where the left off.
You might want to reach out to our support team to explore options that will work for what you are trying to do!
Bri Hillmer
Documentation Coordinator
SurveyGizmo Customer Experience Team
— Technical on 12/17/2018
Hi. Very useful article. However, I'm hoping there's an expert out there that can help us on two queries.
I've successfully set up a pre-test and post-test survey mentor registrations (pre-test), and then for those mentors to provide feedback on their experience at the end (post-test). We are using email as the unique identifier on the gateway survey.
1. During testing, it seems once you have complete the pre-test response, you're unable to access this again. When I attempt to return to my pre-test (perhaps to amend my response), the URL redirect takes me to the POST-test section of the survey instead of the pre-test. Is the re-direct functionality working as intended?
2. Can the survey be set up to accept multiple pre- and post-test responses (i.e. a new response ID)? For example, if someone completes the mentoring program, and then decides to register again.
Appreciate any insight or help.
Admin
— Bri Hillmer on 07/03/2018
@Monica.bandiera: If you're passing the respondents' names as an sguid you can include this field in your export by selecting the option to Include URL Variables shown here:
https://www.screencast.com/t/LGLqLRob
I hope this helps!
Bri Hillmer
Documentation Coordinator
SurveyGizmo Customer Experience Team
— Monica.bandeira on 07/03/2018
Hi, I created a pre and post, using people's names on the gateway survey, but then I need to see their name on the excel sheet of the pre-post survey when I download the data. How can I do this?
Admin
— Dave Domagalski on 04/19/2016
@Alyce: Thank you for exploring SurveyGizmo Documentation! Yes, you can absolutely use a dropdown menu for your unique identifier question and pass the data from the dropdown via your re-directs to the Pre and Post surveys.
I hope this helps clarify!
David Domagalski
Survey Explorer
SurveyGizmo Customer Support
— Admin on 04/19/2016
Would it work if for the unique identifier, I used a dropdown? In this case, there are just 10 different organizations who need to fill out the pre and post test but I worry that they will type slight variations in their name if they just use a textbox - so wondering if I can have there only be the 10 options for the identifier. Thanks!
Admin
— Bri Hillmer on 08/12/2015
@Susan: The spreadsheet would need to be uploaded to an email campaign, in which case you could use another method to send the respondent to a different page of the same response:
https://help.surveygizmo.com/help/article/link/return-respondents-to-a-later-page
As far as exporting the results this is as simple as clicking a button:
http://help.surveygizmo.com/help/article/link/excel-export
I hope this helps!
Bri
Documentation Coordinator/Survey Sorceress
SurveyGizmo Customer Support
— Susan on 08/11/2015
Hi Bri! Where does the external spreadsheet come into play? And, how challenging is it to export all of this data? I have 150+ clients that'll need pre-tests, midpoint tests and end-point tests (we are actually measuring client success and satisfaction throughout a 12 month coaching program) and we'd like to not only get the BIG PICTURE of all of our client's success, yet be able to see how individual clients have improved (or not).
Admin
— Bri Hillmer on 07/20/2015
@Chris: My pleasure!
Bri
Documentation Coordinator/Survey Sorceress
SurveyGizmo Customer Support
— Chris on 07/20/2015
Thanks Bri!
Admin
— Bri Hillmer on 07/16/2015
@Chris: You can! Check out the Review Action for how to set this up!
https://help.surveygizmo.com/help/article/link/review-response-action
Bri
Documentation Coordinator/Survey Sorceress
SurveyGizmo Customer Support
— Chris on 07/16/2015
Just one question: can I set up the pre/post survey so the participant can view their responses at the end of each survey as well as the comparison values after both surveys are completed?