Do you need to purchase responses to your survey that are targeted to age, gender, region, and other demographic attributes? No problem, SurveyGizmo's Survey Audiences allow you to target people with specific demographics easily via the SurveyGizmo Share tab.
SurveyGizmo is happy to help you with purchasing panel responses, but if you prefer to go it alone, you can use almost any panel company to purchase survey responses. Panel companies match their pool of respondents against your targeted needs for a per-response fee.
Understanding the SurveyGizmo Features Used in Panel Integrations
Because there are so many moving pieces to a panel integration there are numerous steps to follow. You might find it useful to read through the below features and their respective tutorials so that you understand the steps below.
- URL Variables - Panel companies will use at least one URL variable (Panel ID) in order to send information to and receive information from your survey. It's a great idea to get familiar with URL variables before setting up your panel integration; check out our Using URL Variables to Pass Data Tutorial to learn more!
- URL Redirects - You will be setting up a redirect on the Thank You page of your survey to notify the panel company that a given respondent has completed their survey. As part of the redirect, you will need to send along some information so the panel company can identify which specific panelist completed the survey; check out our Send Values Through the URL Redirect Action Tutorial to get more familiar with how this works.
- Hidden Values - You will be setting up a Hidden Value to store the Panel ID URL variable. Check out our Storing and Using Hidden Values Tutorial to learn more before getting started with your panel integration setup.
- Disqualify Logic - For some surveys you may include disqualifying/screening questions in your survey to further refine your respondents. If you have a disqualifying/screening question or questions in your survey, check out our Set Up Disqualify Logic Tutorial to learn more before getting started with your panel integration setup.
- Quotas - You will be setting up a quota to make sure you collect the necessary amount of responses (and not more). Check our Survey Quotas Tutorial to learn more before getting started with your panel integration setup.
Need help finding a respondent pool? Let our Professional Audience Services team find your target audience and integrate your survey to collect the data you need!
Step 1: Get Your URLs and Identify Your Panel ID
After you have purchased respondents, your panel company will provide you with 3 URLs (links) that you will use to redirect respondents back to the panel company site. Each URL is used for a different scenario:
- URL for redirecting respondents to the panel company when they complete a survey
- URL for redirecting respondents to the panel company when you the survey is over quota (the number of responses you have purchased)
- URL for redirecting disqualified respondents who don't meet certain criteria (this doesn't always apply)
Once you have your URLs, before you get started setting up your panel integration be sure to identify your panel ID.
This ID is often included at the end of the URLs that the panel company gives you. It is used by the panel company to track respondents. The name of the variable, the uid portion in the example URL below, will vary by panel company, but it typically has id somewhere in it. It will look something like this at the end of each of your URLs:
If you are having trouble identifying your Panel ID, ask your panel company to help you or reach out to our Support Team. It is important to make sure you know what your panel ID is before you get started!
We will be using the following example URLs. Our Panel ID variable for this example is uid (which stands for user identification).
http://yourfriendlypanelco.com/completes?uid=xxxxxx
http://yourfriendlypanelco.com/fullquota?uid=xxxxxx
http://yourfriendlypanelco.com/disqualified?uid=xxxxxx*
*This link might also say something like "earlyscreenout" at the end
Step 2: Store Respondents' Panel IDs
Once you have your URLs and have identified your Panel ID, you're ready to jump in and get started adding the integration pieces to your survey. To start, you will set up a Hidden Value to capture the ID variable at the end of the links that the panel company provides.
- Click Add Action on the first page of your survey, select Hidden Value.
- In the Populate with the following field, click Select a Merge Code and choose URL Variable from the About the respondent section of the menu.
- Click the Insert button, it will populate the field with this: [url("xxx")].
- Replace the xxx between the quotes with your Panel ID. In our example it is uid so our URL Variable merge code will look like so when we are finished:
[url("uid")] - Once it looks correct, click Save Action.


Step 3: Set Up Screening Questions and Disqualify Logic
It is always a good idea to set up screening questions that verify that your respondents meet the demographic requirements that you requested from your panel company. Follow the below steps to set this up!
The below method is a good option if you have a few screening questions. If you have a large amount of screening questions, consider this alternative solution.
- Start by setting up a question for each demographic requirement you defined. For example, let's imagine that we want to collect responses from the following target audience:
- Women
- Ages 18-54
- Associate degree or lower
- We will set up the following questions in our survey to verify that they meet our audience requirements.

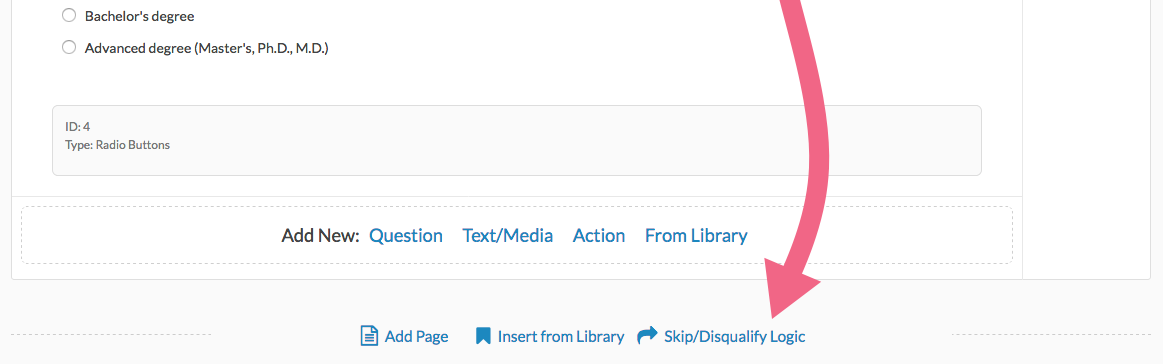
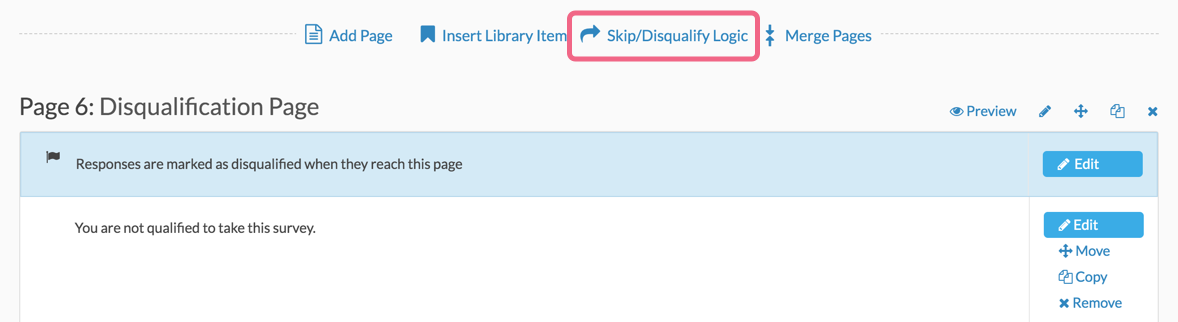
- Next, set up the Disqualify Logic for respondents who do not meet your requirements. To do so, click the Skip/Disqualify Logic link at the bottom of the page with your demographic questions.
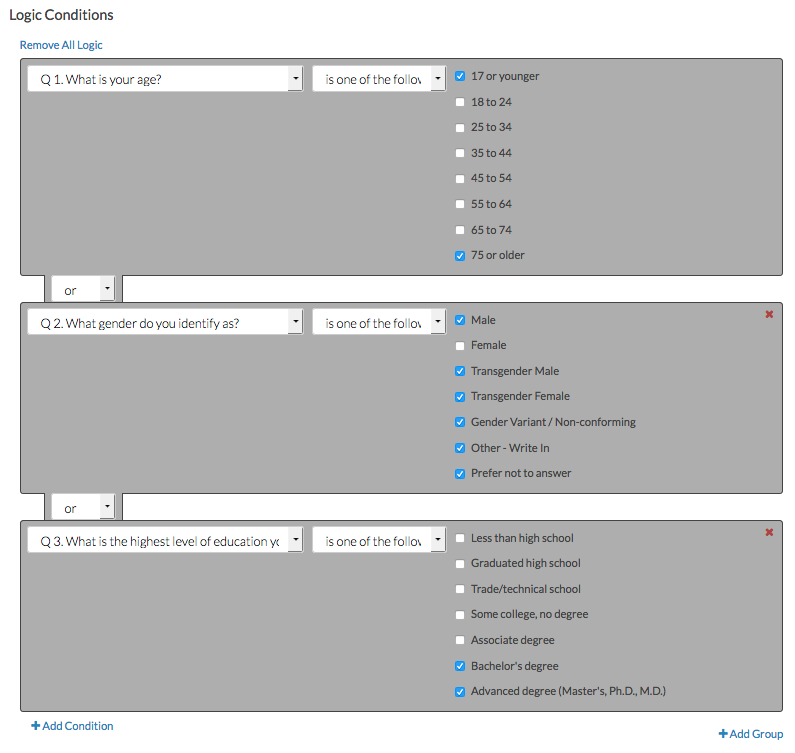
- Set up the logic condition(s) for the disqualify question by choosing the answer option(s) that should disqualify the respondents. In our example this would be any respondent who:
- selects 17 or younger or 65 or older in our "What is your age?" question.
- does not identify as Female in our "What gender do you identify as?" question
- selects Bachelor's degree or Advanced Degree in our "What is the highest level of education that you have completed?" question.
 Best Practice Tip
Notice in the above example we used positive logic to set up the logic rules for respondents we wish to disqualify. This is because positive logic is much easier to think about and get set up correctly.
When setting up disqualify logic, it is very tempting to set up negative logic to define respondents you wish to disqualify. Before using negative logic make sure you read our Best Practice Guide: Understanding Negative Logic and test and re-test your logic to ensure it is doing what you want!
- Below your logic conditions you will set up what you wish to have happen when your logic conditions are met.
For panels you will typically redirect disqualified/terminated responses back to the panel company. To set this up select the option for If the Logic Passes, send the respondent to > External URL. - In the URL field paste the disqualify link provided by the panel company and remove the Panel ID at the end (we will add the ID back starting with step 8).
If the link looks like this: http://yourfriendlypanelco.com/disqualified?uid=xxxxxx
Then enter this: http://yourfriendlypanelco.com/disqualified
Not sure where to find these links? Check out step 1 of our Panel Integration Tutorial for more info!
- Next, select the If the Logic Passes, mark the response as > Disqualified option. This will disqualify the respondent so they don't record as a Partial response in your data.
- Customize the message to show to disqualified respondents.
- In the Fields to Pass, select your Panel ID Hidden Value in the Question to Send dropdown menu.
Don't have a Panel ID Hidden Value set up yet? Check out steps 1 and 2 of our Panel Integration Tutorial to learn how! - Click Add Field and define the Variable Name — This is where we will put uid. This should be your Panel ID.
- Click Save Action.


When it's complete, your Disqualify Logic should end up looking something like this:

Alternative Option: Set Up Disqualification Page
If you have a large number of screening questions, there is an alternative option for setting up disqualification that you may find more efficient.
This solution involves setting up a dedicated disqualification page that all disqualified respondents are sent to. Once there, these respondents are marked as disqualified and redirected appropriately. As a result, you save time by not having to configure disqualification logic for each screening question.
Follow the below steps to set this up:
- First, create a survey page that will serve as your Disqualification Page. To keep things organized, we recommend placing this page just before your survey's Thank You page. As a best practice, we also recommend giving this page a meaningful title, such as Disqualification Page.
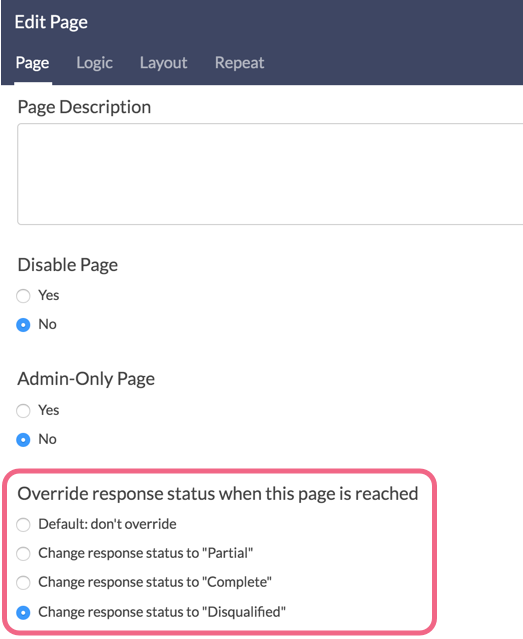
- Next, edit this page and in the Override response status when this page is reached section, select Change response status to "Disqualified". This will ensure that any respondents that land on this page will be marked as Disqualified. Click the Save Page button when you're ready.
- On this same page, click Add New: Action and add a URL Redirect Action.
- Give the action a meaningful Name such as Redirect DQs to Panel. In the Disqualify Respondent section, leave the default setting as No.
- In the URL field paste the disqualify link provided by the panel company and remove the Panel ID at the end (we will add the ID back starting with step 7).
If the link looks like this: http://yourfriendlypanelco.com/disqualified?uid=xxxxxx
Then enter this: http://yourfriendlypanelco.com/disqualified
Not sure where to find these links? Check out step 1 of our Panel Integration Tutorial for more info! - Customize the Message to show to disqualified respondents.
- In the Fields to Pass, select your Panel ID Hidden Value in the Select a Question to Map dropdown menu.
Don't have a Panel ID Hidden Value set up yet? Check out steps 1 and 2 of our Panel Integration Tutorial to learn how! - Click Add Field and define the Variable Name — This is where we will put uid. This should be your Panel ID.
- Click Save Action.
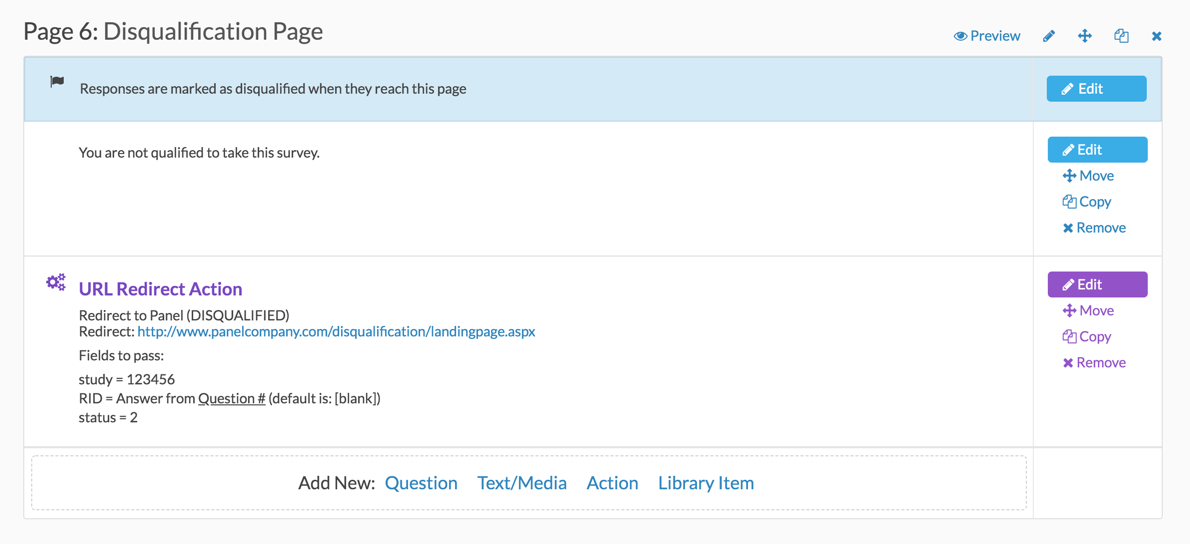
- Your Disqualification Page is now ready and should look similar to the below example:
 There are a couple of additional critical steps that must be completed before this solution is ready. First, you must ensure that respondents who are not disqualified do not land on this Disqualification Page. To do so:
 - Directly above your Disqualification Page, click the Skip/Disqualify Logic link. Give this logic condition a meaningful title such as Direct Complete Respondents to Thank You Page.
- Set up your logic as follows:
- Under the Logic Conditions section, click the Select a condition dropdown and select the Always TRUE option within the System Data section.
- Under the If the Logic Passes, send the respondent to section, select your survey's Thank You page.
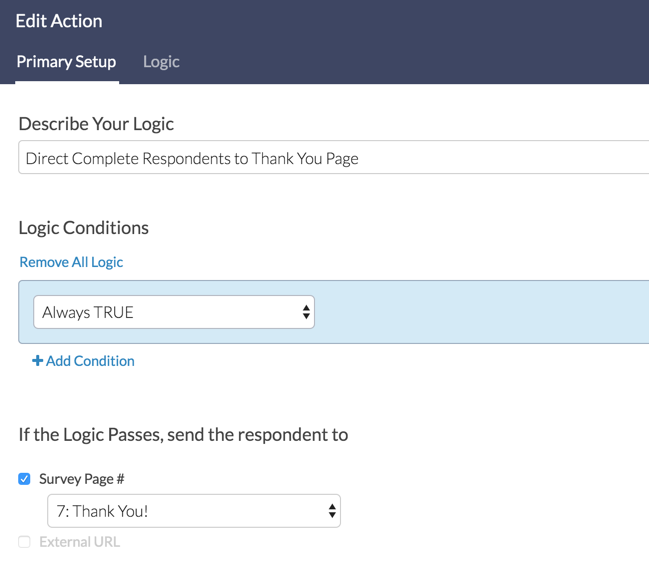
- Save Action.
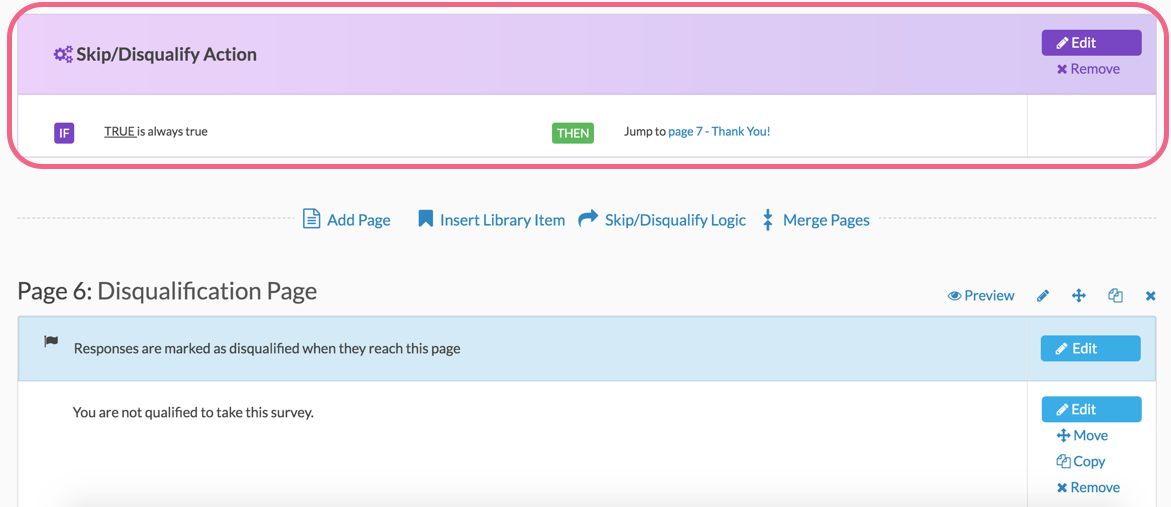
- The completed skip logic should look similar to the below example. This logic will ensure that respondents who have not been screened out will skip over the Disqualification Page and instead will go to your Thank You page.
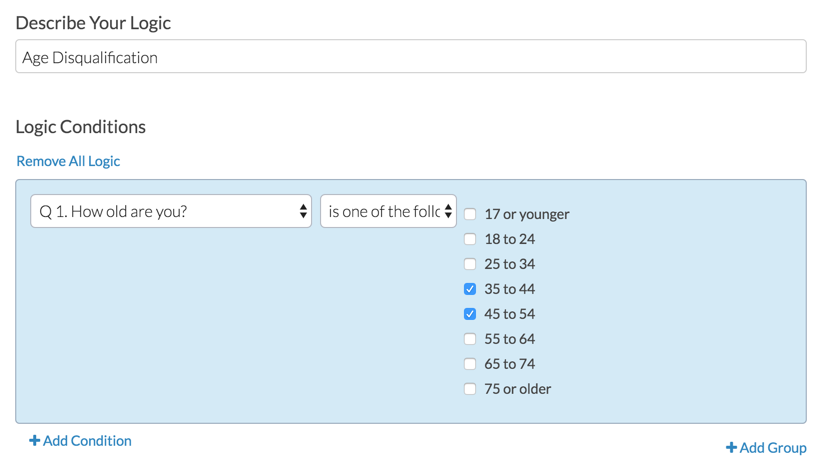
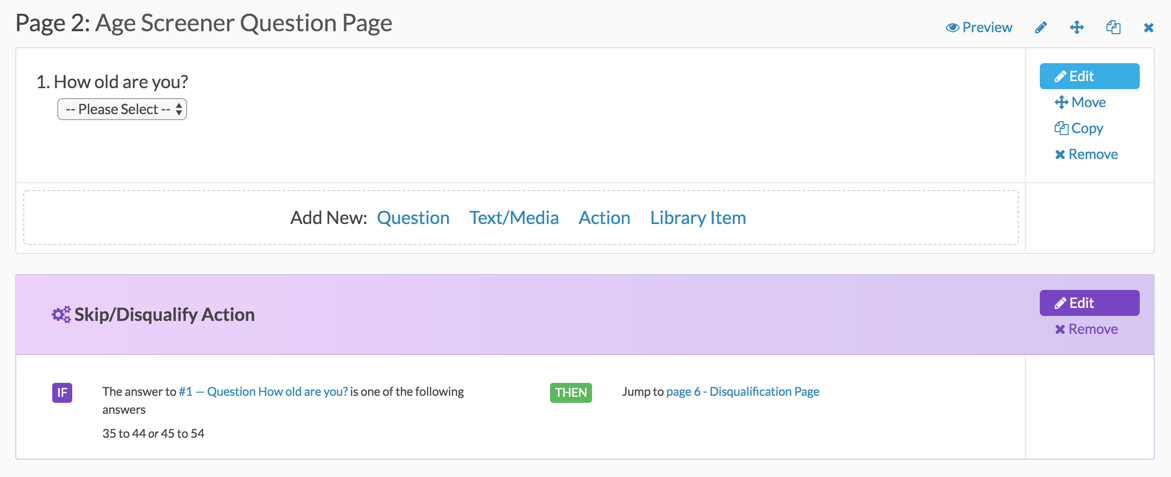
- Finally, locate your survey's screening questions (ideally these are all on the same survey page - typically the first page). If your screening questions are split up across multiple pages, you will need to repeat this step for each page. Click the Skip/Disqualify Logic link after the page that contains your screening questions. Give this logic a meaningful name such as Age Disqualification.
- In the Logic Conditions section, build the logic rule that will disqualify respondents. In our example, we want to disqualify respondents that indicate they are in either the 35 to 44 or 45 to 54 age groups.
- Next, in the If the Logic Passes, send the respondent to section, select your Disqualification Page (set up in steps 1-10). Save Action once you have done this. Your disqualification logic should look similar to this example:
- Your survey is now ready to be thoroughly tested! Before you do so, let's quickly review what we have just configured:
- We created a dedicated Disqualification Page.
- We added a URL Redirect Action to the Disqualification Page to redirect disqualified respondents back to the Panel provider.
- We added Skip Logic to the page just before the Disqualification Page to ensure that non-disqualified respondents will jump over this page and go to the Thank You page.
- We added Disqualify Logic after our screening questions to send respondents to our Disqualification Page.

 There are a couple of additional critical steps that must be completed before this solution is ready. First, you must ensure that respondents who are not disqualified do not land on this Disqualification Page. To do so:


Step 4: Set Up Redirect for Respondents Who Complete the Survey
Now, you need to set up the URL Redirect to send respondents who complete your survey back to the panel company to notify them that that specific respondent completed the survey. This should be placed on the Thank You page of your survey.
- Click Action > URL Redirect.
- In the URL field paste the completed link provided by the panel company and remove the Panel ID at the end (we will add the ID back starting with step 4).
If it looks like this: http://yourfriendlypanelco.com/completes?uid=xxxxxx
Then enter this: yourfriendlypanelco.com/completes - Set a Delay (in seconds) for the redirect; this way your completed respondents will see your Thank You message. You can ignore the disqualify message this time around.
- In the Fields to Pass, select the Panel ID Hidden Value you created in the Question to Send dropdown menu.
- Click Add Field and define the Variable Name — This is where we will put uid in our example case. Remember this should be your Panel ID.
- Click Save Action.


Step 5: Set Up Over Quotas
- Go to Tools > Quotas.
- Click Create Quota > Overall Quota.
- Add a Limit for your quota.
- Select to Stop collection of responses & redirect to a URL under the When a Quota has Been Met.
- Paste your over quota URL (provided by your panel company).
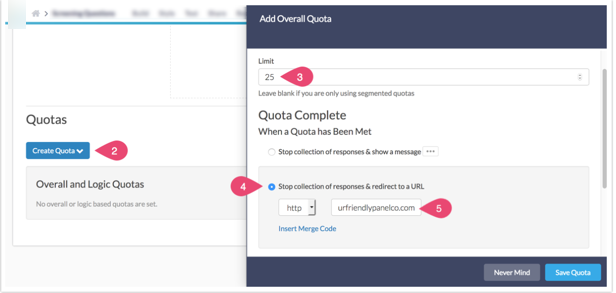
- At the end of the URL, you need to set up your Panel ID URL variable to pass back to the panel company. In our example it is uid. The panel id URL variable should be followed by an equals sign (=). The tricky part is what precedes the URL variable; it should be either a question mark (?) or an ampersand (&). If it is the only URL variable then use a question mark. If it is one of several URL variables use an ampersand. You can check the URL for a question mark, if there's already one there, then append your URL variable to the end with an ampersand.

- Finally, using the merge code helper, insert the merge code for the URL Variable that stores your Panel ID. This inserts the specific value of your URL Variable for each response and passes it through to the Panel company. Make sure to replace the placeholder 'xxx' with the name of your variable - 'uid' in our example.


When you are finished your link should look similar to the following:
http://yourfriendlypanelco.com/quotas?uid=[url("uid")]Make sure to Save Quota on the bottom right of the page. From there, you will just need to send the main share link to your Panel company for testing. Cheers & happy surveying!
Need More Help?
Download a template panel survey with each of the above elements already configured.
FAQ: How do I set up my panel survey to accommodate non-panel respondents too?
If you have another source of respondents in addition to your panel respondents you will need to make some modifications to the above setup so that non-panel respondents are not redirected to your panel.
Probably more important, you don't want these non-panel respondents to count towards your quota. Follow these modifications to the above setup in order to allow non-panel respondents to respond to your survey that is set up for panel respondents.
Modify Your Disqualify Logic
First, you will want to modify your disqualify logic so that non-panel respondents are not redirected to your panel.
- To do so, edit your Disqualify Logic that follows your screener question page.
- Click Add Group at the bottom of your existing logic conditions.
- Leave the and/or operator set to and.
- Select your Panel ID Hidden Value in the first dropdown of the logic builder.
- In the second dropdown of the logic builder select is answered.
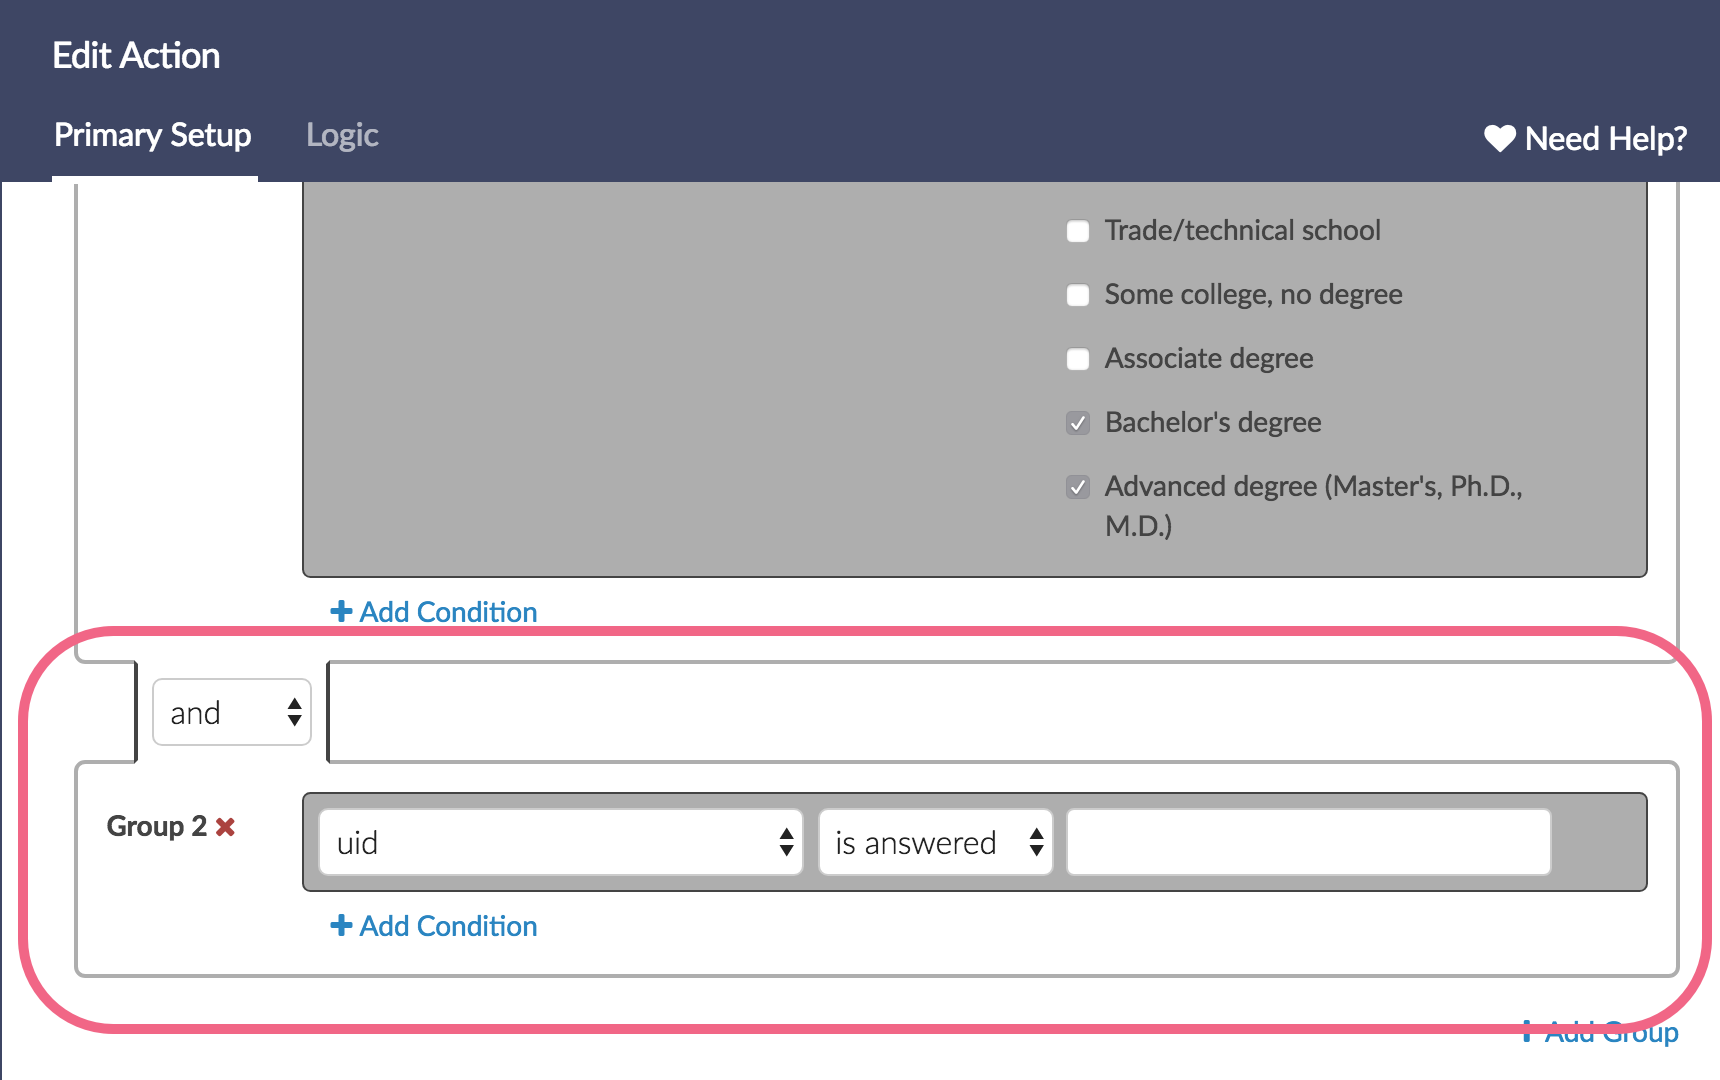
- Click Save Action.

Adding this condition will ensure that only respondents with a panel id (and the other conditions specified) will be disqualified.
(Optional) Add a Second Disqualify Logic Action for Non-Panel Respondents
If you would like to use your screener questions to disqualify non-panel respondents you will need to add a second disqualify action to handle this.
- To do so, click the Skip/Disqualify Logic link below your existing Disqualify Action.
- Using your screener questions set up the logic conditions for respondents you wish to disqualify.

Make sure to also include a separate group condition with Panel ID and set it to is not answered so that your condition is only applied to non-panel respondents.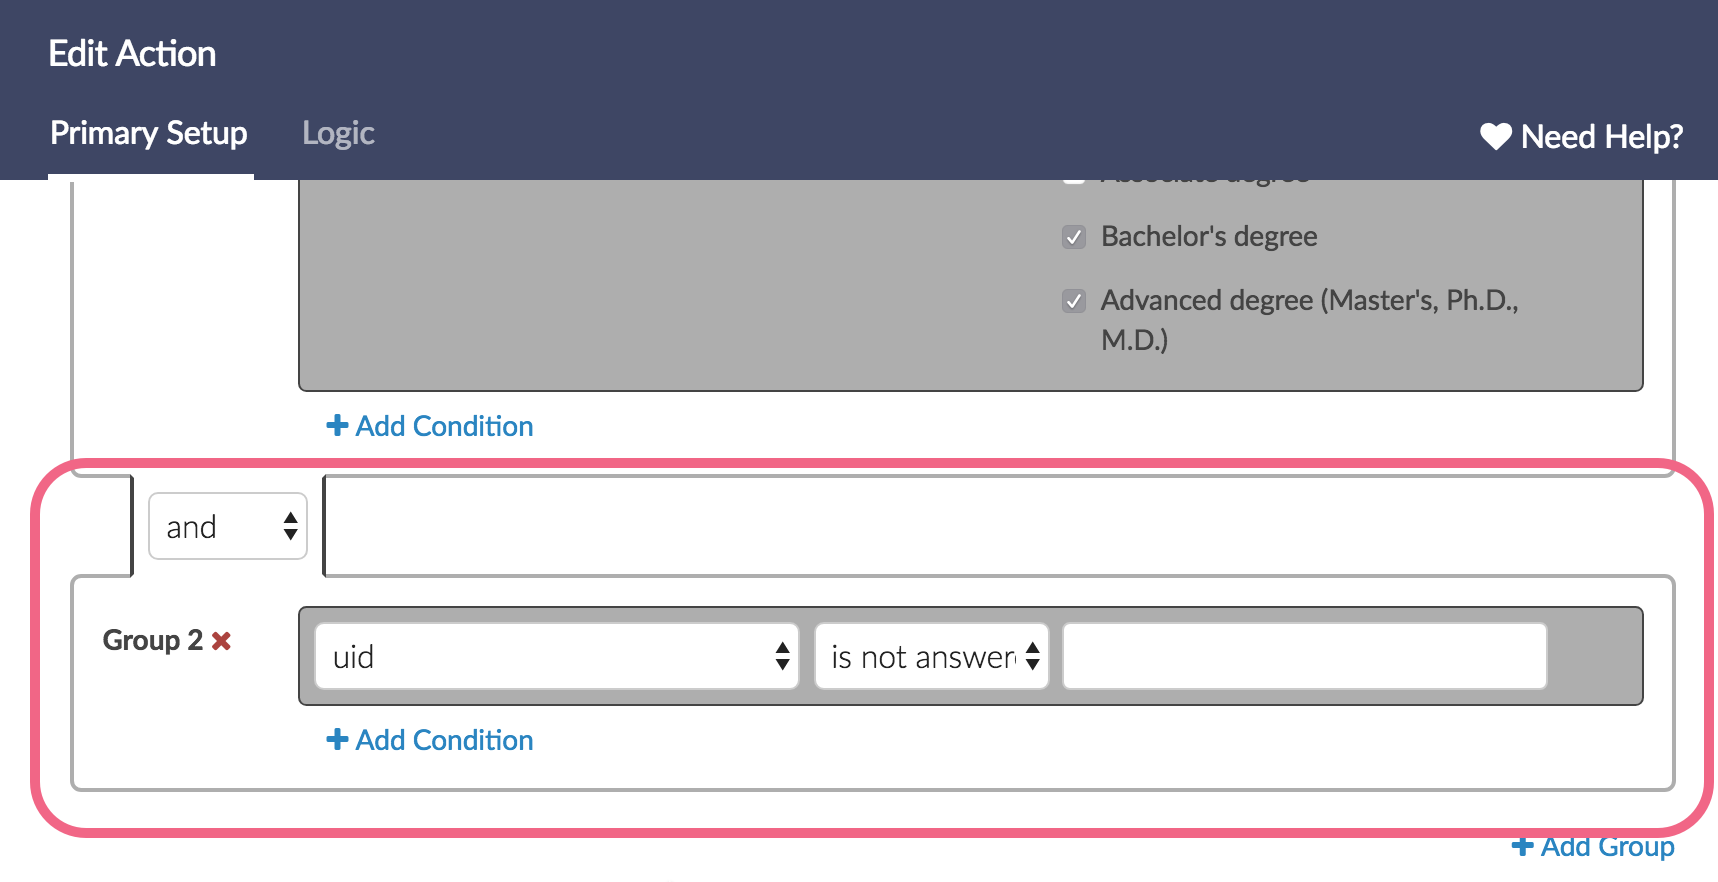
- Under If the Logic Passes, mark the response as select the Disqualified option and customize the message that is displayed.
- Click Save Action.

Modify Your URL Redirect for Completes
You'll also want to add some logic to your redirect for complete respondents so that non-panel respondents are not redirected to your panel.
- To do so, edit the URL Redirect on your Thank You page.
- Go to the Logic tab.
- Select Only show this action based on answers to previous questions or other logic conditions.
- Select your Panel ID Hidden Value in the first dropdown of the logic builder.
- In the second dropdown of the logic builder select is answered.
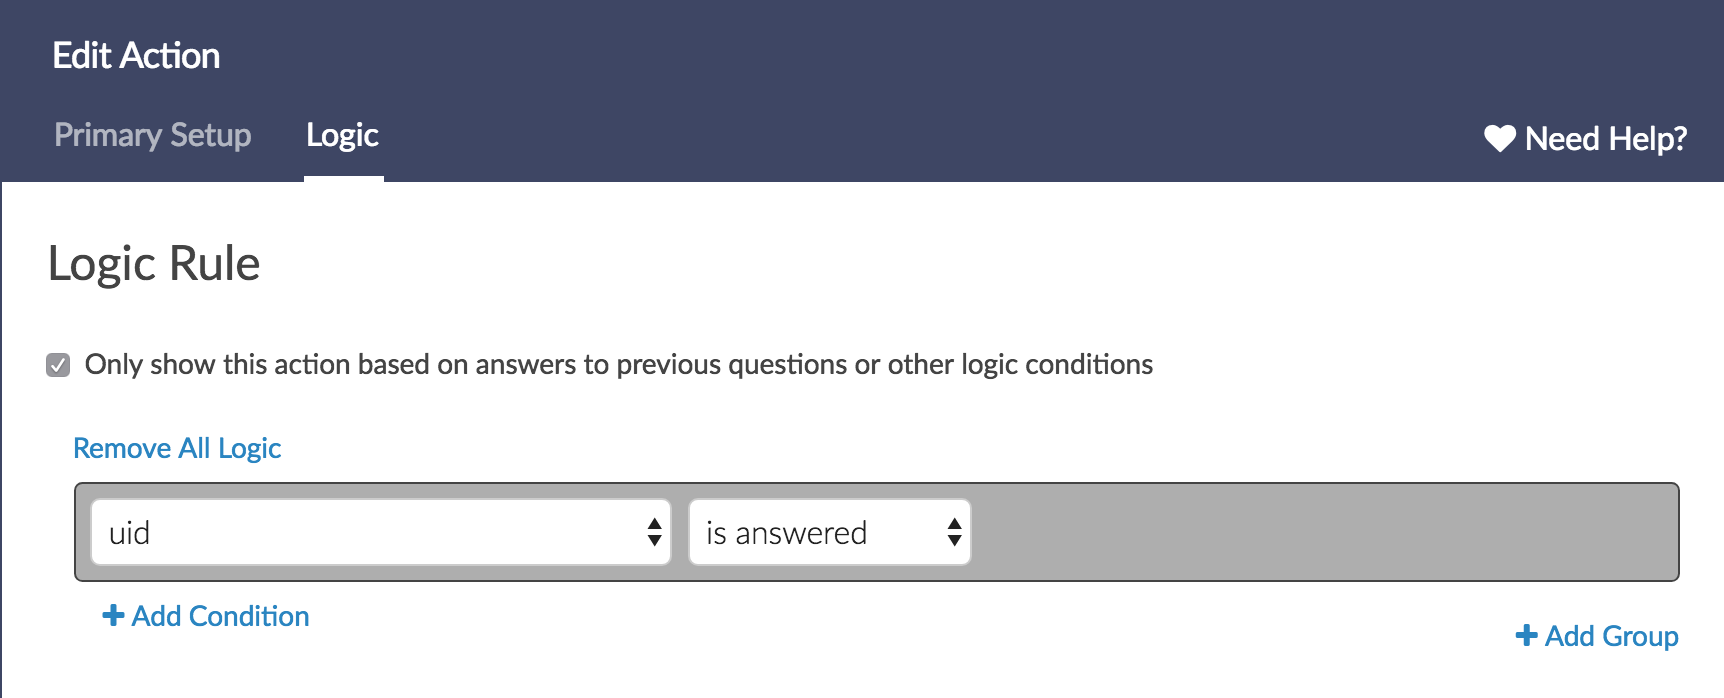

If you decide to create a redirect for non-panel respondents make sure to also include a separate group condition with Panel ID and set it to is not answered so that your condition is only applied to non-panel respondents.
Using Logic Quotas in Place of an Overall Quota
Finally, you'll also want to use a different quota setup to ensure that non-panel respondents do not count towards your quota.
- Go to Tools > Quotas.
- Instead of using an Overall Quota you're going to set up a Logic Quota. If you already set up the Overall Quota from the steps above use the x icon to delete the Overall Quota.
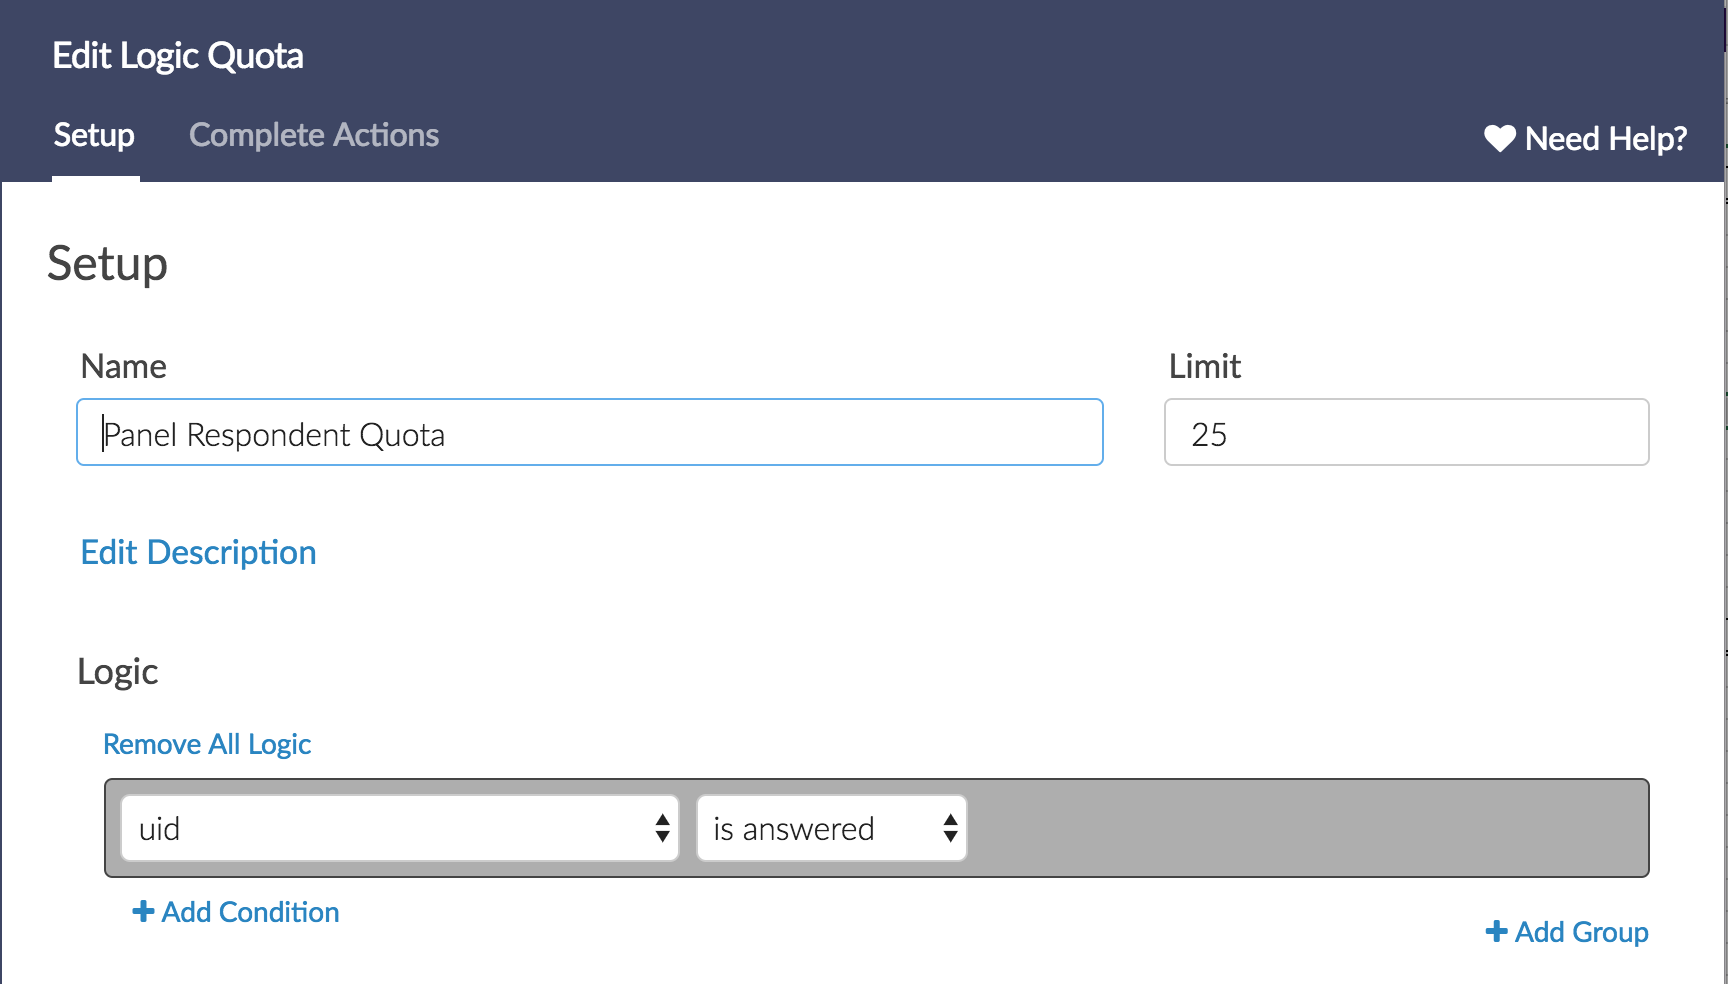
- Click Create Quota > Logic Quota
- Give your quota a Name and add a Limit for your quota.
- Under Logic select your Panel ID Hidden Value in the first dropdown of the logic builder.
- In the second dropdown of the logic builder select is answered.
- On the Complete Actions tab select to Stop collection of responses & redirect to a URL under the When a Quota has Been Met.
- Paste your over quota URL (provided by your panel company).
- At the end of the URL, you need to set up your Panel ID URL variable to pass back to the panel company. In our example it is uid. The panel id URL variable should be followed by an equals sign (=). The tricky part is what precedes the URL variable; it should be either a question mark (?) or an ampersand (&). If it is the only URL variable then use a question mark. If it is one of several URL variables use an ampersand. You can simply check the URL for a question mark, if there's already one there, then append your URL variable to the end with an ampersand.
- Finally, using the merge code helper, insert the merge code for the URL Variable that stores your Panel ID. This inserts the specific value of your URL Variable for each response and passes it through to the Panel company. Make sure to replace the placeholder 'xxx' with the name of your variable - 'uid' in our example.

When you are finished your link should look similar to the following:
http://yourfriendlypanelco.com/quotas?uid=[url("uid")]Make sure to Save Quota on the bottom right of the page. Cheers and happy surveying!
Need More Help?
Download a template panel/non-panel hybrid survey with each of the above elements set up.
Need help finding a respondent pool? Let our Professional Audience Services team find your target audience and integrate your survey to collect the data you need!
Admin
— Bri Hillmer on 03/29/2016
@Lew.bentley: You should definitely have all the features required to set up a panel integration in the Premier plan!
Let us know if you have questions as you work to get it set up!
Bri
Documentation Coordinator/Survey Sorceress
SurveyGizmo Customer Support
— Lew.bentley@headlight.co.nz on 03/28/2016
Hi - I am on a Premier Plan, which is no longer offered. Can I use this panel integration feature?
Lew
Admin
— Bri Hillmer on 10/07/2015
@Daniel.kok: I'm glad to hear our documentation is helpful! Regarding your questions:
1) Your complete link looks correct!
2) This is alittle confusing as the panel company usually provides you with the links but I'm pretty sure I understand what they are looking for. Basically, what you will need is your default web link, available on the share tab plus the URL variable that they wish to append to the link to make it unique. It is usually something like UID.
So, if your default link looks like so:
http://www.surveygizmo.com/s3/1234567/survey
A unique link will look like so:
http://www.surveygizmo.com/s3/1234567/survey?uid=123456
To generate these really quickly I recommend using a spreadsheet tool like Excel. I put all but the id in one column so:
http://www.surveygizmo.com/s3/1234567/survey?uid=
And then the unique IDs in another column and then use a concatenate function to combine the data in the two columns.
I hope this helps!
Bri
Documentation Coordinator/Survey Sorceress
SurveyGizmo Customer Support
— Daniel.kok on 10/07/2015
Hi there,
Great tutorials, makes life easy! Two questions:
1) The link we received has the url variable not at the end, does it still work the way you describe?
Link from panel: http://panel.com/?s=XXXX&p=RESPONDENT_ID&o=C1&lq=ALREADYCOMPLETE
Deleting the ID per your instruction would give: http://panel.com/?s=XXXX&o=C1&lq=ALREADYCOMPLETE
2) We need to provide the panel agency with a batch of unique links with the Panel ID included in this link. I can't find any tutorial about how to create unique links without email addresses (all tutorials assume one has email addresses) and how to include the Panel ID in this link. Can you please explain how we set this up?
Thanks,
Daniel