Diary surveys are a common survey design. In diary surveys respondents take the survey at regular intervals – daily, weekly, monthly, etc. – to record behaviors like sleep, food consumption, purchases, etc.
Usually, survey researchers would like for this data to be in the same survey so that they can easily make data comparisons in the analysis phase. This requires returning respondents to the same response to provide additional data. We will accomplish this by sending a delayed Send Email Action which contains an edit link. If you prefer to use another method, check out our tutorial on Returning Respondents to a Later Page in a Survey for other options.
Step 1: Create Your Initial Survey Questions
For this tutorial example let's say we are collecting sleep diary data from our respondents for an entire week.
We will start by setting up the questions we wish to ask once, e.g. demographic questions, on the first page(s) of the survey. In one of these questions, we will collect the respondent's email address; we will need this later to return them to their response.

Step 2: Set Up Your Diary Interval Pages
On a new page we will begin setting up our diary questions. Typically, the questions are the same for each interval of the diary so we'll just copy this page for Tuesday - Sunday.

Step 3: Set Up Intermediate Thank You Pages
Now, we are going to add a page to follow each day's page that will work like a Thank You Page for that day's response. The set up for these pages is more or less identical, so, once you have one page created (including the send email action covered in Step 4) you will just be able to copy each.

To make your thank-you page work as a typical thank-you page, you will need to set it up as a Terminal Page.
- To do so, click the pencil icon to edit the page and go to the Logic tab.
- Under Terminal Page select Yes.


Now, when survey respondents reach this page, it will appear as if they are done with the survey for now.
Step 4: Set Up Send Email Actions on Your Intermediate Thank-You Pages
Now we are ready to set up our method for returning respondents to the survey. For this example, we will be using a delayed Send Email Action that includes an edit link that will return the respondent to their response. We'll also add a special URL Variable that navigates them to the correct page.
- To get started, we will add a send email action to our intermediate thank you page.
- Customize the Subject, the From Name, From Address, and Reply To fields as needed.
- In the To (recipient) field, using the survey taker link below the field, we will select the field in our survey where we collected an email address from the respondent.
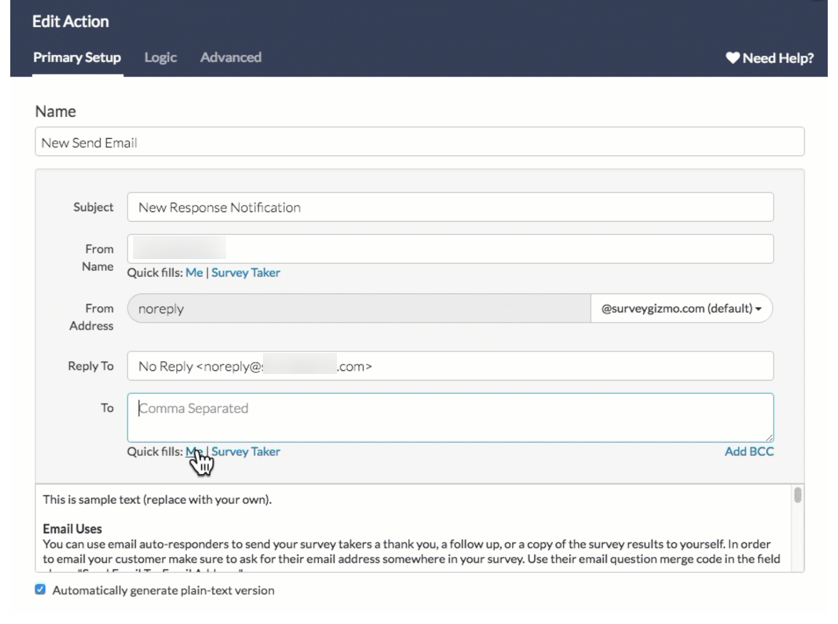
- In the Message Body, we will add our text inviting the survey respondent to return to the survey. As part of the message body, we'll need to add the edit link merge code.
- To do so, click the Merge Code button below the message body.
- Click the About the Respondent section and select the Insert option associated with the Edit Link.


Once we have included our edit link, we will need to add a URL variable to the end of the edit link that will navigate the respondent to the proper page. Before we can do so, we need to get the ID or SKU for the pages you wish the survey respondent to land when returning to the survey.
- To obtain page IDs click the View Settings link in the upper-right corner of the Build tab. Select Page IDs and click Apply.

- Your page IDs will then display to the right of your page title on the Build tab.

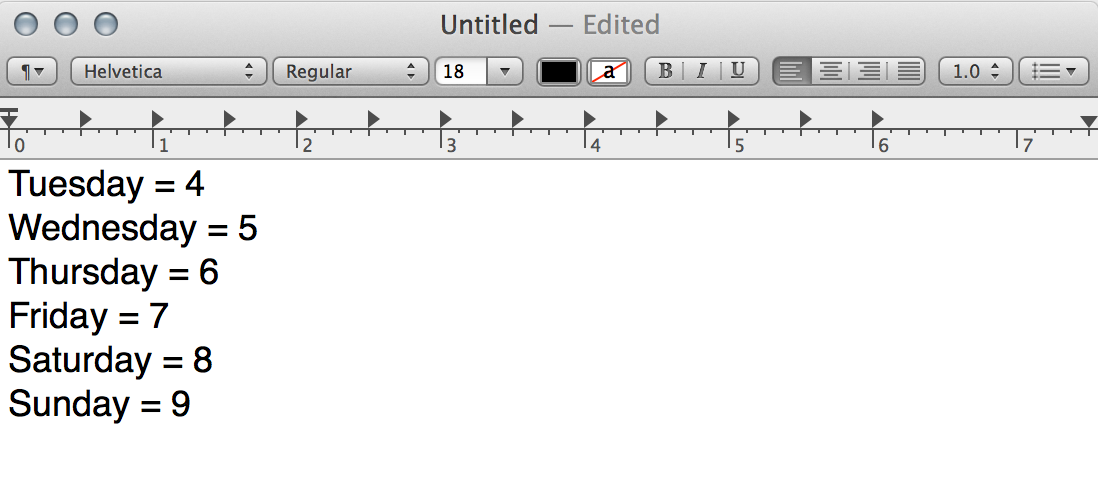
- We recommend making a quick list like the below list to reference while building out the edit links in each of your send email actions.
- With our page ID handy, we'll add the
__sgtargetURL variable to the end of our edit link merge code(which we added to the body of our email message) starting with an ampersand, 2 underscores, and sgtarget=ID. The result will look like this:[survey("edit link")]&__sgtarget=4 - Finally, we need to delay the send email action for the amount of time we wish to elapse before inviting the survey respondent to return to the survey.
- To do so, go to the Advanced tab of the send email action and in the Time delay field enter the time delay you wish to use. This could be +30 days, +2 months, etc.

- Click Save Action!
- To do so, go to the Advanced tab of the send email action and in the Time delay field enter the time delay you wish to use. This could be +30 days, +2 months, etc.


Once you've set up your first intermediate thank you page and send email action you can now copy the page and make the appropriate edits (page ID and message body text) and then reorder the new page to the appropriate location!
Send Diary Reminder on a Specific Date/Time
Note that in order to use this option, you will need to have your respondents' email addresses ahead of time.
Using our daily survey example above, remember that we set a 24 hour delay on our send email actions.
- This means that if a respondent takes the survey at 5 pm on Monday, the email containing Tuesday's invite will arrive around 5 pm on Tuesday.
- If the respondent then takes the survey at 10 pm on Tuesday, Wednesday's invite will not arrive until 10 pm on Wednesday, and so on.
What if you want the invite for each iteration of your diary survey to arrive at the exact same time each day, week, etc.?
To do this, you can utilize SurveyGizmo's Email Campaign feature. An email campaign allows you to send an invitation link to a list of email addresses. You can then send a scheduled reminder (for a specific date/time) for each iteration of your diary.
The good news is that you do not have to change the structure of your diary survey. If you want to use an email campaign, you should still follow Steps 1-3* above.
Create Your Email Campaign
- The first step to distributing your diary survey is to create an email campaign. You will need to customize your invitation email message and add the contact(s) that will be invited to participate in your diary survey.
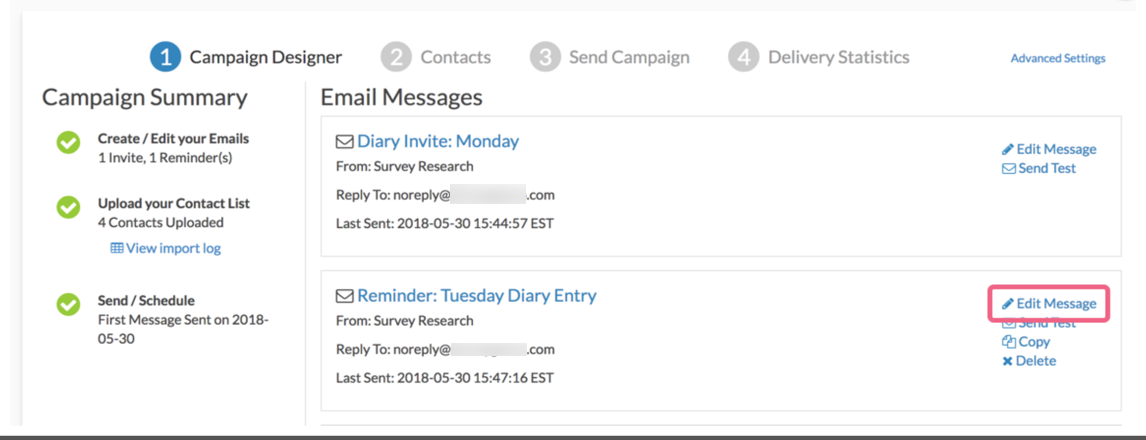
- Next, you will need to add a separate Reminder Message for each iteration of the diary (minus the first day). Using our above example, respondents are asked to submit a response each day of the week (7 days).
- The initial invite will go out on Monday.
- We need a reminder message to be sent for each of the following days (Tue-Sun). As such, we will need six reminder messages. Our campaign designer page should look something like this:

- Each of the reminder messages will require a URL variable to be added to the end of the survey link that will navigate the respondent to the proper page when they return to their survey. Before we can do so, we need to get the ID or SKU for the pages you wish the survey respondent to land when returning to the survey.
- To obtain page IDs click the View Settings link in the upper-right corner of the Build tab. Select Page IDs and click Apply.
- Your page IDs will then display to the right of your page title on the Build tab.
- We recommend making a quick list of the Page IDs (like the below list) to reference while building out the links in each of your reminder messages.
- To obtain page IDs click the View Settings link in the upper-right corner of the Build tab. Select Page IDs and click Apply.
- With our page IDs handy, we will edit the first of our reminder messages.
- Next, we need to access the HTML source code for the reminder message. We click the Source button to do so.
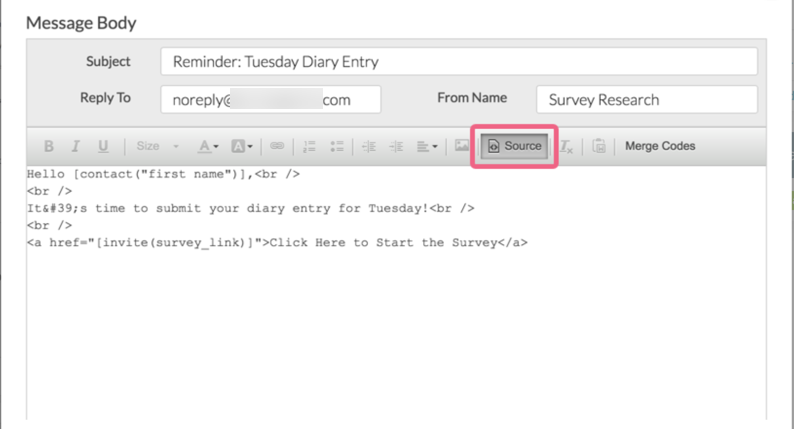
- Once we are viewing the source code, we need to locate the survey link merge code. This merge code is "[invite(survey_link)]". We must add the
__sgtargetURL variable to the end of our survey link merge code starting with an ampersand, 2 underscores, and sgtarget=ID. The result will look like this:"[invite(survey_link)]&__sgtarget=4"
Note that the sgtarget URL variable should be added just after the link merge code, prior to the closing quotation mark. - You will need to repeat this process for each of your Reminder messages, making sure to add the appropriate Page ID (depending on the day, week, etc.) after the equals sign of the sgtarget URL variable.
- Once you have configured each of the survey links for your reminder messages, it's time to schedule your reminders.
- To do so, navigate to your Email Campaign's Send Campaign page.
- Click on the Not Scheduled link associated with the reminder messages and use the available options to select a date and time to send your message. Repeat the process for all of the reminder messages that you have created.

- Important! Before you send out your initial invite, there is a final step. It's important to note that reminder messages can only be sent to respondents that have either Not Started, or have a response status of Partial. In Step 3 above, we configured intermediate Thank You pages that are shown after each diary entry. By default, these intermediate Thank You pages set a respondent's status to Complete, thus making them ineligible to receive reminder messages. We need to override this behavior.
- Edit the first intermediate Thank You page and scroll down to the Override response status when this page is reached section.
- Select the Change response status to "Partial" option and Save Page.

- Repeat this process for each of your intermediate Thank You pages.
- Now you are ready to send your Email Campaign initial invite and start collecting diary entries.


Admin
— Bri Hillmer on 03/07/2018
@Mitch: I'm so happy to hear it was helpful!
240 pages might stretch the capabilities of SurveyGizmo. If your questions remain the same every day you could send respondents back to record a new response (by including the default share link instead of an edit link in the email) and then pass in information about what day it is using a URL variable. This way you could still filter on the day and the respondent but you have a nice short survey.
Here is a tutorial on using URL variables to pass in info:
https://help.surveygizmo.com/help/url-variables
I hope this helps!
Bri Hillmer
Documentation Coordinator
SurveyGizmo Customer Experience Team
— Megan on 03/06/2018
Terrific article! We are a preschool and have a survey we want the teachers to complete every day for a school year - approximately 240 days. Would we need to create 240 pages in the survey?
Thanks for the great resource!