Have you ever been browsing a business website, when after three or four pages of browsing, a survey pops up to ask you about your experience using the site? That is what we call a Website Intercept and SurveyGizmo has this functionality built in! It allows you to target visitors with content that can drive conversions or engagement through feedback surveys.
- Check out a banner intercept example. (Close any previous intercepts you have triggered first.)
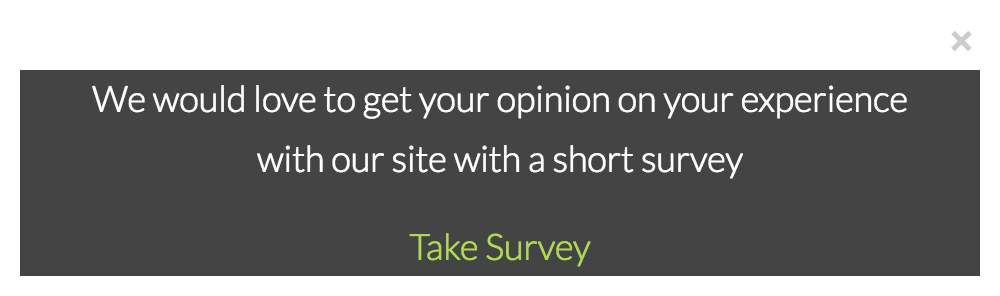
- Check out a modal dialog intercept example! (Close any previous intercepts you have triggered first.)
- Check out an inline intercept example (Close any previous intercepts you have triggered first.)
Create a Beacon
The first step to adding an Intercept survey to your website is to create a Beacon. A Beacon contains the Javascript code that you will paste at the bottom of all pages in your site that you want to track. You must be an Account Administrator to create or edit Beacons.
- Click Integrations > Website Intercept.
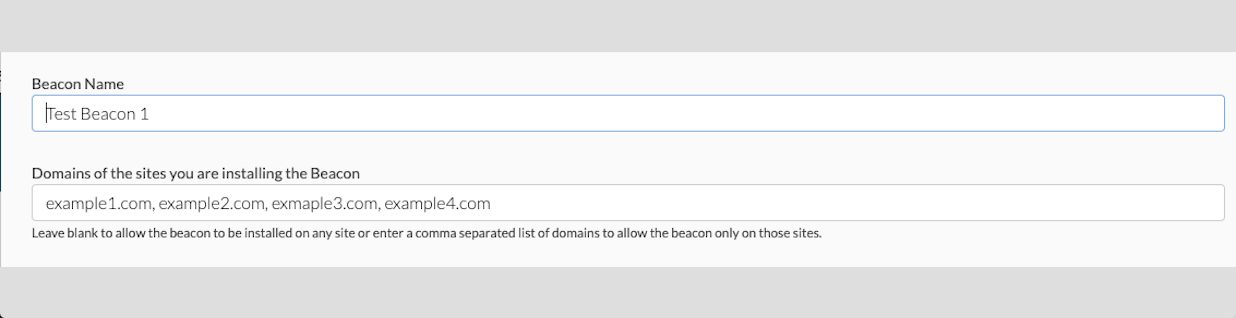
- Give your new Beacon a Name. We recommend having this name reference the site and page(s) you plan on using with this Beacon.
- Input the domain(s) of the site(s) where you will be installing this Beacon. Be sure to input only the domain name (everything up to .com), and not specific page paths. The Domains of the sites you are installing the beacon textbox can be left blank so that it may be installed on any site, or separate each domain added manually to the field by a comma:
- (Optional) You can restrict access to a Beacon based on Teams in your account.
- By default, a Beacon is active upon creation. You can disable the Beacon at any time.
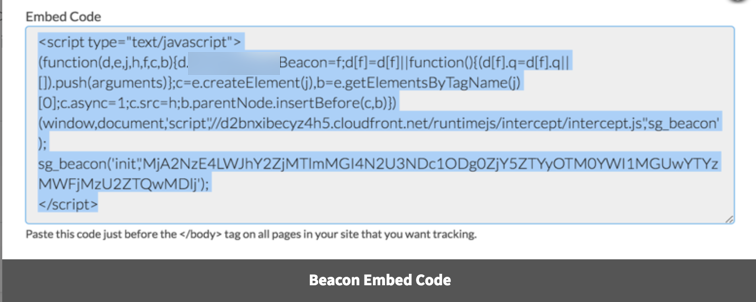
- Copy the embed code for this Beacon. You will then paste it at the bottom of the source code of all pages you want to track.


Once your beacon is created, it will be viewable and accessible via Integrations > Website Intercept. Here you can view general information such as Beacon Name, the date it was created, and the name of the user that created it.
![]()
Create a Website Intercept link
Now it's time to set up the link between the Beacon and the survey you want to appear!
- Go to the Share tab of your survey and click Website Intercept Survey (located on the bottom-half of the Share page). Give this link a memorable name.

- Choose the Invite Type. See the above examples of each of invite type.
- Top/Bottom Banner - This will create a banner that is positioned statically at the top or bottom of the targeted page. If you choose a Top or Bottom banner, you'll also have an option to Fix to, which will anchor the banner to the top or bottom of the browser window instead of the page contents.
- Modal Dialog - This will create a 'popup' modal window inside the targeted page. Popup blockers will not block this type of interaction.
- Inline - This can target a specific CSS selector to make the Intercept appear inline on the chosen page.
- You can customize the colors of the Background of the banner/popup, the Invite and Link text by clicking on the color next to each option. If you need to make a lot of style customizations CSS can be added on the Advanced tab.)

- Now it's time to write your Invite Text. This text should encourage your website visitors to engage with your survey. This field supports basic HTML and inline CSS. (CSS can also be added to the Advanced tab if you have a lot of style customizations.)
- Your Survey Link Text will be what the visitor actually clicks to get the survey. This field supports basic HTML and inline CSS (CSS can also be added to the Advanced tab if you have a lot of style customizations.)
- Choose your previously-created Intercept Beacon from the menu. By default, this link will be open, you can come back here to close it!


Site intercept link changes can take up to 30 minutes to take effect.
Advanced Controls
Once you have the initial setup complete, you now need to determine how and when the Intercept will appear to visitors. Click on the Advanced tab to get started!
- The logic builder allows you to select what actions will trigger the Intercept to appear. You can add multiple conditions or groups of conditions. You can choose from the following options for a logic trigger:
- Last Offered this Survey (days ago) - The survey will be triggered when it has either never been offered or was last offered more than X days ago. As a best practice, this condition should be added as an AND condition to most other conditions to prevent the intercept from being triggered repeatedly.
- Percent Chance (1-100) - Percent chance that the survey will be triggered each time the Beacon code is evaluated. Since this is applied each time the beacon code is executed, if you set the chance to 50%, you can expect the survey to be triggered roughly every other page that has the beacon code as you move through the site.
- Number of Site Visits - The survey will be triggered as soon as the user visits the site X times.
- Page(s) Visited by User - The survey will be triggered as soon as the user visits the specified page(s). The intercept will be triggered immediately once the condition has been met and will trigger repeatedly on all subsequent pages where the beacon has been added.
- Time on Page (seconds) - The survey will be triggered once the user has been on a page for X or more seconds. You can also specify less than or equal to X seconds, but this only makes sense when used with other logic conditions to prevent the survey from being triggered immediately.
- Time on Site (seconds) - The survey will be triggered once the user has been on the site for X or more seconds. Only site pages where the beacon has been added will be counted towards the time on site.
- Browser - The survey will be triggered on the specified browser(s).
- Device - The survey will be triggered on desktop, tablet, or mobile device as specified.
- Advanced
- CSS Selector Clicked by User (targets a specific CSS class name on your site that the respondent would interact with. This is on-click only)
- Cookie (has to be setup on the same domain as the Beacon)
- Custom Data
- Say you only wanted to present a survey to 20% of the visitors to your site that are using desktop computers, here are the triggers needed for that Intercept:

- You can also set a Quota of responses to collect, as well as set an Open/Close date for the Intercept.
- You can define any URL Variables you want to pass along with responses collected by the Intercept.
- You can also specify a Language for the survey to display in. If left set to Auto the Intercept will automatically detect the language of the respondent's browser and, if a translation is available, it will present the survey to them in that language.

- Finally, use the Custom JavaScript and Custom CSS fields to change the intercept invite styles or behavior. If you wish to style the survey use the Style tab controls or add Custom CSS via the Style tab.


Scripting and Other Custom Solutions
We’re always happy to help you debug any documented script that is used as is. That said, we do not have the resources to write scripts on demand or to debug a customized script.
If you have customization ideas that you haven't figured out how to tackle, we're happy to be a sounding board for SurveyGizmo features and functionality ideas that might meet your needs. Beyond this, check out our Professional Services; these folks have the scripting chops to help you to achieve what you are looking for!
Themes
If you want surveys displayed via an Intercept link to use a different theme than the one you've chosen in the Style tab, you'll find the override options on the Themes tab. This can be useful if you want to brand the survey differently depending on which section of your website a visitor happens to be in when they launch the Intercept survey. This could be implemented with multiple Intercept links, each triggered by different page path logic, and each with different theme overrides.
Test
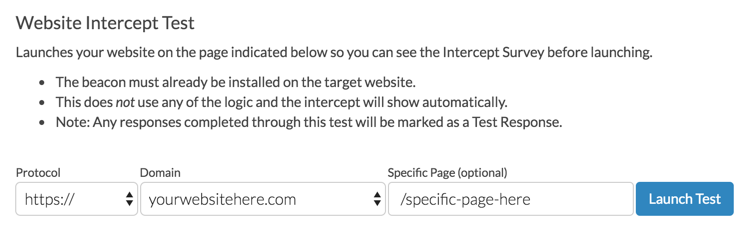
Once you are done with the setup, it's time to test! Click over to the Test tab and input the domain and page path where you've pasted the Beacon code. You can also switch from https:// to http:// depending on your needs.
Depending on whether the domains in the beacon are left empty or populated changes what is displayed in the Test tab:
- If there is a list of domains in the linked beacon, the domain portion of the tst link will be in a dropdown menu with the domains provided.
- If the domains textbox is left blank, there is a blank textbox field that displays.
Now click Launch Test to preview your page with the Intercept! This will bypass any logic you have set up, and force the Intercept invite to show.
A successful intercept invite will look like one of the above examples depending on the invite type you chose.
Advanced Logic Triggers
CSS Selector Clicked by User
You can target a specific CSS selector that a visitor on your page will interact with to trigger an Intercept. Imagine a user interacts with a specific button on a targeted page and you want to ask why they did what they did. Perhaps they clicked a Back button, taking them away from a checkout page and you want to know why they didn't proceed.
You could use the CSS selector of that button (.backButton) to target that specific interaction.

Cookie
Many websites create session cookies that contain information about the usage of the site (did you add items to your shopping cart, have you logged in to the application) and you can have an Intercept appear based off of a cookie value. An example of a cookie would look something like this:
document.cookie =
 'sgcookie=testcookie; expires=Thu, 26 July 2014 23:42:00 UTC; path=/'
An Intercept set to show when the cookie sgcookie is set to testcookie would look like this:

Custom Data
Custom Data attributes stored on a page can also be used to trigger the Intercept. In this case, a custom value for cart that is set to item3 would trigger the survey. These are attributes that you or your web developer will have to program into the site.

To add custom data, simply call sg_beacon('data', 'name', 'value'); right after the sg_beacon('init', …); call in the default beacon code.
To put it a different way, let's assume various pages of our website will be loading the beacon code. The following is a normal beacon snippet; this stays the same for each page:
(function(d,e,j,h,f,c,b){d.SurveyGizmoBeacon=f;d[f]=d[f]||function(){(d[f].q=d[f].q||[]).push(arguments)};c=e.createElement(j),b=e.getElementsByTagName(j)[0];c.async=1;c.src=h;b.parentNode.insertBefore(c,b)})(window,document,'script','//d2bnxibecyz4h5.cloudfront.net/runtimejs/intercept/intercept.js','sg_beacon');

sg_beacon('init','Mjg1MjcwLTRFOTMxQkRCMzMxRDRGRjBBMjc0RUU0MDAxMDFCNEU2');
We will then add the following code, right after the sg_beacon('init', …); call. This changes depending on the page being loaded, or whatever else you want it to depend on:
sg_beacon('data','myName','someValue');You can call this sg_beacon function more than once to include more than one piece of information. Think of custom data just like URL variables—partially because they do get automatically added as URL variables when loading the Intercept survey! This means, if the user is logged in to your website, you could pass along their username or ID as a piece of custom data, and record that in a hidden value. Or pass along their name and display it in a merge code ("Thanks for opting to take my survey, [url("name")]!"). So custom data isn't just about intercept logic—though it certainly can be used for that.
Custom Data Example
Say you want to show a survey when a customer adds more than 3 items to their cart. Here's the custom data call, to be put right after the beacon code:
var items = someFunctionOnYourSite(); // however you would normally check for the current number of items in their cart when loading the page

sg_beacon('data','itemsInCart', items);
And in the beacon Advanced tab:

One important note: custom data must be added soon after the sg_beacon('init', … ); call.
That means if you use AJAX to dynamically do stuff on your page without actually reloading the page, calling sg_beacon('data','name','value'); long after the original sg_beacon('init', … ); won't trigger the intercept to show (if the Intercept logic depends on the custom data).
The Beacon code is called on the initial page load. If one is utilizing a framework such as Angular or React , the site in use may not reload the web page, and will not be able to re-trigger the Website Intercept after the initial page completes loading. Always check in with your developers to explore the possible impact of this in conjunction with the use of Website Intercepts.
FAQ
How do I set up my intercept survey to open in a new window?
Intercept invitations load two hyperlinks – one that opens your survey in an iframe, and one that opens your survey in a new window. The default behavior is to show the iframe link and hide the other link, unless you are using a bottom-bar banner invitation, and are on a device with a screen width between 300 and 1024 pixels. In this case only, we display the link that opens in a new window instead.
To override this behavior, and have your Website Intercept surveys always open in a new window, simply hide the .sg-b-l-t class and show the .sg-b-l-m class, like below. To do so, copy and paste the below code in the Custom CSS field on the Advanced tab of the intercept.
.sg-b-l-t {display: none;}
.sg-b-l-m {display: block;}
How do I record the page the website intercept respondent was on?
On the Details tab of each Individual Response the page the respondent was on will be available in the Http Referrer field.
Can I translate the invite?
At this time the invite cannot be translated.
Does my website intercept pass data via https or http protocol?
The website intercept does not have a setting to select link protocol (http vs https). As different websites have different security settings, intercepts are designed to be flexible:
- If the webpage that is hosting the intercept is secure (Ex: https://www.surveygizmo.com), the data will be transferred using a secure protocol.
- If the webpage uses a normal security setting (Ex: http://yourdomain.com), the data will be transferred using normal a normal protocol.
Admin
— Bri Hillmer on 04/07/2016
@Martin: We do not have this option with the website intercept. You can definitely achieve this with one of our embed options. Of course you won't have the logic options that you have with the website intercept to determine when the survey displays.
Here is our tutorial on our embed options:
https://help.surveygizmo.com/help/article/link/embed-a-survey-on-your-website
I hope this helps!
Bri
Documentation Coordinator/Survey Sorceress
SurveyGizmo Customer Support
— Martin on 04/07/2016
Hi!
How do I setup an intercept-survey that just shows the first question rather than require the user to click a link/button to see the first survey?
— Labs on 02/16/2016
@Jeff You can declare it directly in a in the invite text ( aka .sg-b-l-t {display: none;}
.sg-b-l-m {display: block;} )
Admin
— Nathan Sollenberger on 09/10/2015
@Martina — Great questions! All Intercept invitations display very nicely on a variety of screen sizes including mobile, with the exception of modal dialogues, which may need some size and positioning tweaks with CSS to display nicely on older mobile devices.
The survey itself will utilize all of SurveyGizmo's usual mobile optimizations, however I would recommend using the tip listed at the end of this article to "Open Website Intercept Survey In A New Window", as this will ensure the best experience possible for all devices (scrolling around in an iframe on a mobile device can be a less than satisfactory experience, in my opinion). I hope this helps!
Nate
— Martina on 09/09/2015
How will a website intercept work on a responsive site? Is the survey also responsive? I want the surve and the "Invite (top/bottom banner or modal dialog)" to look good on all device, and I want the survey to be adjusted to mobile.
Admin
— Dave Domagalski on 08/31/2015
@Subaru: Thank you for your question! The .sg-b-l-t and .sg-b-l-m classes are found on any of the webpages where an Intercept Beacon has been embedded. The above CSS modifications would need to be made on the webpage where the intercept survey is triggered.
I hope this helps!
David Domagalski
Survey Explorer
SurveyGizmo Customer Support
— Julie on 08/28/2015
To open a website intercept in a new window, the instructions say, "simply hide the .sg-b-l-t class and show the .sg-b-l-m class", but does not show where we do this. I tried looking everywhere. Please show us where these class names are found. Thanks.