Does your team use Slack as a communication tool? If so, you can now send data from your SurveyGizmo surveys directly to a public slack channel, or to a specific user!
SurveyGizmo's Slack Integration allows you to send a message about survey activity to Slack. This feature is great for allowing your team members to take immediate action on survey responses.
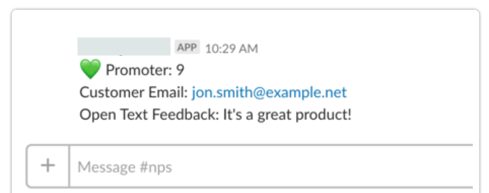
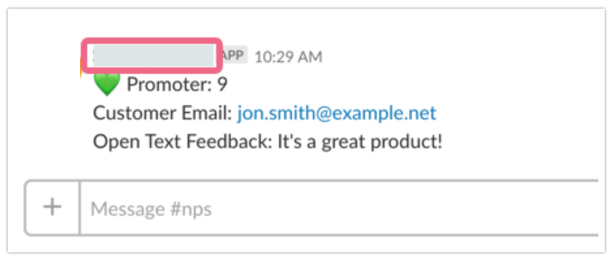
For example, let's say that you have a survey that collects your customers' NPS®. Using the Slack Integration, you can send each NPS response as a message to a Slack channel monitored by your Customer Service team. When a detractor score comes in, it can be immediately addressed by a service representative.
Integrate With Slack
In order to use the Slack Integration, you will first need to connect your SurveyGizmo and Slack accounts. You will need your SurveyGizmo Account Administrator for this part.
Note: The Slack Integration does not allow for posting to private channels; only public channels are supported.
Visit the Slack documentation to learn how to manage apps for your Slack workspace.
- In SurveyGizmo, navigate to Account > Integrations > 3rd Party Integrations.
- The Slack Integration will be available as a Collaborator level integration. Click the Configure button associated with the Slack Integration.
- Provide an Integration Name in the provided field. This is an internal title that will not be seen by survey respondents nor Slack users.
- In order for this integration to work, we need to ask Slack for permission to send messages to your workspace. When you click Save, you will be redirected to a Slack page asking you to grant SurveyGizmo the permission that it needs.
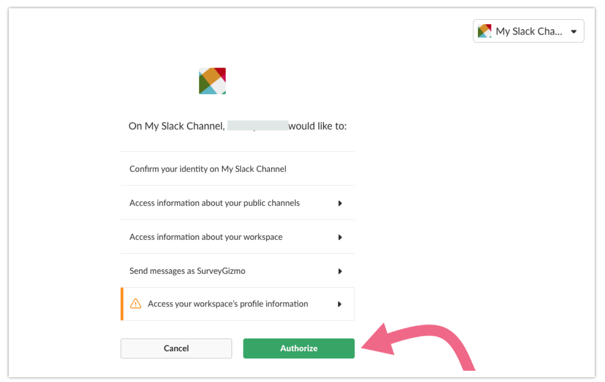
- Click Authorize to allow SurveyGizmo the access it needs to integrate with your Slack workspace. Learn why SurveyGizmo needs access to this information and how it's used.
- Once the authorization has been granted, you should see your integration added in your SurveyGizmo account with a Status of enabled and a green checkmark in the Verified column.
- You will receive an email from Slack informing you that you have installed SurveyGizmo for your Slack workspace. The email will also include instructions for removing the SurveyGizmo app, should you need to do this.


Now that you have connected your SurveyGizmo account to your Slack workspace, read on to learn how to send information from a survey to either a Slack channel or a specific user.
Authorize SurveyGizmo Access to Your Slack Workspace
SurveyGizmo needs access to your Slack workspace to complete the integration set up. Authorization is needed for the following:
- Access information about your public channels - SurveyGizmo needs to access information about channels in order to auto-populate a list of channels that the Slack Action can send to.
- Access information about your workspace - SurveyGizmo needs to access your team information in order to display which Slack team is associated with an interaction.
- Send messages as SurveyGizmo - SurveyGizmo needs authorization in order to post messages to your Slack channel(s) via the Slack Action.
- Access your workspace's profile information - SurveyGizmo needs access to your Slack users in order to auto-populate a list of users that your action can send messages to.
Add Slack Action
In order to send information from a survey to Slack, you will need to add a Slack Action to the survey. As a best practice, we recommend that you add this action after you are finished with the survey build.
Note: Since your Slack Action will need to use data from survey questions, make sure that you add the action on a page after the last question that you want to use!
- On the survey page where you want to add the action, click Add New Action.
- Locate the Slack action in the Integrations section and click the corresponding + Add button.
- Give the action a Name (internal) and select the Slack Integration from the available dropdown menu (if you have integrated SurveyGizmo with multiple Slack workspaces). Click Save to initiate the connection.

- Now, click Edit on the just-saved Slack action to finish the setup.

- If you need to change the integration that this information will be sent to, select a different integration via the Slack Integration dropdown menu.
- The message can be sent to either a Slack channel or an individual user.
- To send to a specific channel, type # in the Channel or User field. Available channels will be auto-suggested; click on the channel that you want to post a message to. You can also use the Select a Merge Code tool to merge in the channel name from another part of the survey. The channel name must be in the format of
#channelname.
- To send to a specific user, type @ in the Channel or User field. Available users will be auto-suggested; click on the user whom you want to notify. You can also use the Select a Merge Code tool to merge in the channel name from another part of the survey. The user name must be in the format of
@username.
- To send to a specific channel, type # in the Channel or User field. Available channels will be auto-suggested; click on the channel that you want to post a message to. You can also use the Select a Merge Code tool to merge in the channel name from another part of the survey. The channel name must be in the format of
- Next, you can customize the message content. This is what will be sent to the Slack channel/user when the SurveyGizmo action is fired. Type in your message content or use the Select a Merge Code tool to merge in survey information, questions answers, etc. (from prior pages) into the message body.
If you want to use Slack emojis in your message, you will need to type in the text shortcut. There are a number of other formatting options available for your Slack message. Visit Slack's documentation to learn about your formatting options.
- After you have customized your message content, provide a Slack Bot Name in the available field. This will be the name of the sender that appears in Slack.
- Now that you have provided a Slack Bot Name, you can customize the Slack Bot Icon. This will be the icon/image that displays along with the above Slack Bot Name. The following options are available:
- Use default icon - this will use Slack's default Slack Bot image.
- Use a Slack emoji - use a Slack emoji as the Slack Bot Icon. You will need to input the emoji text into the provided field in the format of
:emojiname:. Visit the Slack documentation to learn about using emoji and emoticons in Slack.
- Use a custom image - use a custom image as your Slack Bot Icon. Click on the add image icon to add your image. You can select from images previously uploaded to your File Library, upload one here, or reference the image URL (if externally hosted).

- Last, determine when you want to send the Slack message.
- Only send once for each response - this will send the message once for each survey respondent (assuming that the respondent reaches the page that the action has been added to).
- Send each time this page is rendered - this will send the message each time a respondent visits the survey page that contains the action. If the respondent navigates back through the survey, and forward again, the action will trigger again.
- Once you're finished setting up this Slack message, click Save!


Use Logic to Trigger Slack Message
In the event that you need to conditionally trigger a Slack message, you can do so with the use of logic. Click on the Logic tab to access the logic builder and create your condition(s). Visit our Question Logic documentation to learn more about logic!

NPS Example
For example, if you are sending Net Promoter Score (NPS) survey data to Slack, you may want to use different messaging, formatting, emojis, etc. for each category of NPS: Promoter, Neutral, and Detractor.
In this case, you will create three separate Slack Actions: one action for Promoters, one for Neutrals, and another for Detractors.
You will then want to make sure that each of the actions only triggers for its appropriate scenario. For example, only send the Promoter Slack message if the NPS provided is a 9 or 10.
- To do this, edit your Slack Action and click on the logic tab to access the logic builder.
- Check the box to Only show this action based on answers...
- Select your NPS question from the Select a condition dropdown and select the 9 and 10 scores.

- Make sure to Save your action when you're finished!
- Repeat this process to set up the appropriate conditions for both your Neutral and Detractor messages.

Additional Resources
- Slack Help Center
- Learn how to format your messages to display appropriately in Slack
- Learn about using emoji and emoticons in Slack messages
Net Promoter, Net Promoter System, Net Promoter Score, NPS and the NPS-related emoticons are registered trademarks of Bain & Company, Inc., Fred Reichheld and Satmetrix Systems, Inc.