Setting up a Salesforce action to push data from your SurveyGizmo survey to Salesforce is easy! Pushing data simply means sending data from SurveyGizmo to Salesforce. You can also leverage logic options to push to different places under different circumstances.
Looking to pull information from Salesforce to prepopulate a survey? Check out our Salesforce Pull Action Tutorial to learn how!
What Are Salesforce Integration Push* Options and When Would I Use Them?
There are three push options available:
- Upsert - If you have a Salesforce ID, the ID will be used to update an existing record during an upsert. If an ID doesn't exist, a new record will be created. An upsert is a conditional action: update if it exists, insert if it doesn't. 99% of the time this is the Push option you'll want to use as it handles both updating existing records and creating new records all in one action!
- Insert - Insert is the term used for creating a new record. An identifier is not mapped in this case as it doesn't exist. Use an insert when you only need to create new records in Salesforce.
- Update - An update is just that, an update of an existing record. As such, an ID field or unique identifier is required. Use an update when you only need to update existing records in Salesforce.
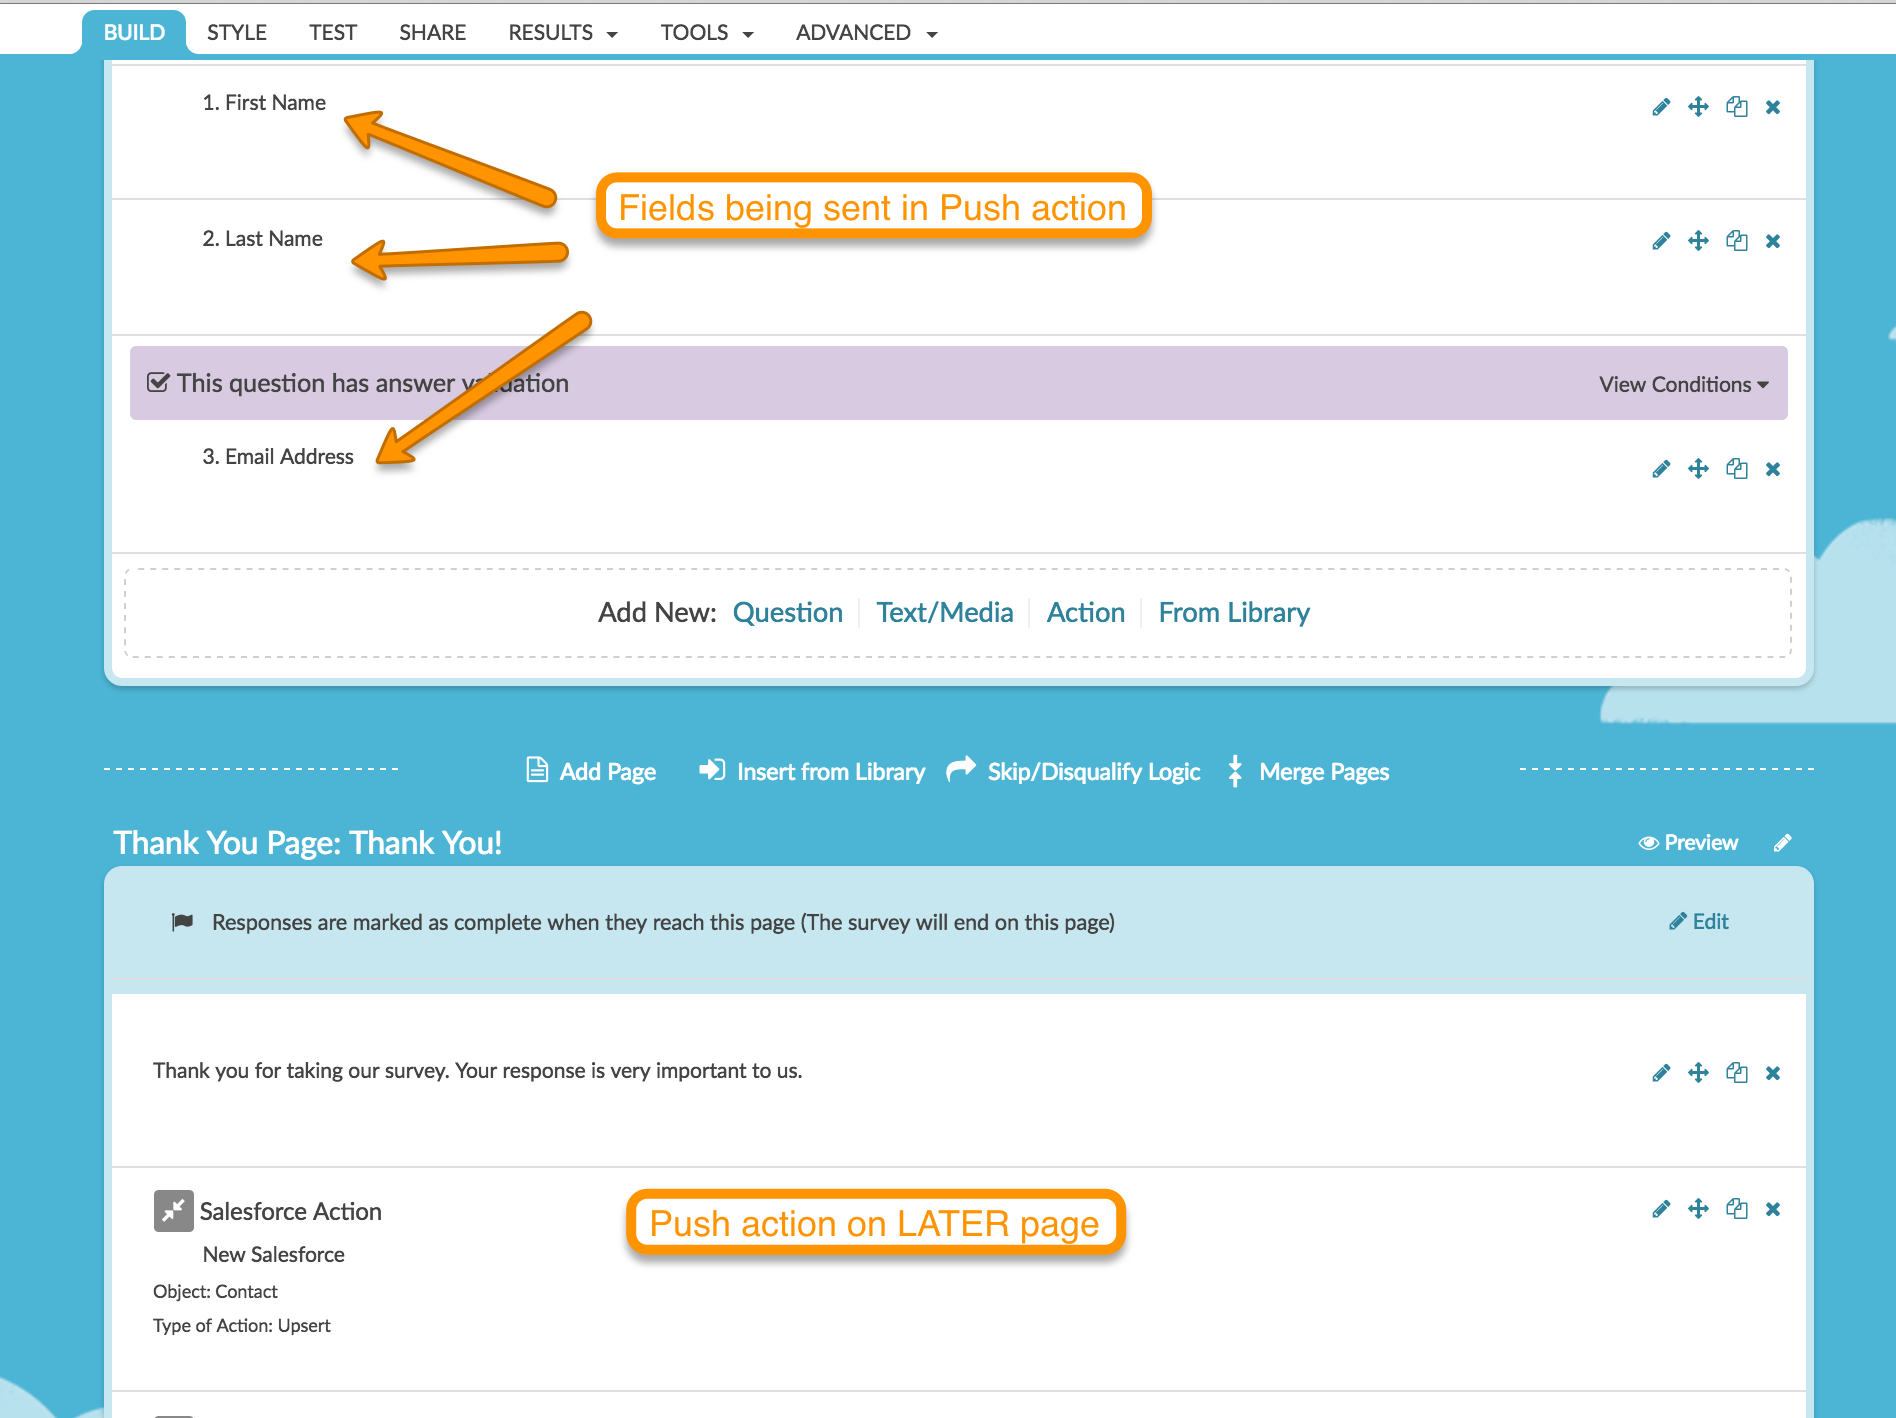
*When pushing data to Salesforce the push action must be on a page that follows the fields that contain the data that is being sent via the push.
Requirements for integrating SurveyGizmo with Salesforce:
- An Enterprise or Unlimited edition of Salesforce (these are paid accounts - our integration will not work with a Demo account)
- SurveyGizmo Admin User
- Salesforce Admin or have access to the admin
- Must have access to the API in Salesforce
- Must know or be able to obtain your Salesforce Security Token
Setup for Upsert
If you wish to handle both the update of existing Salesforce records, as well as, the creation of new Salesforce records all at once, the Upsert is the option for you. Upsert is a really efficient way of maintaining records in Salesforce.
Behind the scenes, the action will check for an ID (or other unique identifier you specify).
- If an ID is present, the action will push updated information to the Salesforce record with the matching ID/unique identifier.
- If there is no ID/unique identifier present, the action will create a new record in Salesforce and send the details as part of the new record.
To set up an upsert follow these steps:
First things first, if you haven't already done so, you'll need to start by setting up the integration itself. Check out our Salesforce Integration Setup Tutorial to learn how!
Step 1. Create a survey and add the questions that you wish to send to Salesforce.
As an example, let's imagine we're working with the Contact object in Salesforce. Other commonly used objects include Account, Lead, and Case).
- We have used a Salesforce Pull to populate contact details from Salesforce for existing records.
- We will then have respondents change their contact details if they are incorrect.
- In the same fields of the survey we'll also collect contact details for new contacts. Because the action will see that there is no contact ID associated with these entries it will know to create a new record.
You will see in the below image from our example survey that we added different instructions in a Text/Instruction element for new contacts and existing contacts. We just used some simple logic based off the contactid URL Variable to make sure the correct instructions display.

Step 2. Add your Salesforce Push Action on a page that follows the fields in your survey that you plan to send to Salesforce.
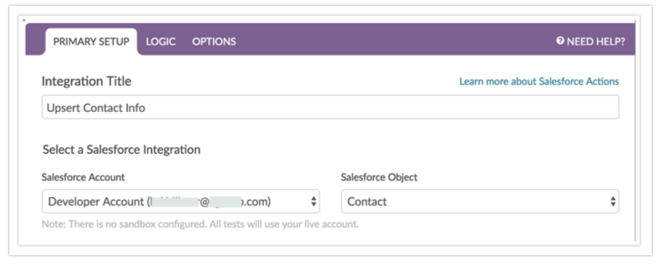
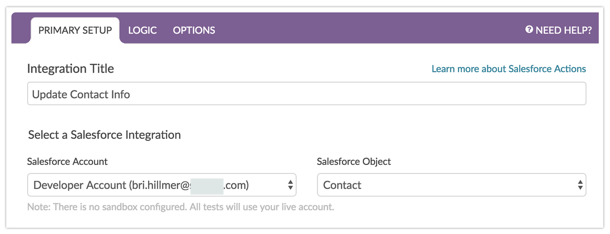
Step 3. Customize your Integration Title (this is internal and not visible to respondents). Select the Salesforce Account and Salesforce Object you wish to push to.
In our example, we will push to the Contact object as we are updating the contact information for our existing contact records and creating new records. You can also update Account, Lead, Case, and a number of different object types.
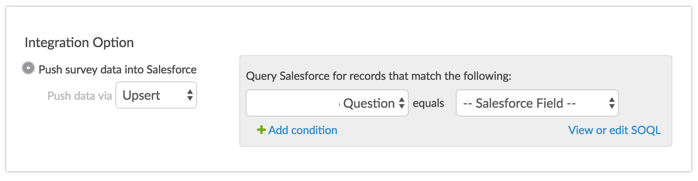
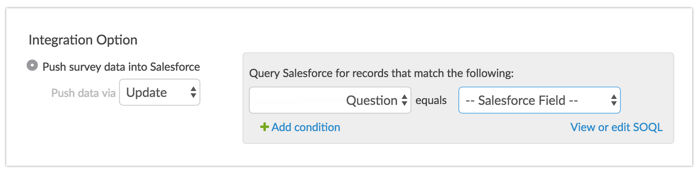
Step 4. Select Push survey data into Salesforce and then select Upsert from the Push data via dropdown menu.
Step 5. Your next step is to query Salesforce for records according to certain matching conditions. A query is the part of every Salesforce Pull action that tells Salesforce which record to use.
- It is both easiest and a best practice to set up queries using Salesforce identity fields.
- To customize the query you wish to use to identify records to update, identify the SurveyGizmo Question that contains the data you wish to match to the specified Salesforce Field.
For advanced Salesforce users, you can click View or edit SOQL (Salesforce Object Query Language) to take your query to the next level.
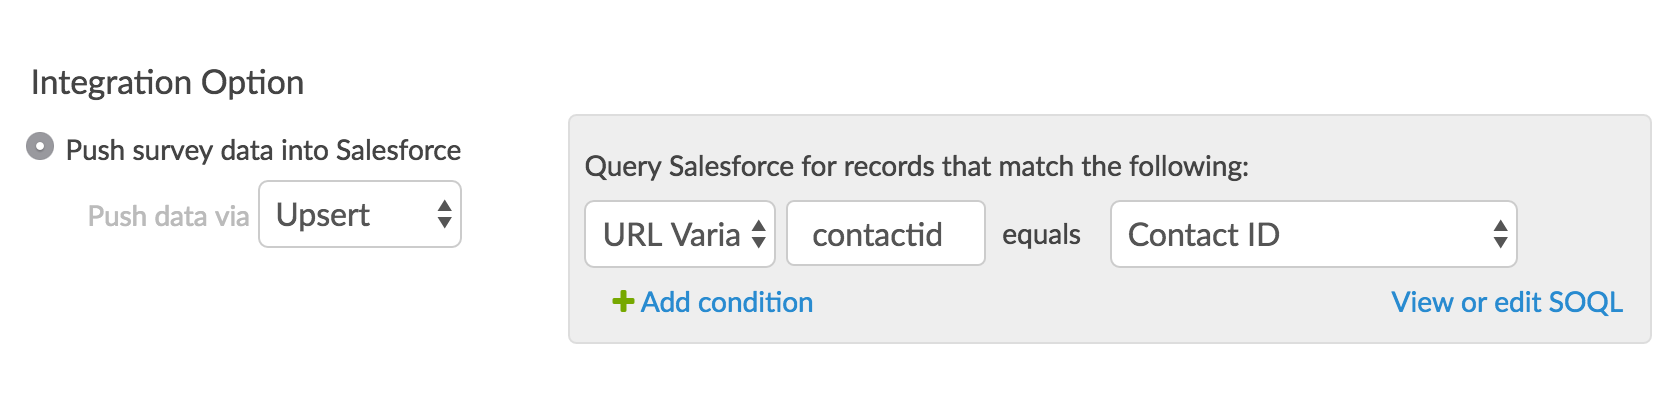
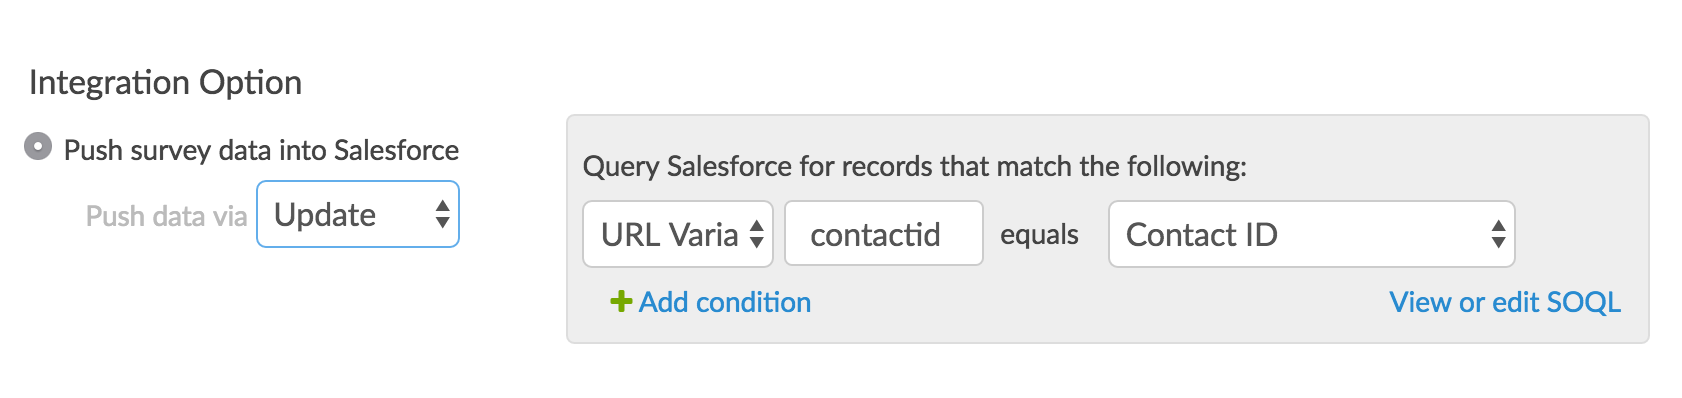
In the case of our example, we will identify which field in SurveyGizmo contains the Contact ID. A common example of a query is to pull the ID that is sent as a URL variable in the survey link. This is set up below.
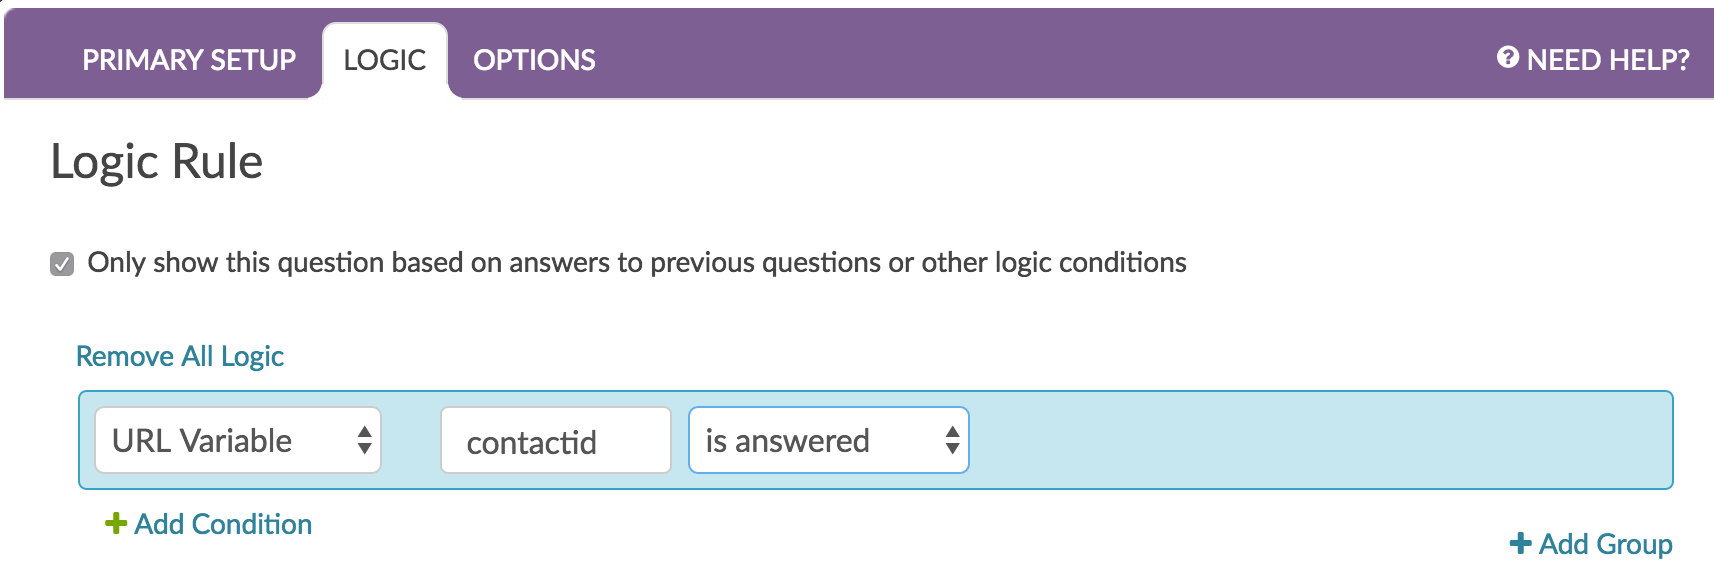
- We selected URL Variable in the SurveyGizmo Question dropdown menu
- We entered the URL variable name "contactid"
- We then selected the Salesforce Field that it should match.
This is the extent of the magic behind identifying the correct record to update in Salesforce!
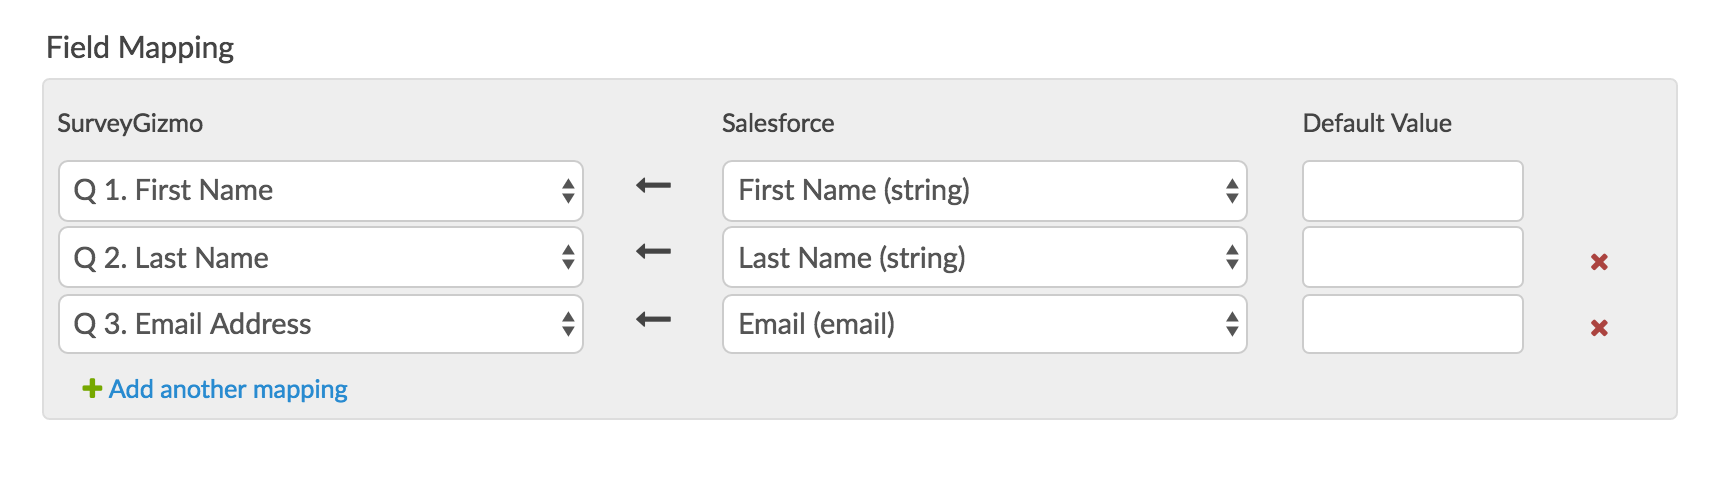
Step 6. From here all you need to do is map the fields you wish to send to Salesforce.
- To do so, scroll to the Fields Mapping section and map each SurveyGizmo Question in the survey to the corresponding Salesforce Field you wish to push to.
- To add another field to map click Add another mapping.
- The Default Value field is optional. If you wish to send something other than a blank when there is no matching contact record, you can enter a value in the Default Value field.
Step 7. Finally, make sure to double-check the placement of your Salesforce Push Action in relation to the fields that are being sent to Salesforce.
- Salesforce Push Actions must be on a page that follows the fields in your survey you plan to send to Salesforce.
- If you added your action on the same page as the fields you are sending be sure to move it to a later page.
This completes the set up for upserting Salesforce records. Next, you'll want to test that the integration works.
Setup for Update
If you know that you only want to update existing records in Salesforce then use the Update option. Make sure you are absolutely, positively sure that every survey respondent has an existing record otherwise you will lose data!
To set up an update follow these steps:
First thing's first, if you haven't already done so, you will need to start by setting up the integration itself. Check out our Salesforce Integration Setup Tutorial to learn how!
Step 1. Create a survey and add the questions that you wish to send to Salesforce.
As an example, let's imagine we're working with the Contact object in Salesforce (other common objects include Accounts, Leads, and Cases).
- We have used a Salesforce Pull to populate contact details from Salesforce for existing records.
- We will then have respondents change their contact details if they are incorrect.
Step 2. Add your Salesforce Push Action on a page that follows the fields in your survey you plan to send to Salesforce.
Step 3. Customize your Integration Title (this is internal and not visible to respondents). Select the Salesforce Account and Salesforce Object you wish to push to.
In our example, we will push to the Contact object as we are updating the contact information for our existing contact records. However, Salesforce offers many standard and custom objects, including Accounts, Leads, Cases, and many more!
Step 4. Select Push survey data into Salesforce and then select Update from the Push data via dropdown menu.
Step 5. Your next step is to query Salesforce for records according to certain matching the conditions. A query is the part of every Salesforce update that tells Salesforce which record to update. It is both easiest and a best practice to set up queries using Salesforce identity fields.
To customize the query you wish to use to identify records to update, identify the SurveyGizmo Question that contains the data you wish to match to the specified Salesforce Field.
For advanced Salesforce users, you can click View or edit SOQL (Salesforce Object Query Language) to take your query to the next level.
In the case of our example, we will identify which field in SurveyGizmo contains the Contact ID. A common example of a query is to pull the ID that is sent as a URL variable in the survey link. This is set up below.
- We selected URL Variable in the SurveyGizmo Question dropdown menu
- We entered the URL variable name "contactid"
- We then selected the Salesforce Field that it should match
This is the extent of the magic behind identifying the correct record to update in Salesforce!
Step 6. From here all you need to do is map the fields you wish to send to Salesforce.
- To do so, scroll to the Fields Mapping section and map each SurveyGizmo Question in the survey to the corresponding Salesforce Field you wish to use to push to.
- To add another field to map click Add another mapping.
The Default Value field is optional. If you wish to send something other than a blank when there is no data present, you can enter a value in the Default Value field.
Step 7. (Optional) To keep your survey as efficient as possible you can set up logic on the Logic tab to only run the action when the URL Variable contactid is present or "is answered."
This completes the set up for updating records in Salesforce. Next, you'll want to test that the integration works.
Setup for Insert
If you know that you only want to create new records in Salesforce then use the Insert option. Make sure you are absolutely, positively sure that every survey respondent does not have an existing record otherwise you will create duplicate records as the Insert does not care whether an existing record is present or not.
While the Upsert and Update setups are pretty easy, the Insert setup is even more straightforward! To set up an insert follow these steps:
First thing's first, if you haven't already done so, you will need to start by setting up the integration itself. Check out our Salesforce Integration Setup Tutorial to learn how!
Step 1. Add your Salesforce Push Action on a page that follows the fields in your survey you plan to send to Salesforce.
Step 2. Customize your Integration Title (this is internal and not visible to respondents). Select the Salesforce Account and Salesforce Object you wish to push to.
Step 3. Select Push survey data into Salesforce and then select Insert from the Push data via dropdown menu. You will notice no query is required here since there is no record to reference when performing an insert.
Step 4. From here all you need to do is map the fields you wish to send to Salesforce.
- To do so, scroll to the Fields Mapping section and map each SurveyGizmo Question in the survey to the corresponding Salesforce Field you wish to use to push to.
- To add another field to map click Add another mapping.
The Default Value field is optional. If you wish to send something other than a blank when there is no data present, you can enter a value in the Default Value field.
This completes the set up for inserting records in Salesforce. Next, you'll want to test that the integration works.
Testing Your Push Action
The steps to test your push action setup depend on whether you have a Salesforce Sandbox Account. If you have a Salesforce Sandbox and have set it up under Account > Integrations > 3rd Party Integrations in SurveyGizmo then you are all set to record test responses using your sandbox.
Test responses include:
- Any response recorded via the New Test Response or Invite Others to Test buttons on the Test tab.
- Any response recorded via the Invite Others to Test option in Build > Preview.
- Any response recorded via Build > Preview that is selected to be recorded.
If you do not have a Salesforce Sandbox then you will be using your live Salesforce account to test that things are working.
Testing also depends on whether you are doing an Insert or Update (Upsert is both of these options together so just follow all the steps below.) See steps below for testing each push option.
Update Testing
The easiest way to test an update is to manually append the URL Variable that you are using to pull records to the end of your test or live link.
- The live link can be obtained on the Share tab.
- A test link can be obtained by going to the Test tab, clicking Invite Others to Test and sending yourself an email with a link.
Once you've obtained your live or test link, copy and paste your survey link in the address bar of your browser.
http://www.surveygizmo.com/s3/1618822/Salesforce-Test
Next, add the URL Variable for a given record. To do so, go to the record within Salesforce that you wish to test. From the end of the URL for the record copy the ID.

Append the ID to the survey link as below. Notice we prepend the URL variable with a ? and the URL Variable name is identical to how we set it up in the query in steps above.
http://www.surveygizmo.com/s3/1618822/Salesforce-Test?contactid=003i000000jXE94AAG
Fill out the survey with your changes and then check Salesforce to confirm that the record reflects these changes.
Insert Testing
In an insert, you can use either the live link or a test link as is since we are not identifying a record.
- The live link can be obtained on the Share tab.
- A test link can be obtained by going to the Test tab, clicking Invite Others to Test and sending yourself an email with a link.
Access your live or test link and populate the fields that you are sending along to create a new record. Then check Salesforce to confirm that the new record is present!
Upsert Testing
Upsert is both an insert and an update so follow all the steps above to test both an insert and an update.
- The record that was created or updated will be available via an Individual Response (available under Results > Individual Responses), on the response Data tab.
- You can locate this by tracking down the Salesforce Action in the location where action is present in the survey. For example, if you added your Salesforce action on page 2 of your survey, you can find it on page 2 of the response data.
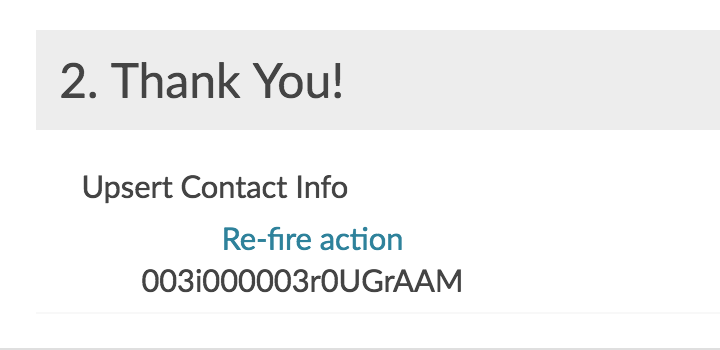
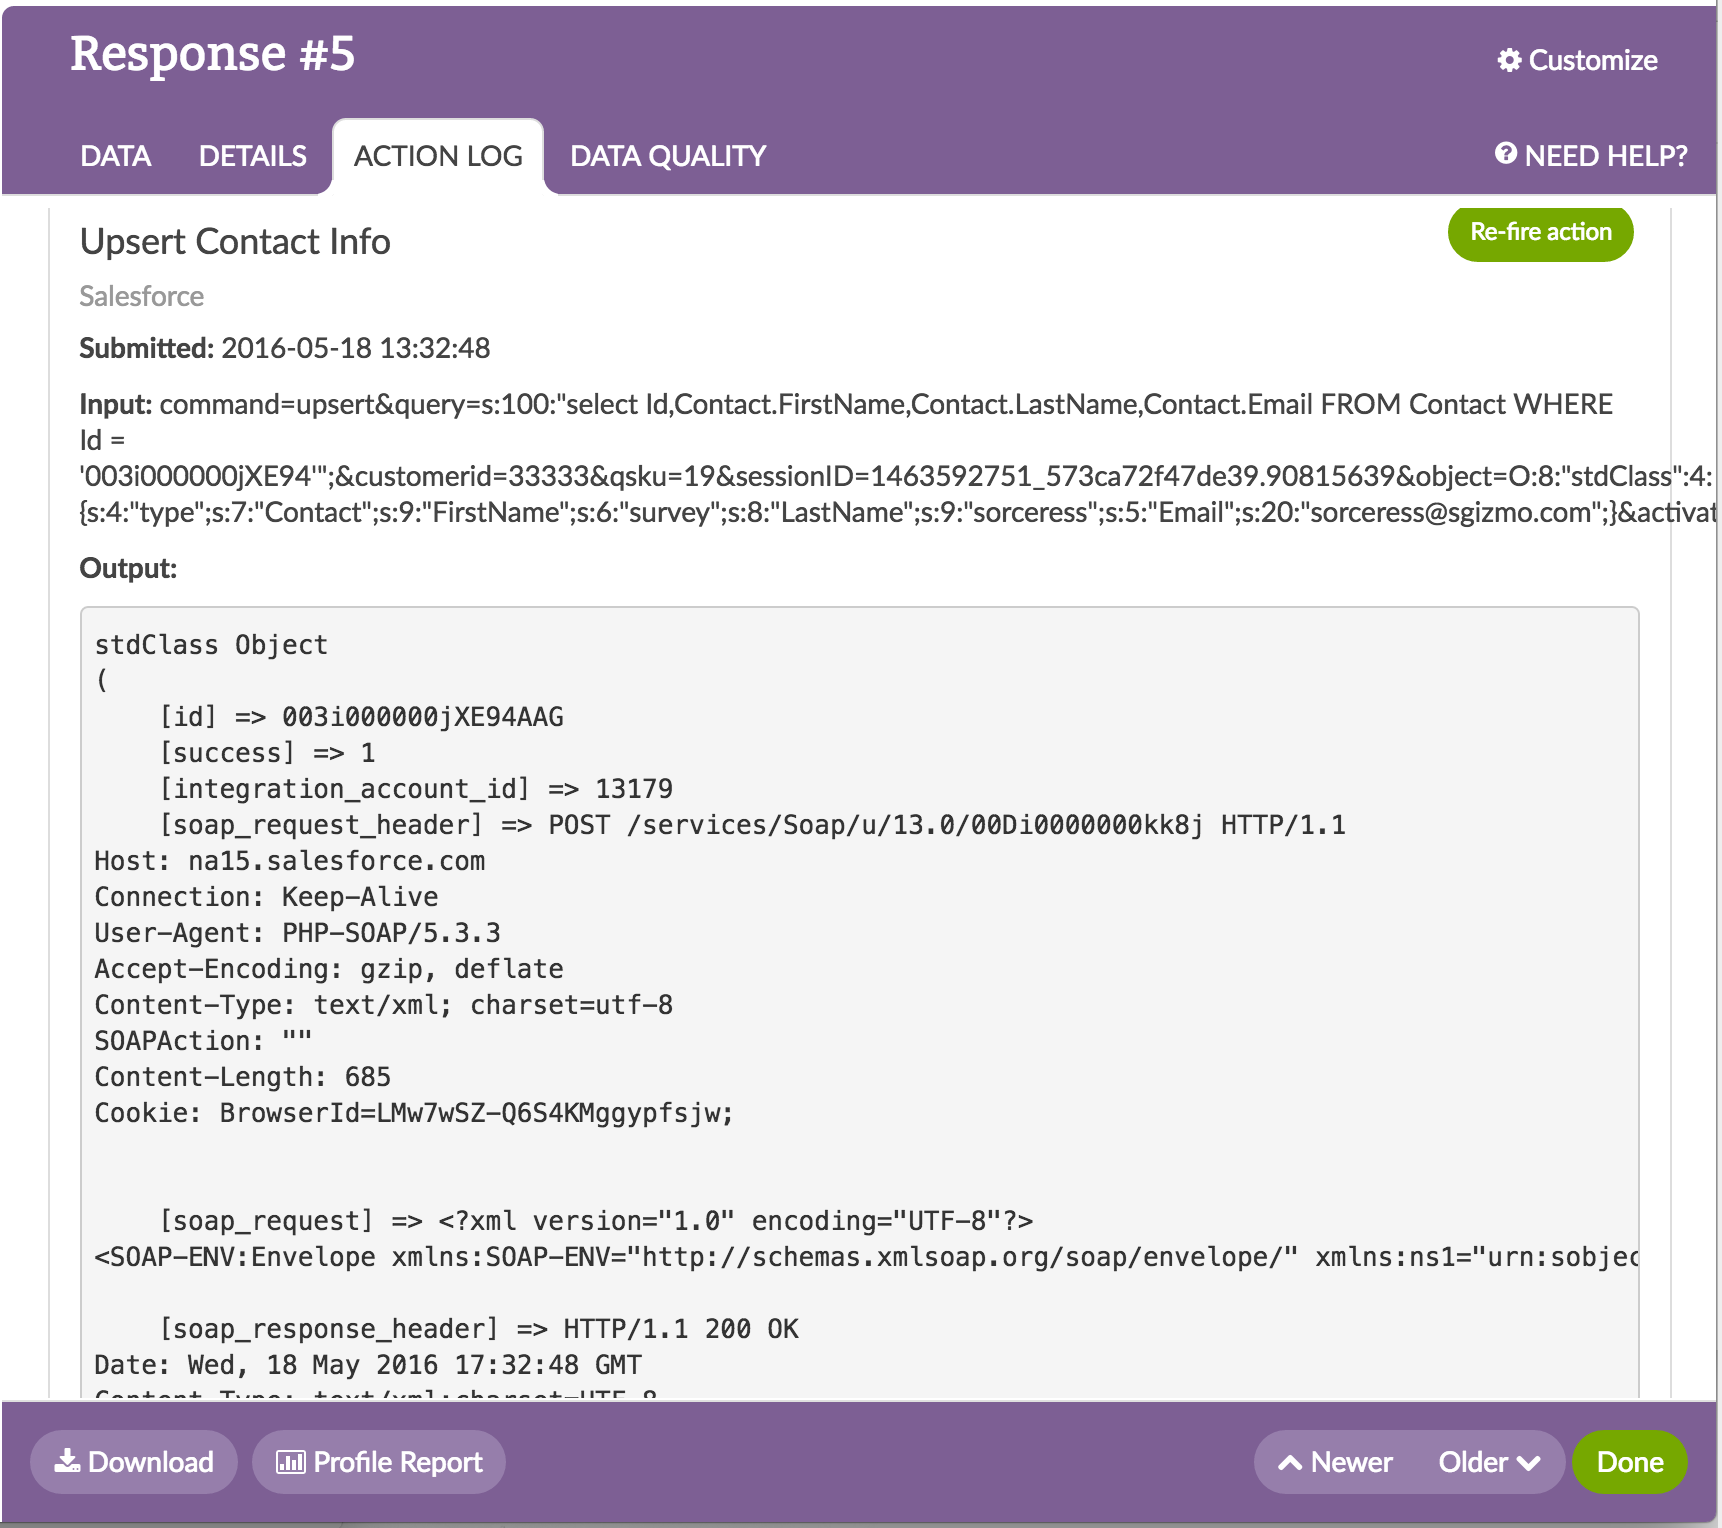
Within an Individual Response, available under Results > Individual Responses, go to the Action Log tab. From here you can review the date and time the action was submitted, as well as the Input and Output.
This same information is available as part of a CSV/Excel Export.
- Go to Results > Exports > CSV/Excel and select the option to Include Action Data.
- This will export the date and time the action fired, the input, the output and the objectID for each Salesforce action in your survey.
FAQ
I'd prefer to push a link to the SurveyGizmo response or just a unique identifier for the response to Salesforce rather than the data. How can I do this?
While Response ID is not available in the response itself there are a couple of options for sending a unique value over to Salesforce. Check out our Unique Identifier Tutorial for more info.
You might also choose to send an edit link for the response to Salesforce. You can store the edit link merge code in a Hidden Value and send this along to Salesforce.
Can I use the Salesforce Action to create a Case?
Yes, in this case you will most likely want to use an Insert Push Action and select Case as the object. You will then need to map your survey questions to fields associated with the case object, as needed.
